Difference between revisions of "NavBar - Calendar"
m (Travis moved page 2. Tab Calendar to NavBar - Calendar) |
|||
| (3 intermediate revisions by the same user not shown) | |||
| Line 90: | Line 90: | ||
<div class="mw-parser-output"> | <div class="mw-parser-output"> | ||
| + | <div class="mw-parser-output"><div class="mw-parser-output"><div class="mw-parser-output"> | ||
== Add: == | == Add: == | ||
| − | [[File:Add Calendar.png | + | [[File:Add Calendar.png|left|Add Calendar.png]] |
| | ||
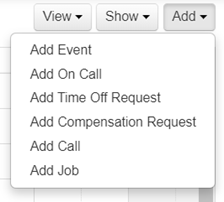
*<span style="tab-stops:177.0pt"><span style="font-size:14.0pt"><span style="line-height:107%">add Event (Ex: meeting or Lunch) to the Calendar</span></span></span> | *<span style="tab-stops:177.0pt"><span style="font-size:14.0pt"><span style="line-height:107%">add Event (Ex: meeting or Lunch) to the Calendar</span></span></span> | ||
| − | *<span style="tab-stops:177.0pt"><span style="font-size:14.0pt"><span style="line-height:107%"> | + | *<span style="tab-stops:177.0pt"><span style="font-size:14.0pt"><span style="line-height:107%">Create on Call Schedule</span></span></span> |
*<span style="tab-stops:177.0pt"><span style="font-size:14.0pt"><span style="line-height:107%">Create a Time off request</span></span></span> | *<span style="tab-stops:177.0pt"><span style="font-size:14.0pt"><span style="line-height:107%">Create a Time off request</span></span></span> | ||
*<span style="tab-stops:177.0pt"><span style="font-size:14.0pt"><span style="line-height:107%"> If “spiffs” are given for Signs/sticks etc….request</span></span></span> | *<span style="tab-stops:177.0pt"><span style="font-size:14.0pt"><span style="line-height:107%"> If “spiffs” are given for Signs/sticks etc….request</span></span></span> | ||
| Line 108: | Line 109: | ||
| | ||
| − | </div> <div class="mw-parser-output"> </div> </div></div></div></div></div></div></div> | + | </div> <div class="mw-parser-output"> </div> </div> </div></div></div></div></div></div></div></div></div> |
= Calendar Groups = | = Calendar Groups = | ||
| Line 127: | Line 128: | ||
[https://help.thermogrid.com/index.php/Main_Page#Scheduling_.26_Dispatching https://help.thermogrid.com/index.php/Main_Page#Scheduling_.26_Dispatching] | [https://help.thermogrid.com/index.php/Main_Page#Scheduling_.26_Dispatching https://help.thermogrid.com/index.php/Main_Page#Scheduling_.26_Dispatching] | ||
| + | <div class="mw-parser-output"> | ||
<div class="mw-parser-output"> | <div class="mw-parser-output"> | ||
== Add Events == | == Add Events == | ||
| − | Click: | + | Click: '''Calendar''' then '''Add Event''' |
| − | Put in a | + | Put in a title and a description for the event. |
| − | Choose | + | Choose visibility: |
| − | + | '''Public''' = Everyone with access the to full calendar can see the event and description. | |
| − | + | '''Show As Busy''' = Everyone with access the to full calendar can see the event but it will just say or show as busy. | |
| − | + | '''Private '''= only you can see the event on the calendar it will show as an empty time slot for everyone else. | |
| − | + | '''Add Invites:''' just click anyone you want to add this event on their calendar. | |
If you click lasts all day it will block you for every minute of that day you select. Otherwise you can select the date and time window for the event. | If you click lasts all day it will block you for every minute of that day you select. Otherwise you can select the date and time window for the event. | ||
| − | + | '''Add another date''' allows you to choose another random day and time for the event. | |
| − | + | '''Repeat''': choose frequency... if you want Monday through Friday than choose custom, weekly, then click each day that you want. If you want everyday of a month except weekends you can select repeat custom and monthly and select the days you want. | |
| − | + | '''Add Alerts''': select an alert and then click add. You can as many alerts as you like but you must click add after each one. | |
| − | Then click | + | Then click '''Create Event''' </div> </div> </div> </div> |
| − | </div> </div> </div> | + | <div class="mw-parser-output"><div class="mw-parser-output"> </div> </div> </div> |
| − | | ||
| − | </div> | ||
| − | |||
= Calendar Lock = | = Calendar Lock = | ||
| − | [[File:Lock Calendar.png]] | + | [[File:Lock Calendar.png|border|RTENOTITLE]] |
| − | <div class="mw-parser-output">When you unlock the calendar it will allow you to move any event assigned to you or move or extend/shorten any Job on the calendar.</div> </div> <div class="mw-parser-output"> </div> </div> | + | <div class="mw-parser-output">When you unlock the calendar it will allow you to move any event assigned to you or move or extend/shorten any Job on the calendar.</div> </div> <div class="mw-parser-output"> </div> </div></div> |
= Sync Calendar to another Calendar - Show Feeds = | = Sync Calendar to another Calendar - Show Feeds = | ||
Latest revision as of 12:48, 16 August 2021
Contents
User Interface
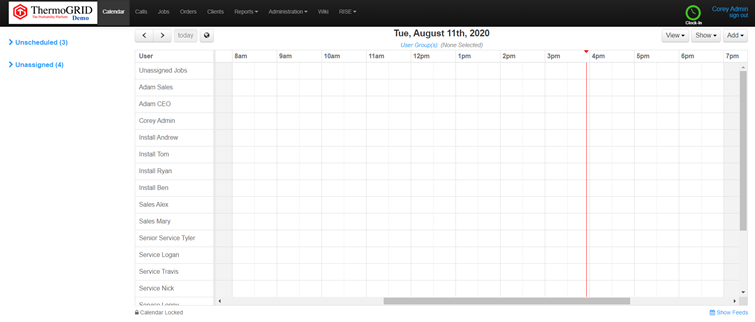
This is how an Admin/Dispatcher will see the Calendar
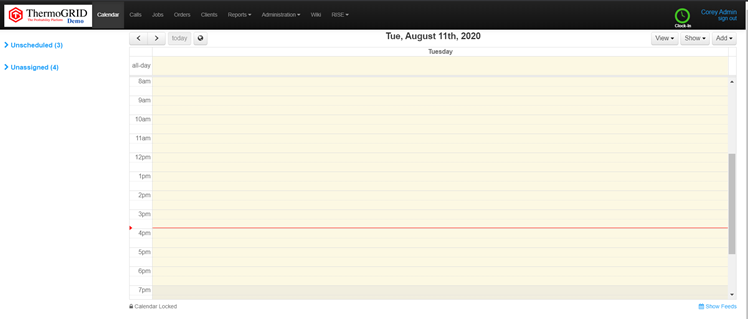
This is how a Field Tech will see the Calendar. (you will notice it is now vertical instead of horizontal and only shows them their Jobs)
The Left and Right Arrows allow you to move through days
Today is a Quick link backtothe Current day
The “Globe/World” Icon will display a map of Users, Supply houses and Jobs
Note: Users must grant permission for GPS Location and it is updated every 5 mins or on a clock in/out.
Clock in and out of Daily Time Keeping and Individual Jobs with the “Clock-in/out”
Hover over it to populate the Clock-in/out Dropdown
Clicking on Your Name gives you the Option to update your personal information such as Phone number, Email, Name, Job notifications and Holiday Decorations.
Sign out– Signs user out of ThermoGrid and Password will need to be reentered
View:
- Day -Show a Day View
- Week -Show a Week View
- Month -Show a Month View
- Summary -Shows the Total Jobs needed per assigned settings for that day (Not Typically Used)
Show:
- Show on Call –only displays On Call information
- Show Map –same as Globe Icon
- Show my/all Events –Only see your Jobs/Events or show all of them
- Hide Dispatching –Removes Dispatching option from left side of Page
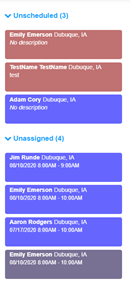
Dispatching will show any Jobs to have be attached to a technician but not put on the calendar
Will also show any Jobs that have been scheduled but not assigned to any user
Calendar Groups
Create Group
- Administration
- Manage Users
- Manage User Groups
- + New User Group
- + Add Users - and name the group.
Add (Cont.)
https://help.thermogrid.com/index.php/Main_Page#Scheduling_.26_Dispatching
Add Events
Click: Calendar then Add Event
Put in a title and a description for the event.
Choose visibility:
Public = Everyone with access the to full calendar can see the event and description.
Show As Busy = Everyone with access the to full calendar can see the event but it will just say or show as busy.
Private = only you can see the event on the calendar it will show as an empty time slot for everyone else.
Add Invites: just click anyone you want to add this event on their calendar.
If you click lasts all day it will block you for every minute of that day you select. Otherwise you can select the date and time window for the event.
Add another date allows you to choose another random day and time for the event.
Repeat: choose frequency... if you want Monday through Friday than choose custom, weekly, then click each day that you want. If you want everyday of a month except weekends you can select repeat custom and monthly and select the days you want.
Add Alerts: select an alert and then click add. You can as many alerts as you like but you must click add after each one.
Then click Create EventCalendar Lock
Sync Calendar to another Calendar - Show Feeds
Calendar Sync
Click: Calendar. then how feeds in the bottom right of the calendar.
There are 2 links.
Company feed will show all jobs and events for everyone... a lot of times when companies have a cell phone used for on-call CSRs, they will put this feed in the subscription of the phones calendar as a backup calendar.
Private feed is what most techs and sales reps use as a way of quickly seeing their calendar from the calendar app on their phone and to do this you need to copy the link and paste it in as a subscription on the device.
Copy the link and paste it in your subscriptions on your device.
Example IPhone:
Click:
- Settings
- Accounts & Passwords
- Add Account
- Other
- Add Subscribed Calendar
Paste in the Private feed from ThermoGRID at the bottom right of the calendar.
Rearrange Techs
You can put a techs First and Last name in the First Name area of Manage User Accounts and a number 1 in the last name and this person will be listed at the top of a calendar.
If you want to sort by department and order them you can
First Name: Sales Ken Last Name: 1
First Name: Sales Jeff Last Name: 2
First Name: Service Ben Last Name: 1
First Name: Service Fred Last Name: 2
This way they will appear in this order for this department on the calendar.


