Difference between revisions of "Credit Cards"
| (11 intermediate revisions by the same user not shown) | |||
| Line 7: | Line 7: | ||
<div class="mw-parser-output"> | <div class="mw-parser-output"> | ||
<div class="mw-parser-output"> | <div class="mw-parser-output"> | ||
| − | == Application | + | <div class="mw-parser-output"> |
| + | = <span style="font-size:xx-large;">Application</span> = | ||
Download CardConnect [http://nebula.wsimg.com/2906a31c825bd663e6a1f433e3864a74?AccessKeyId=AA19C13E8A4EF537D068&disposition=0&alloworigin=1 Application] | Download CardConnect [http://nebula.wsimg.com/2906a31c825bd663e6a1f433e3864a74?AccessKeyId=AA19C13E8A4EF537D068&disposition=0&alloworigin=1 Application] | ||
| − | <div class="mw-parser-output"><div class="mw-parser-output"> </div> </div> </div></div> | + | <div class="mw-parser-output"><div class="mw-parser-output"> </div> </div> </div></div> <div class="mw-parser-output"><div class="mw-parser-output"><div class="mw-parser-output"> </div> </div> </div> </div> |
<div class="mw-parser-output"> | <div class="mw-parser-output"> | ||
| − | == Setup | + | = <span style="font-size:xx-large;">Setup</span> = |
| − | <div class="mw-parser-output">Send all Documentation to [email protected] Your Application will be provided in your set up meeting. If you need another Copy of the document [[Media:CardConnect_app_Card_Processing_TEMPLATE.pdf|CLICK HERE]]</div> <div class="mw-parser-output"> </div> <div class="mw-parser-output"> </div> <div class="mw-parser-output"> </div> </div> | + | <div class="mw-parser-output">Send all Documentation to [email protected] Your Application will be provided in your set up meeting. If you need another Copy of the document [[Media:CardConnect_app_Card_Processing_TEMPLATE.pdf|CLICK HERE]]</div> <div class="mw-parser-output"> </div> <div class="mw-parser-output">The ThermoGrid Implementation Team will take care of Submitting your Application for Processing, Contacting the Processor and Inputting your Custom Credentials after the Application is accepted. </div> <div class="mw-parser-output"> </div> </div> <div class="mw-parser-output"> </div> </div></div> <div class="mw-parser-output"><div class="mw-parser-output"><div class="mw-parser-output"><div class="mw-parser-output"> </div> </div> </div> </div> </div> |
| − | == | + | <div class="mw-parser-output"> |
| + | = <span style="font-size:xx-large;">Making a Transaction</span> = | ||
| − | + | ---- | |
| − | | + | <span style="background-color:#ffff66;">Payments can for an Order Can </span><u>'''<span style="background-color:#ffff66;">ONLY</span>'''<span style="background-color:#ffff66;"> </span></u><span style="background-color:#ffff66;">be Made on the Client</span>''<span style="background-color:#ffff66;"> </span>''<span style="background-color:#ffff66;">Agreement Page.</span> |
<span style="font-size:medium;">'''Process Credit Cards'''</span> | <span style="font-size:medium;">'''Process Credit Cards'''</span> | ||
| − | '''Step 1:''' | + | <span style="font-size:medium;">'''Step 1:'''</span> |
| + | |||
| + | From the [[NavBar_-_Orders|Order Estimate Page]] follow normal protocol and select credit card as the payment method. | ||
| + | |||
| + | Then click “2. View Outputs > Client Agreement.” | ||
| − | + | [[File:View Outputs Client Agreement.png|RTENOTITLE]] | |
| − | + | | |
'''Step 2:''' | '''Step 2:''' | ||
| − | From the “Client Agreement” page scroll down to right above the signature area and click the triangle next to the word payment. | + | From the “Client Agreement” page scroll down to right above the signature area and click the triangle next to the word payment and Click / Tap on Payment. (Below Terms and Conditions) |
| + | |||
| + | Select "<span style="color:#3498db;">Card Connect</span>" and you will presented with this screen. | ||
| + | |||
| + | [[File:Taking a Payment.png|RTENOTITLE]] | ||
| − | + | As you can see Here you have an Option to Input: | |
| − | + | *Amount to Charge | |
| + | *Name on Card | ||
| + | *Card Number | ||
| + | *CVV Code | ||
| + | *Expiration (MM) | ||
| + | *Expiration (YY)<br/> <br/> | ||
| − | + | If you click on the [[File:Money Icon.png|RTENOTITLE]] Icon you will have the option to use a Card that is already saved on file. | |
| − | + | [[File:CArd on File.png|border|CArd on File.png]] | |
| − | + | '''Step 3:''' | |
| − | + | Enter card information | |
| − | <span style=" | + | '''''<span style="background-color:#ffff66;">NOTE: (make sure you type in the card number in whole without pausing, if you type a couple numbers in and pause more than 3 seconds it will try to authorize and make the card number invalid... so you will need to delete and re enter the card number. In some cases refresh the page after deleting the card number)</span>''''' |
| − | + | ''' ''' | |
| − | |||
| − | |||
| − | |||
| − | | + | '''Step 4:''' Click "Authorize", after a payment is authorized it will show up on your credit card transactions. This means that there is money in the account and it is ready to be taken and has '''<u>NOT </u> '''been captured yet. |
| − | + | *Use the Cog / Gear on the Left hand side to Capture the Payment if you want the transaction to go through now. Or you can leave it till job is complete and then capture later, this allows you to wait on payment if needed. | |
| − | + | #[[File:Card Transaction.png|border|Card Transaction.png]] | |
| + | #[[File:Capture Payment.png|border|x110px|Capture Payment.png]] | ||
| + | #[[File:Queued for Capture.png|border|Queued for Capture.png]] | ||
| − | + | | |
| − | |||
</div> | </div> | ||
| + | |||
| + | <div class="mw-parser-output"> | ||
| + | = Payment Report = | ||
| + | |||
| + | Please Follow [https://help.thermogrid.com/index.php/Reports#Payments_Report This Link] to the payment reports page | ||
</div> | </div> | ||
Latest revision as of 13:06, 6 October 2021
Setup
Making a Transaction
Payments can for an Order Can ONLY be Made on the Client Agreement Page.
Process Credit Cards
Step 1:
From the Order Estimate Page follow normal protocol and select credit card as the payment method.
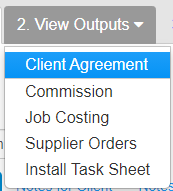
Then click “2. View Outputs > Client Agreement.”
Step 2:
From the “Client Agreement” page scroll down to right above the signature area and click the triangle next to the word payment and Click / Tap on Payment. (Below Terms and Conditions)
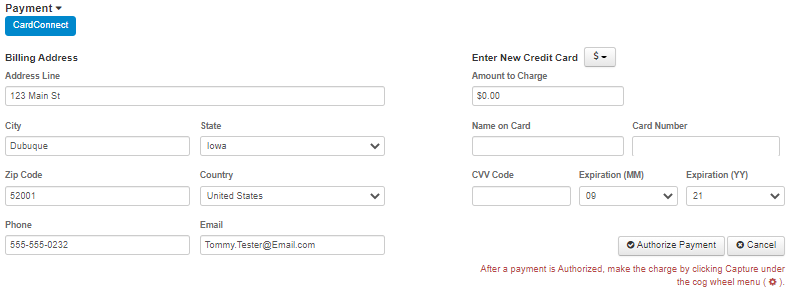
Select "Card Connect" and you will presented with this screen.
As you can see Here you have an Option to Input:
- Amount to Charge
- Name on Card
- Card Number
- CVV Code
- Expiration (MM)
- Expiration (YY)
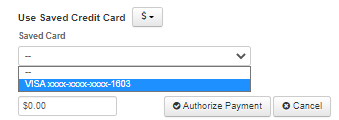
If you click on the ![]() Icon you will have the option to use a Card that is already saved on file.
Icon you will have the option to use a Card that is already saved on file.
Step 3:
Enter card information
NOTE: (make sure you type in the card number in whole without pausing, if you type a couple numbers in and pause more than 3 seconds it will try to authorize and make the card number invalid... so you will need to delete and re enter the card number. In some cases refresh the page after deleting the card number)
Step 4: Click "Authorize", after a payment is authorized it will show up on your credit card transactions. This means that there is money in the account and it is ready to be taken and has NOT been captured yet.
- Use the Cog / Gear on the Left hand side to Capture the Payment if you want the transaction to go through now. Or you can leave it till job is complete and then capture later, this allows you to wait on payment if needed.
Payment Report
Please Follow This Link to the payment reports page


