Difference between revisions of "Marketing"
| (34 intermediate revisions by 2 users not shown) | |||
| Line 1: | Line 1: | ||
| − | <div class="mw-parser-output"><div class="mw-parser-output"><div class="mw-parser-output"><div class="mw-parser-output"> | + | <div class="mw-parser-output"><div class="mw-parser-output"><div class="mw-parser-output"><div class="mw-parser-output"><div class="mw-parser-output"><div class="mw-parser-output"><div class="mw-parser-output"><div class="mw-parser-output"> |
| − | < | + | <div class="mw-parser-output"> |
| − | <div class="mw-parser-output"><div class="mw-parser-output"> | + | <div class="mw-parser-output"> |
| − | <span style="font-size: | + | <div class="mw-parser-output"> |
| + | <div class="mw-parser-output"> | ||
| + | <div class="mw-parser-output"> | ||
| + | <div class="mw-parser-output"> | ||
| + | = <span style="font-size:xx-large;">Creating an email marketing campaign</span> = | ||
| − | + | | |
| − | #<span style="font-size:14.0pt">Click ''Manage Email Templates''</span> | + | <div class="mw-parser-output"> |
| − | #<span style="font-size: | + | <span style="font-size:14.0pt">Go to the '''Administration '''tab at the top and select '''Manage Communications'''</span> |
| + | |||
| + | #<span style="font-size:14.0pt">Click '''Manage Email Templates'''</span> | ||
| + | |||
| + | [[File:Select Manage Email Templates.png|RTENOTITLE]] | ||
| + | |||
| + | #<span style="font-size:large;">Select "'''+ New Template'''" </span><br/> [[File:New Template.png|border|New Template.png]] | ||
| + | |||
| + | | ||
| + | |||
| + | | ||
'''<span style="font-size:14.0pt">Select the Category, Title, and Subject.</span>''' | '''<span style="font-size:14.0pt">Select the Category, Title, and Subject.</span>''' | ||
<ol style="list-style-type:lower-alpha"> | <ol style="list-style-type:lower-alpha"> | ||
| − | <li><span style="font-size:14.0pt">Category: What is the purpose of this email? This will be confined to the options in the dropdown</span></li> | + | <li><span style="font-size:14.0pt">'''Category''': What is the purpose of this email? This will be confined to the options in the dropdown</span></li> |
| − | <li><span style="font-size:14.0pt">Title: This will help your team identify what the theme of the email is. Is it for a certain sale? A thank you?</span></li> | + | <li><span style="font-size:14.0pt">'''Title''': This will help your team identify what the theme of the email is. Is it for a certain sale? A thank you?</span></li> |
| − | <li><span style="font-size:14.0pt">Subject: This is what will show up in your recipient’s subject line.</span></li> | + | <li><span style="font-size:14.0pt">'''Subject''': This is what will show up in your recipient’s subject line.</span><br/> [[File:Category Title Subject.png|border|Category Title Subject.png]]</li> |
</ol> | </ol> | ||
| + | |||
| + | | ||
| + | |||
| + | | ||
| + | |||
| + | | ||
| + | |||
| + | | ||
'''<span style="font-size:14.0pt">Adding a section, text, image, or button</span>''' | '''<span style="font-size:14.0pt">Adding a section, text, image, or button</span>''' | ||
| + | <div class="mw-parser-output"><div class="mw-parser-output"><div class="mw-parser-output"><div class="mw-parser-output"> | ||
| + | == <span style="font-size:xx-large;">Editing a text box</span> == | ||
<ol style="list-style-type:lower-alpha"> | <ol style="list-style-type:lower-alpha"> | ||
| − | <li><span style="font-size:14.0pt"> | + | <li><div class="mw-parser-output"> |
| − | </ | + | <span style="font-size:14.0pt">By default, there will always be a text box in the document. If you would like to add another, you simply click and drag the ''Text'' box on the right and place it where you would like.</span> |
| + | |||
| + | *<span style="font-size:14.0pt">In order to edit the text, double click in the text box and that will make a popup appear that looks like the second graphic below.</span> | ||
| + | |||
| + | <span style="font-size:14.0pt">[[File:Body of Email.png|border|Body of Email.png]]</span> | ||
| + | |||
| + | <span style="font-size:14.0pt">Double Click on the Text area and you will be presented with options to edit text</span> | ||
| + | |||
| + | <span style="font-size:14.0pt">[[File:Edit Text Box.png|border|Edit Text Box.png]]</span> | ||
| + | |||
| + | <span style="font-size:14.0pt">'''Source''': This will show the Code for the Data you are Creating <span style="color:#c0392b;">(Only use this is you are VERY Advanced)</span></span> | ||
| + | |||
| + | [[File:Find Replace Select All.png|RTENOTITLE]] '''<span style="font-size:large;">Find, Replace, Select All: </span>'''<span style="font-size:large;">Find and Replace will help you Quickly replace any data on the Template that you would like to change verbiage on and Select all selects the entire Template for easy Copying or Deleting. </span> | ||
| + | |||
| + | <span style="font-size:large;">[[File:Copy Paste.png|RTENOTITLE]]''' Cut, Copy, Paste, Paste as plain text, paste from word:''' These function as all Copy and Paste Functions do, Paste as plain text removes formatting and pasting from word keeps formatting of word. </span> | ||
| + | |||
| + | <span style="font-size:large;">[[File:TAble tokens.png|RTENOTITLE]] </span> | ||
| + | |||
| + | *'''<span style="font-size:large;">Create a Table: </span>'''<span style="font-size:large;">This will allow you to create a Table similar to those in an Excel File</span> | ||
| + | *<span style="font-size:large;">'''Line Break: '''Adds a Line for separation on the Email</span> | ||
| + | *'''<span style="font-size:large;">Special Character: </span>'''<span style="font-size:large;">You are able to add special Characters Such as Arrows, Chevrons, Etc (</span>⇔ ♦ ½) | ||
| + | *'''<span style="font-size:large;">Add Tokens:</span>'''<span style="font-size:large;">Tokens are placeholders for data that is pulled per client. Such as Client_First_Name, This would input the proper name for the client you are sending the Email to. Works the same for all data. </span><br/> <br/> | ||
| + | |||
| + | <span style="font-size:large;">Those Items listed above are possibly some of the more confusing Icons and the others will all have a popup with their name if you hover over them, most work identical to what Microsoft Word does. </span> | ||
| + | |||
| + | | ||
| − | + | | |
<ol style="list-style-type:lower-alpha"> | <ol style="list-style-type:lower-alpha"> | ||
| − | |||
| − | |||
</ol> | </ol> | ||
| − | + | </div> <div class="mw-parser-output"> </div> </li> | |
| − | + | </ol> | |
| + | </div> </div> </div> </div> <div class="mw-parser-output"> | ||
| + | == <span style="font-size:xx-large;">Inserting a picture</span> == | ||
| + | </div> <div class="mw-parser-output"> | ||
| + | [[File:Click on 4 Squares.png|border|Click on 4 Squares.png]] | ||
<ol style="list-style-type:lower-alpha"> | <ol style="list-style-type:lower-alpha"> | ||
| − | <li><span style="font-size:14.0pt">Drag and drop the ''Image'' button where you would like it on the email.</span></li> | + | <li><span style="font-size:large;">Click on the 4 Squares in the Top right corner of the Page and you will be presented with this menu:<br/> [[File:Object Options.png|RTENOTITLE]]</span><br/> <br/> </li> |
| − | <li><span style="font-size:14.0pt">Once it is placed, a | + | <li><span style="font-size:14.0pt">Drag and drop the ''Image'' button where you would like it on the email. A green Line will show up where the Image will be inserted</span><br/> [[File:Insert image.png|border|Insert image.png]]</li> |
| + | <li><span style="font-size:14.0pt">Once it is placed, a default Image Icon will appear and you can double Click on that Icon to activate the Image Uploader</span><br/> <br/> <span style="font-size:large;">The Image Uploader will store all Images that are input to any Email template for later use</span><br/> [[File:Marketing image uploader.png|RTENOTITLE]]</li> | ||
| + | <li><span style="font-size:large;">Once you have uploaded the Image Select it and it will be inserted into the Email Template</span></li> | ||
</ol> | </ol> | ||
| − | + | [[File:Picture on Template.png|border|Picture on Template.png]] | |
| + | |||
| + | | ||
| + | <div class="mw-parser-output"> </div> </div> <div class="mw-parser-output"> </div> </div> <div class="mw-parser-output"><div class="mw-parser-output"><div class="mw-parser-output"> | ||
| + | == <span style="font-size:xx-large;">Editing a button</span> == | ||
<ol style="list-style-type:lower-alpha"> | <ol style="list-style-type:lower-alpha"> | ||
| − | <li><span style="font-size:14.0pt">Drag and drop the ''Button'' button where you would like it on the email.</span> | + | <li><div class="mw-parser-output"> |
| − | + | <span style="font-size:14.0pt">Drag and drop the ''Button'' button where you would like it on the email.</span> | |
| − | + | ||
| − | + | *<span style="font-size:14.0pt">Double click on “Button” to edit the text on the button.</span> | |
| − | + | *<span style="font-size:14.0pt">Before you can do any other editing, be sure you have first clicked on the Button’s cell. This will look like a blue rectangle around the button.</span> | |
| − | + | *<span style="font-size:14.0pt">Once you are in the button’s cell, click on the paintbrush in the top right corner of the editor.</span> | |
| − | </ol> </ | + | *<span style="font-size:14.0pt">Click on ''Decorations'' to change the button color and background color of the button’s cell.</span> <ol style="list-style-type:lower-roman"> |
| − | + | </ol> </ul> | |
| + | </div> </li> | ||
</ol> | </ol> | ||
| + | </ul></div> </div> | ||
| + | *<span style="font-size:14.0pt">NOTE: The first ''Background color ''is for the button color. The second ''Background color ''is for the background color of the button’s cell.</span> | ||
| + | *<span style="font-size:14.0pt">Putting in the button’s landing page: Click on the cogwheel in the upper right corner of the editor. Once you are there, paste in the URL of the landing page you would like the button to take the recipient to.</span> | ||
| + | |||
| + | [[File:Button Edit.png|border|Button Edit.png]] | ||
| + | |||
| + | | ||
| + | </div> <div class="mw-parser-output"><div class="mw-parser-output"> </div> </div> | ||
| + | == <span style="font-size:xx-large;">Inserting social media links</span> == | ||
| + | <div class="mw-parser-output"> | ||
| + | <span style="font-size:14.0pt">Drag and drop the ''Social, Image or Button Object'' where you would like it in the email.</span> | ||
| + | |||
| + | *<span style="font-size:14.0pt">The default social media icons that appear will be Facebook, Twitter, and Google+. You can change which icons appear by first being in the Social cell and clicking on the cogwheel icon.</span> | ||
| + | *<span style="font-size:14.0pt">You can change the icons that appear by typing the name of the social media site in the ''Display ''field. If you would like multiple sites, simply separate the names with one space and all lowercase. Example: Facebook twitter Google.</span> | ||
| + | *<span style="font-size:14.0pt">Inserting the link: copy and past the links to your social media pages into the field that is related to that page.</span> | ||
| + | |||
| + | [[File:Social Media Editing.png|RTENOTITLE]] | ||
| + | |||
| + | | ||
| + | |||
| + | <span style="font-size:large;">This can Also be done with buttons or with Images. By Adding an Image and Clicking on the Cog Wheel you are presented with the option to ad an "Href" which gives you the ability to add a URL to the Image so when your client clicks/taps on it, they will be navigated to the exact page you have input. </span> | ||
| − | + | <span style="font-size:large;">[[File:Edit Image Link.png|border|Edit Image Link.png]]</span> | |
| − | + | </div> </div> | |
| − | + | </div> | |
| − | + | <div class="mw-parser-output"><div class="mw-parser-output"> </div> </div> | |
| − | < | ||
| − | |||
| − | </ | ||
| − | <span style="font-size: | + | = <span style="font-size:xx-large;">Creating a marketing campaign list</span> = |
| + | <div class="mw-parser-output"> | ||
| + | <span style="font-size:14.0pt">Under the ''Administration ''tab, select ''Manage Communications''</span> | ||
| − | #<span style="font-size:14.0pt"> | + | #<span style="font-size:14.0pt">Click ''Manage Marketing Lists''</span><br/> [[File:Select Marketing.png|RTENOTITLE]] |
| − | #<span style="font-size:14.0pt">Click '' | + | #<span style="font-size:14.0pt">Click ''+ New Marketing List<br/> [[File:New Marketing List.png|border|New Marketing List.png]]''</span><br/> |
| − | + | #<span style="font-size:14.0pt">Type in a Name for your list and a Description then click ''Save Marketing List''</span><br/> [[File:Save marketing list.png|RTENOTITLE]]<br/> | |
| − | #<span style="font-size:14.0pt">Type in a Name for your list and a Description then click ''Save Marketing List''</span> | ||
#<span style="font-size:14.0pt">Click the ''+ Add Client ''button</span> <ol style="list-style-type:lower-alpha"> | #<span style="font-size:14.0pt">Click the ''+ Add Client ''button</span> <ol style="list-style-type:lower-alpha"> | ||
</ol> </ol> | </ol> </ol> | ||
</ol> | </ol> | ||
| − | + | [[File:Add to marketing list.png|border|Add to marketing list.png]] | |
*<span style="font-size:14.0pt">You can add every client in your database by clicking the ''Select All ''button.</span> | *<span style="font-size:14.0pt">You can add every client in your database by clicking the ''Select All ''button.</span> | ||
*<span style="font-size:14.0pt"> You can search for clients based on first name, last name, company name, or email address and select clients manually by checking the box to the left of the client.</span> | *<span style="font-size:14.0pt"> You can search for clients based on first name, last name, company name, or email address and select clients manually by checking the box to the left of the client.</span> | ||
| + | |||
| + | [[File:Select clients for marketing.png|RTENOTITLE]] | ||
| + | |||
| + | | ||
| + | |||
| + | | ||
<span style="font-size:20.0pt">Scheduling your email marketing campaign</span> | <span style="font-size:20.0pt">Scheduling your email marketing campaign</span> | ||
| Line 70: | Line 153: | ||
* | * | ||
*#<span style="font-size:14.0pt">Under the ''Administration ''tab, select ''Manage Communications''</span> | *#<span style="font-size:14.0pt">Under the ''Administration ''tab, select ''Manage Communications''</span> | ||
| − | *#<span style="font-size:14.0pt">Click ''Manage Marketing Campaigns''</span> | + | *#<span style="font-size:14.0pt">Click ''Manage Marketing Campaigns<br/> [[File:Select schedule.png|border|Select schedule.png]]''</span> |
| − | *#<span style="font-size:14.0pt">Click ''+ New Marketing Campaign''</span> | + | *#<span style="font-size:14.0pt">Click ''+ New Marketing Campaign<br/> [[File:New marketing campeign.png|border|New marketing campeign.png]]''</span> |
| − | *#<span style="font-size:14.0pt">Fill in the Name, Description, Email Template, and Marketing List you would like to use and press save.</span> | + | *#<span style="font-size:14.0pt">Fill in the Name, Description, Email Template, and Marketing List you would like to use and press save.</span><br/> [[File:Edit marketing campaign.png|RTENOTITLE]] |
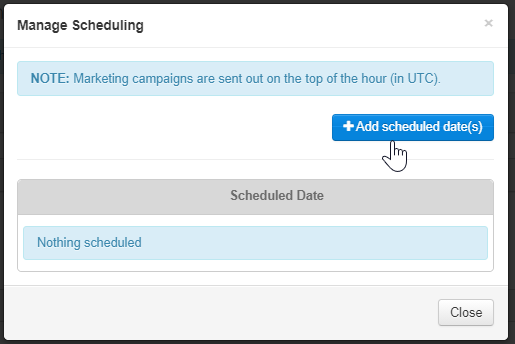
| − | *#<span style="font-size:14.0pt">Click ''Manage ''to schedule</span> | + | *#<span style="font-size:14.0pt">Click ''Manage ''to schedule<br/> [[File:Manage schedule.png|RTENOTITLE]]</span> |
| − | *#''<span style="font-size:14.0pt">+ Add Scheduled Date(s)</span>'' <ol style="list-style-type:lower-alpha"> | + | *#''<span style="font-size:14.0pt">+ Add Scheduled Date(s)<br/> [[File:Manage dates.png|border|Manage dates.png]]</span>'' <ol style="list-style-type:lower-alpha"> |
</ol> </ol> </ul> | </ol> </ol> </ul> | ||
</ol> </ul> | </ol> </ul> | ||
| − | + | | |
*<span style="font-size:14.0pt">One-time occurrence: Choose the desired date and time.</span> | *<span style="font-size:14.0pt">One-time occurrence: Choose the desired date and time.</span> | ||
| − | *<span style="font-size:14.0pt">Recurring: Choose the cycle of how often you want the email sent and when you want the cycle to end.</span> | + | *<span style="font-size:14.0pt">Recurring: Choose the cycle of how often you want the email sent and when you want the cycle to end.</span><br/> <br/> <span style="font-size:large;">Once you Save the Dates the system will show you the schedule for the entire Campaign and you can edit or delete any dates. </span> |
| + | |||
| + | [[File:Save dates.png|border|Save dates.png]] [[File:View dates.png|border|View dates.png]] | ||
| | ||
| − | + | | |
| − | <span style="font-size:medium;"> | + | <div class="mw-parser-output"> |
| + | == '''<span style="font-size:14.0pt">Remove someone from a marketing list</span>''' == | ||
| + | <div class="mw-parser-output"> | ||
| + | <span style="font-size:medium;">Multiple ways:</span> | ||
<span style="font-size:medium;">Unsubscribe from list-</span> | <span style="font-size:medium;">Unsubscribe from list-</span> | ||
| − | <span style="font-size:medium;">1. Clients>Search for client>edit>marketing>edit> remove from list</span> | + | <span style="font-size:medium;">1. Clients> Search for client> edit> marketing> edit> remove from list</span> |
| + | |||
| + | <span style="font-size:medium;">[[File:Delete from marketing.png]]</span> | ||
| + | |||
| + | <span style="font-size:medium;">[[File:Remove from list.png|border]]</span> | ||
<span style="font-size:medium;">Or</span> | <span style="font-size:medium;">Or</span> | ||
| Line 96: | Line 188: | ||
<span style="font-size:medium;">Delete from list-</span> | <span style="font-size:medium;">Delete from list-</span> | ||
| − | <span style="font-size:medium;">2. Administration>manage communications>manage marketing lists>edit list> Search client>delete off list</span> | + | <span style="font-size:medium;">2. Administration> manage communications> manage marketing lists> edit list> Search client> delete off list</span> |
| − | + | [[File:Remove from list 2.png]] | |
| − | + | </div> </div> | |
Latest revision as of 09:27, 29 September 2021
Contents
Creating an email marketing campaign
Go to the Administration tab at the top and select Manage Communications
- Click Manage Email Templates

- Select "+ New Template"


Select the Category, Title, and Subject.
- Category: What is the purpose of this email? This will be confined to the options in the dropdown
- Title: This will help your team identify what the theme of the email is. Is it for a certain sale? A thank you?
- Subject: This is what will show up in your recipient’s subject line.


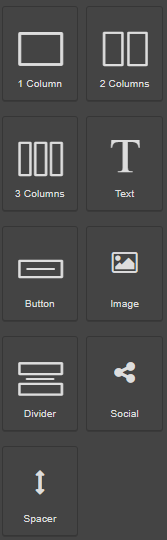
Adding a section, text, image, or button
Editing a text box
By default, there will always be a text box in the document. If you would like to add another, you simply click and drag the Text box on the right and place it where you would like.
- In order to edit the text, double click in the text box and that will make a popup appear that looks like the second graphic below.
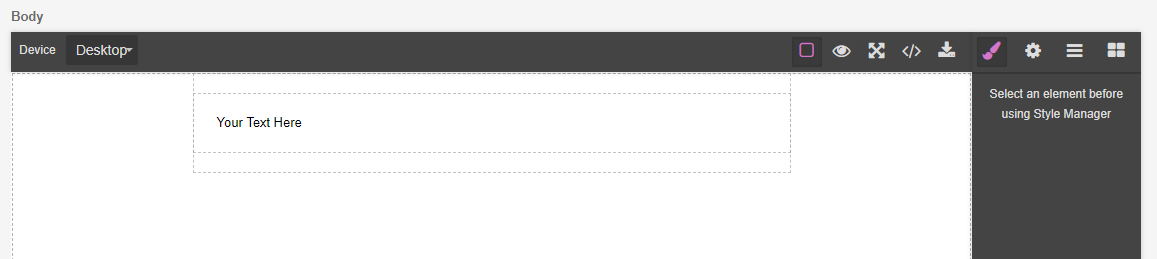
Double Click on the Text area and you will be presented with options to edit text
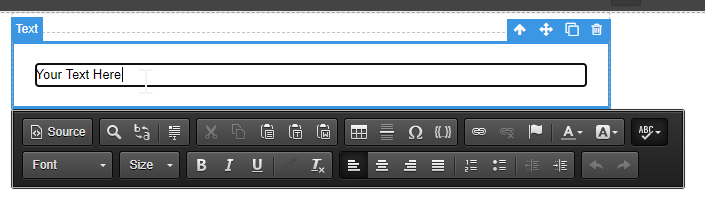
Source: This will show the Code for the Data you are Creating (Only use this is you are VERY Advanced)
 Find, Replace, Select All: Find and Replace will help you Quickly replace any data on the Template that you would like to change verbiage on and Select all selects the entire Template for easy Copying or Deleting.
 Cut, Copy, Paste, Paste as plain text, paste from word: These function as all Copy and Paste Functions do, Paste as plain text removes formatting and pasting from word keeps formatting of word.
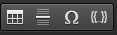
- Create a Table: This will allow you to create a Table similar to those in an Excel File
- Line Break: Adds a Line for separation on the Email
- Special Character: You are able to add special Characters Such as Arrows, Chevrons, Etc (⇔ ♦ ½)
- Add Tokens:Tokens are placeholders for data that is pulled per client. Such as Client_First_Name, This would input the proper name for the client you are sending the Email to. Works the same for all data.
Those Items listed above are possibly some of the more confusing Icons and the others will all have a popup with their name if you hover over them, most work identical to what Microsoft Word does.


Inserting a picture

- Click on the 4 Squares in the Top right corner of the Page and you will be presented with this menu:
- Drag and drop the Image button where you would like it on the email. A green Line will show up where the Image will be inserted

- Once it is placed, a default Image Icon will appear and you can double Click on that Icon to activate the Image Uploader
The Image Uploader will store all Images that are input to any Email template for later use
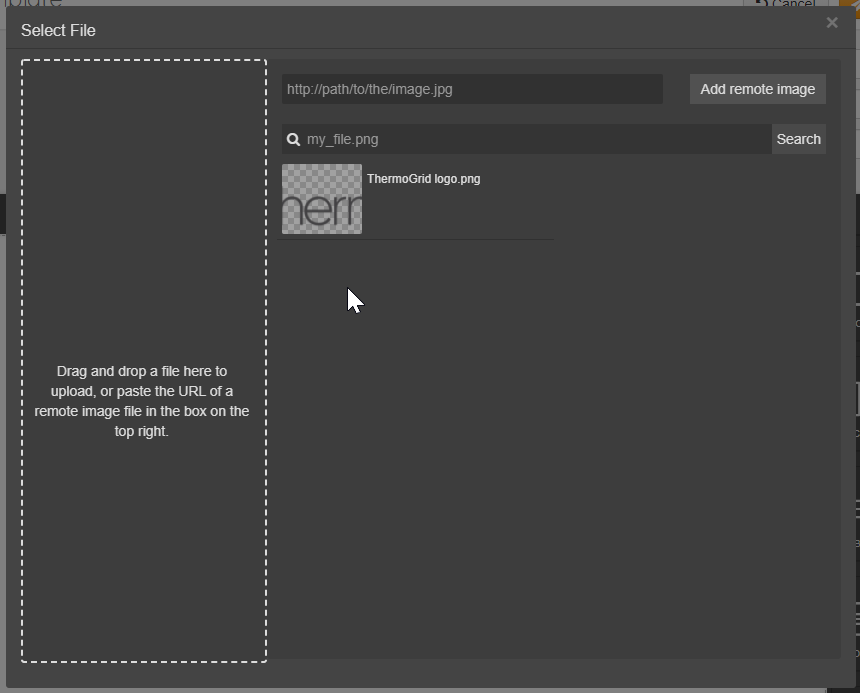
- Once you have uploaded the Image Select it and it will be inserted into the Email Template


Editing a button
Drag and drop the Button button where you would like it on the email.
- Double click on “Button” to edit the text on the button.
- Before you can do any other editing, be sure you have first clicked on the Button’s cell. This will look like a blue rectangle around the button.
- Once you are in the button’s cell, click on the paintbrush in the top right corner of the editor.
- Click on Decorations to change the button color and background color of the button’s cell.
- NOTE: The first Background color is for the button color. The second Background color is for the background color of the button’s cell.
- Putting in the button’s landing page: Click on the cogwheel in the upper right corner of the editor. Once you are there, paste in the URL of the landing page you would like the button to take the recipient to.

Inserting social media links
Drag and drop the Social, Image or Button Object where you would like it in the email.
- The default social media icons that appear will be Facebook, Twitter, and Google+. You can change which icons appear by first being in the Social cell and clicking on the cogwheel icon.
- You can change the icons that appear by typing the name of the social media site in the Display field. If you would like multiple sites, simply separate the names with one space and all lowercase. Example: Facebook twitter Google.
- Inserting the link: copy and past the links to your social media pages into the field that is related to that page.

This can Also be done with buttons or with Images. By Adding an Image and Clicking on the Cog Wheel you are presented with the option to ad an "Href" which gives you the ability to add a URL to the Image so when your client clicks/taps on it, they will be navigated to the exact page you have input.

Creating a marketing campaign list
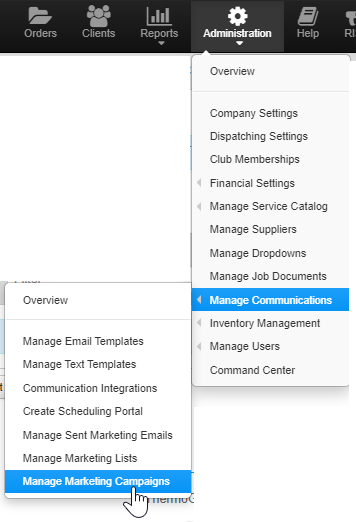
Under the Administration tab, select Manage Communications
- Click Manage Marketing Lists

- Click + New Marketing List

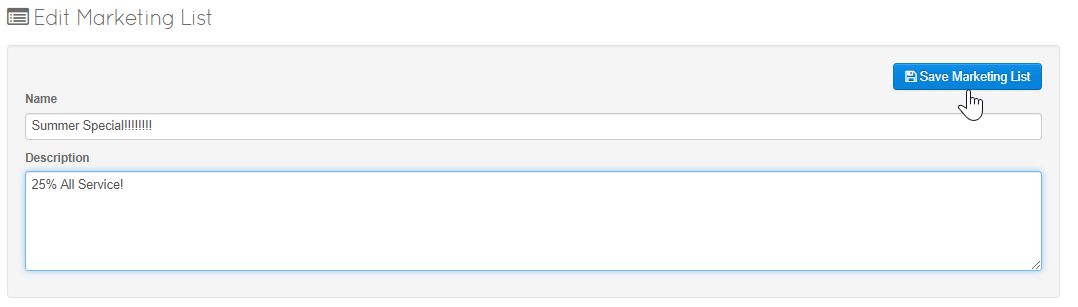
- Type in a Name for your list and a Description then click Save Marketing List
- Click the + Add Client button


</ol>

- You can add every client in your database by clicking the Select All button.
- You can search for clients based on first name, last name, company name, or email address and select clients manually by checking the box to the left of the client.

Scheduling your email marketing campaign
-
- Under the Administration tab, select Manage Communications
- Click Manage Marketing Campaigns
- Click + New Marketing Campaign

- Fill in the Name, Description, Email Template, and Marketing List you would like to use and press save.

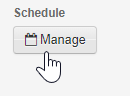
- Click Manage to schedule
- + Add Scheduled Date(s)


</ol> </ul>
- One-time occurrence: Choose the desired date and time.
- Recurring: Choose the cycle of how often you want the email sent and when you want the cycle to end.
Once you Save the Dates the system will show you the schedule for the entire Campaign and you can edit or delete any dates.


Remove someone from a marketing list
Multiple ways:
Unsubscribe from list-
1. Clients> Search for client> edit> marketing> edit> remove from list


Or
Delete from list-
2. Administration> manage communications> manage marketing lists> edit list> Search client> delete off list
