Difference between revisions of "Online Scheduler"
(Created page with " = Online Scheduler = This Tool can be added to your current Website to allow you customers to have a digital method to contact you through you Web Page to ThermoGrid. &...") |
|||
| Line 1: | Line 1: | ||
| + | <div class="mw-parser-output"> | ||
= Online Scheduler = | = Online Scheduler = | ||
| Line 10: | Line 11: | ||
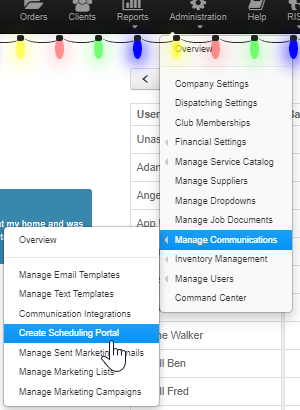
Once you have it activated you will see a new menu option under Administration > Manage Communications > Create Scheduling Portal | Once you have it activated you will see a new menu option under Administration > Manage Communications > Create Scheduling Portal | ||
| − | [[File:Admin portal.png]] | + | [[File:Admin portal.png|RTENOTITLE]] |
| | ||
| Line 18: | Line 19: | ||
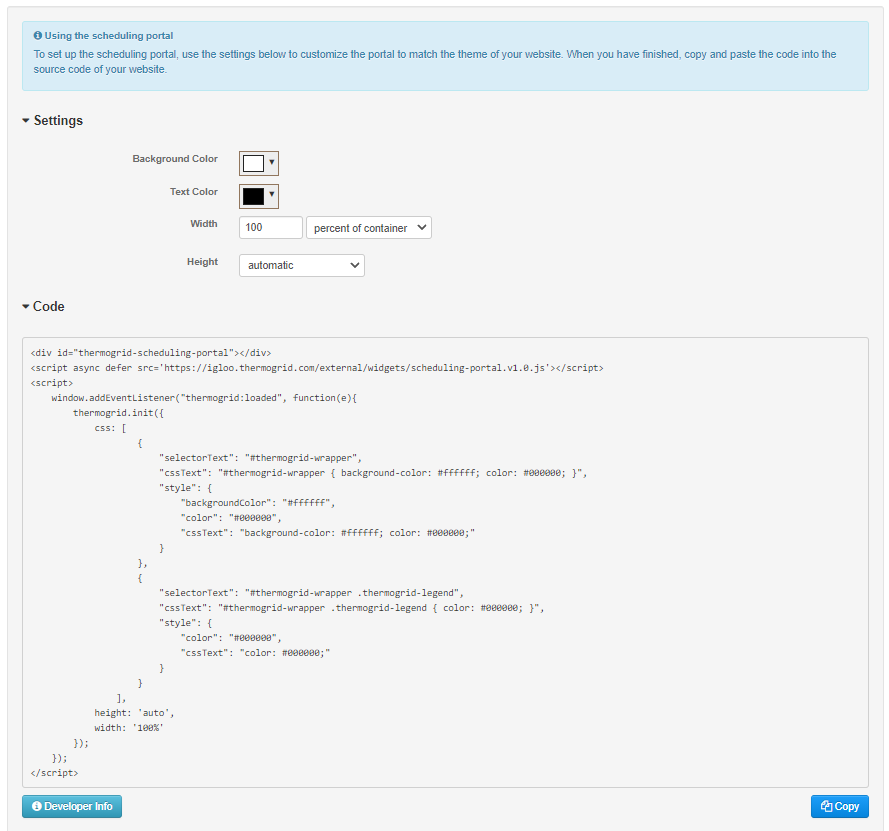
You can make changes to the Code Itself or to the Dropdowns on the Page: | You can make changes to the Code Itself or to the Dropdowns on the Page: | ||
| − | [[File:Portal and code.png]] | + | [[File:Portal and code.png|RTENOTITLE]] |
To apply This to your website simply have your IT team or website management company Insert this code on your Companies Page. | To apply This to your website simply have your IT team or website management company Insert this code on your Companies Page. | ||
| Line 28: | Line 29: | ||
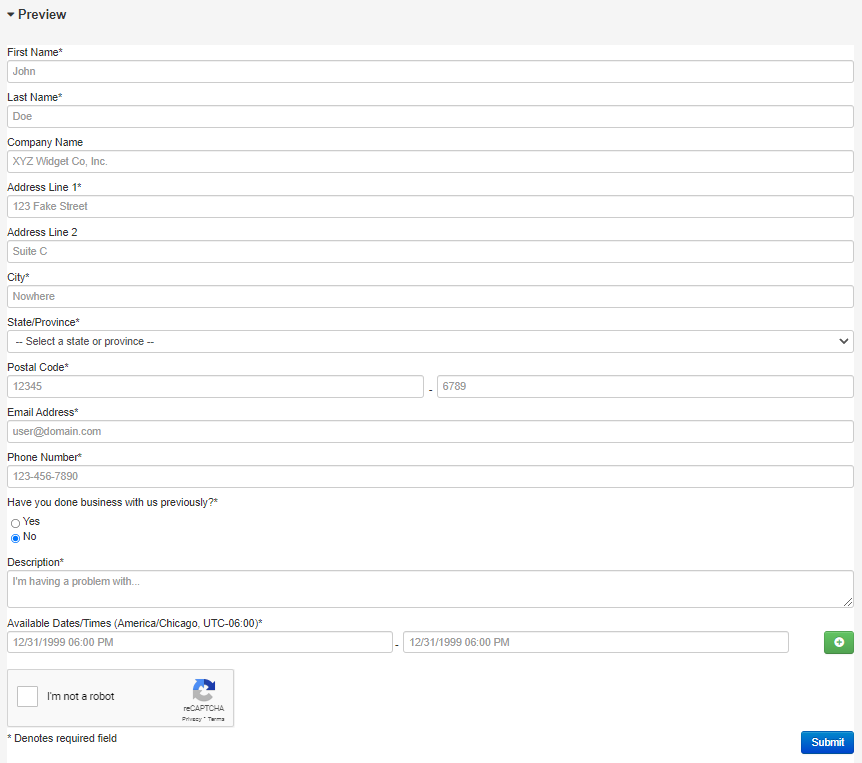
If you would like to test our the scheduler feel free to use the Provided Fields at the bottom of the page and you can submit a request to see how it will show up in your system. | If you would like to test our the scheduler feel free to use the Provided Fields at the bottom of the page and you can submit a request to see how it will show up in your system. | ||
| − | [[File:ShedulerFields.png]] | + | [[File:ShedulerFields.png|RTENOTITLE]] |
| | ||
| Line 34: | Line 35: | ||
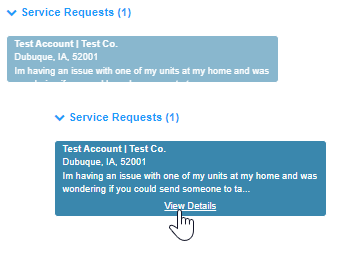
When you see the Service Request Click on it to activate it and then Click on "View Details" | When you see the Service Request Click on it to activate it and then Click on "View Details" | ||
| − | [[File:Service Request.png]] | + | [[File:Service Request.png|RTENOTITLE]] |
| | ||
| Line 40: | Line 41: | ||
A modal will pop up in the middle of the screen allowing your to create a Call directly from the Request | A modal will pop up in the middle of the screen allowing your to create a Call directly from the Request | ||
| − | [[File:Request modal.png]] | + | [[File:Request modal.png|RTENOTITLE]] |
You can now Convert this into a Call or remove it from the Page. | You can now Convert this into a Call or remove it from the Page. | ||
| Line 46: | Line 47: | ||
If you create a Call it will automatically try to find the Client that has created the Request based on the information provided by the customer. | If you create a Call it will automatically try to find the Client that has created the Request based on the information provided by the customer. | ||
| − | [[File:Clientinfo.png]] | + | [[File:Clientinfo.png|RTENOTITLE]] |
If you select one of these options the Call information will automatically fill in and the notes from the Request will be added to the Call and Job, | If you select one of these options the Call information will automatically fill in and the notes from the Request will be added to the Call and Job, | ||
| − | [[File:Autonotes.png]] | + | [[File:Autonotes.png|RTENOTITLE]] |
| | ||
| Line 58: | Line 59: | ||
When Scheduling out a Job for a Service Request you will see the availability information for reference on the Dispatching Page. You can use this to schedule the Job within the Clients requested window. | When Scheduling out a Job for a Service Request you will see the availability information for reference on the Dispatching Page. You can use this to schedule the Job within the Clients requested window. | ||
| − | [[File:Requestav.png]] | + | [[File:Requestav.png|RTENOTITLE]] |
| − | + | </div> | |
| − | |||
| − | |||
| − | |||
| − | |||
| − | |||
| − | |||
| − | |||
| − | |||
| − | |||
Latest revision as of 10:44, 29 December 2021
Online Scheduler
This Tool can be added to your current Website to allow you customers to have a digital method to contact you through you Web Page to ThermoGrid.
Setting up
To Set up the Online Scheduler contact your Sales Representative or Customer Service ( The Scheduler is Free but must be activated by a ThermoGrid Admin)
Once you have it activated you will see a new menu option under Administration > Manage Communications > Create Scheduling Portal
Editing
You can make changes to the Code Itself or to the Dropdowns on the Page:
To apply This to your website simply have your IT team or website management company Insert this code on your Companies Page.
Many new website Management companies are using prebuilt templates that they insert your data into and don't code the website. These Template builders often do not support certain code and will cause issues when adding the scheduler, Make sure to talk to your website management team to ensure that you will not have these challenges.
Testing
If you would like to test our the scheduler feel free to use the Provided Fields at the bottom of the page and you can submit a request to see how it will show up in your system.
When you see the Service Request Click on it to activate it and then Click on "View Details"
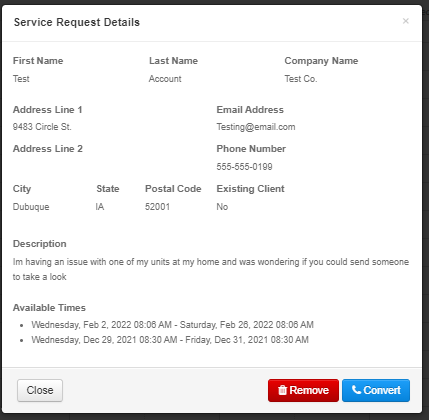
A modal will pop up in the middle of the screen allowing your to create a Call directly from the Request
You can now Convert this into a Call or remove it from the Page.
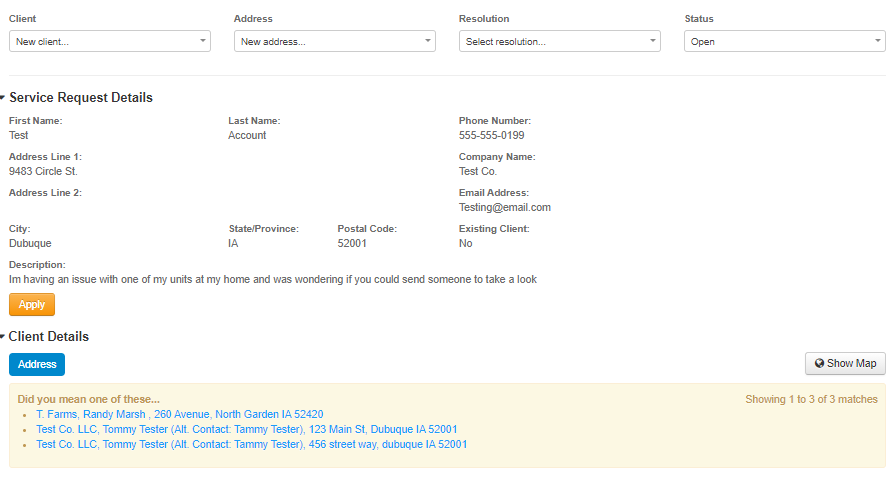
If you create a Call it will automatically try to find the Client that has created the Request based on the information provided by the customer.
If you select one of these options the Call information will automatically fill in and the notes from the Request will be added to the Call and Job,
Scheduling
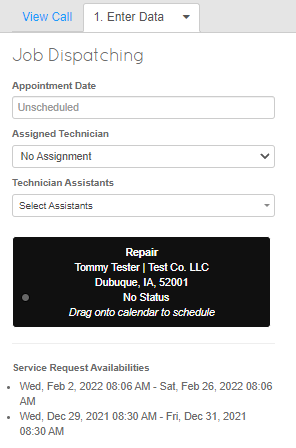
When Scheduling out a Job for a Service Request you will see the availability information for reference on the Dispatching Page. You can use this to schedule the Job within the Clients requested window.
