|
|
| (13 intermediate revisions by 2 users not shown) |
| Line 1: |
Line 1: |
| | <div class="mw-parser-output"><div class="mw-parser-output"><div class="mw-parser-output"><div class="mw-parser-output"><div class="mw-parser-output"><div class="mw-parser-output"><div class="mw-parser-output"><div class="mw-parser-output"><div class="mw-parser-output"><div class="mw-parser-output"><div class="mw-parser-output"><div class="mw-parser-output"><div class="mw-parser-output"><div class="mw-parser-output"><div class="mw-parser-output"> | | <div class="mw-parser-output"><div class="mw-parser-output"><div class="mw-parser-output"><div class="mw-parser-output"><div class="mw-parser-output"><div class="mw-parser-output"><div class="mw-parser-output"><div class="mw-parser-output"><div class="mw-parser-output"><div class="mw-parser-output"><div class="mw-parser-output"><div class="mw-parser-output"><div class="mw-parser-output"><div class="mw-parser-output"><div class="mw-parser-output"> |
| | + | <div class="mw-parser-output"> |
| | + | <div class="mw-parser-output"> |
| | + | <div class="mw-parser-output"> |
| | + | <div class="mw-parser-output"> |
| | <div class="mw-parser-output"> | | <div class="mw-parser-output"> |
| | <div class="mw-parser-output"> | | <div class="mw-parser-output"> |
| | = Setup - SOP = | | = Setup - SOP = |
| − |
| |
| − |
| |
| | | | |
| | | | |
| Line 10: |
Line 12: |
| | Full SOP | | Full SOP |
| | | | |
| − | Workshop & Training Session 2: <youtube urlargs="rel=0">ZG_TTT_11rA</youtube>
| + | [https://help.thermogrid.com/images/e/e4/DMR_SOP_&_Training.docx DMR_SOP_&_Training.docx] |
| − | | |
| − | Session 3: <youtube urlargs="rel=0">5VXObx_N_B8</youtube>
| |
| | | | |
| | | | |
| − | <div class="mw-parser-output"><div class="mw-parser-output">
| |
| − | == General Tab ==
| |
| | | | |
| − | On this tab you can change the Category Name and the Budget Multiplier. The Budget Multiplier will take the budget you type in on the summary page and add this percentage to it. This will increase the budget to a goal and increase the jobs needed to achieve this goal. By having a goal it sets your sights a little higher making it more likely that you will achieve the budget.
| + | [https://help.thermogrid.com/images/3/34/ThermoGRID_-_Administration_-_Set-Up_11_-_Daily_Management_Report.docx ThermoGRID_-_Administration_-_Set-Up_11_-_Daily_Management_Report.docx] |
| | | | |
| | | | |
| | + | </div> |
| | | | |
| − | [http://nebula.wsimg.com/ee597f270c698e525539fbde211415c8?AccessKeyId=AA19C13E8A4EF537D068&disposition=0&alloworigin=1 http://nebula.wsimg.com/ee597f270c698e525539fbde211415c8?AccessKeyId=AA19C13E8A4EF537D068&disposition=0&alloworigin=1]
| + | = Screenshots = |
| − | <div class="mw-parser-output"> </div> </div> <div class="mw-parser-output">
| |
| − | == KPI Tab ==
| |
| − | | |
| − | On this tab you can set certain KPI's that are expectations for the company as a whole. On the summary page it will display the revenue missed when the company is not achieving these numbers and will show you what you would be on track for if you would be at these numbers. When you are able to see this it will let you know if you have a marketing issue... meaning that there are not enough jobs to hit budget because the KPIs are where they should be. This will also show you if it is a performance issue because there maybe plenty of jobs and the company would be exceeding goal if the team was performing at the right numbers.
| |
| | | | |
| | | | |
| | | | |
| − | [http://nebula.wsimg.com/3b4d12156434d41b0da717d7ded5ca68?AccessKeyId=AA19C13E8A4EF537D068&disposition=0&alloworigin=1 http://nebula.wsimg.com/3b4d12156434d41b0da717d7ded5ca68?AccessKeyId=AA19C13E8A4EF537D068&disposition=0&alloworigin=1] | + | [[File:Catagory department.png|1200px|RTENOTITLE]] |
| − | <div class="mw-parser-output"> </div> </div> <div class="mw-parser-output">
| |
| − | == Department Tab ==
| |
| | | | |
| − | On this tab you can Create a department or separate tap on the DMR... Example: Sales Service Install, Call Center. Here you are also a Set Average Sale, Average Ticket, % of revenue (meaning what percentage of the total companies revenue is made up by this department). You can choose if it applies to the Budget or not.. make sure you do not double count your revenue. You are able to rename sections here as well on the DMR as well.
| + | |
| | | | |
| | | | |
| | | | |
| − | [http://nebula.wsimg.com/0e1238297d3eff7947200b38c5b3e43c?AccessKeyId=AA19C13E8A4EF537D068&disposition=0&alloworigin=1 http://nebula.wsimg.com/0e1238297d3eff7947200b38c5b3e43c?AccessKeyId=AA19C13E8A4EF537D068&disposition=0&alloworigin=1]
| + | |
| − | <div class="mw-parser-output"> </div> </div> <div class="mw-parser-output">
| |
| − | == Types Tab ==
| |
| | | | |
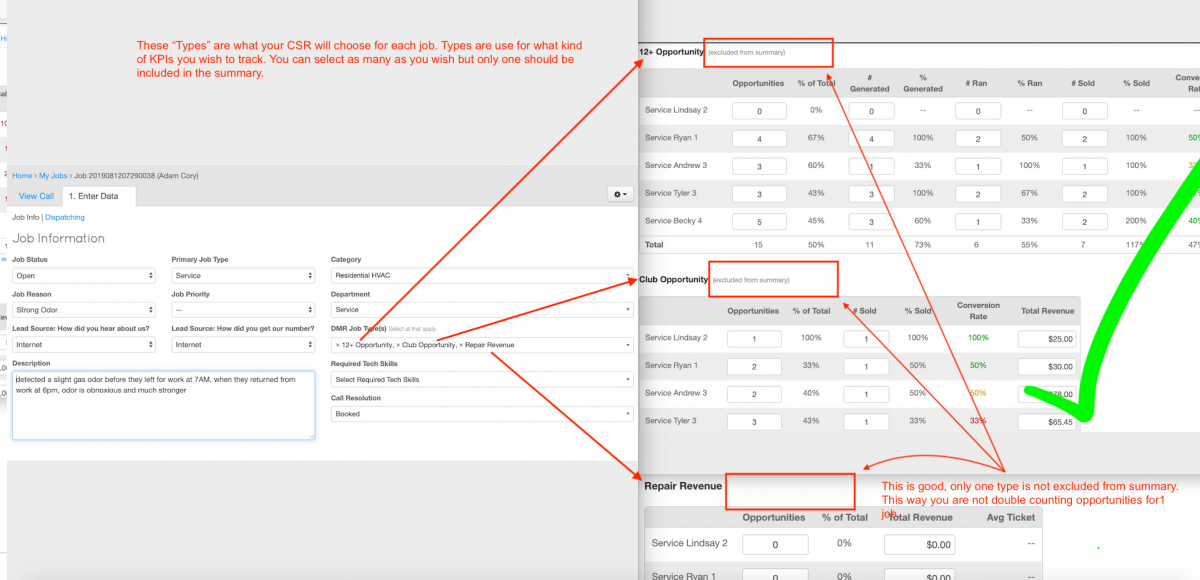
| − | ''On this tab you can Setup the types of KPIs that you want to track. ''
| + | [[File:Date, tech.png|1200px|RTENOTITLE]] |
| | | | |
| − | '''Dollars Per Lead:''' This is the total revenue brought in divided by the total number of jobs ran.
| + | |
| − | | |
| − | '''Avg Ticket:''' This is the total revenue divided by the completed service/install jobs or sold sales jobs.
| |
| − | | |
| − | '''Fixed Call Number:''' This means total calls ran. Example: run 30 Calls/Jobs.
| |
| − | | |
| − | '''Fixed Sales Number:''' This means number sold. Example: Sell 10 clubs.
| |
| − | | |
| − | '''Percentage of Sales Calls''': This means having a certain % to all jobs Example: 10% of all jobs ran.
| |
| − | | |
| − | '''Total Revenue''': This is the total revenue sold. Example Sell $100,000
| |
| − | | |
| − | '''Include Summary''': means it will take jobs and revenue and add up in the summary if you have this set for no it will exclude it from the summary.
| |
| − | | |
| − | Track Runs: Will track if a job or lead has been ran if set to yes.
| |
| − | | |
| − | Track Revenue: This will show any revenue tied to the job if set to yes.
| |
| − | | |
| − | Track Generated: This will track leads generated from service if set to yes.
| |
| | | | |
| | | | |
| − |
| |
| − | [http://nebula.wsimg.com/99794406ee207870de74994ab6f950ff?AccessKeyId=AA19C13E8A4EF537D068&disposition=0&alloworigin=1 http://nebula.wsimg.com/99794406ee207870de74994ab6f950ff?AccessKeyId=AA19C13E8A4EF537D068&disposition=0&alloworigin=1]
| |
| | | | |
| | | | |
| − | <div class="mw-parser-output"> </div> </div> <div class="mw-parser-output"><div class="mw-parser-output"><div class="mw-parser-output"><div class="mw-parser-output">
| |
| − | == Tech Levels Tab ==
| |
| | | | |
| − | ''You are able to set different expectations and goals for each person in the company based on experience and ability. You will be able to set minimum expectations and goals to all "Types" of goals you entered. The system comes with 8 levels by default with different expectations at each level. All you need to do is click the drop down next to "Techs" and add all team members in to a level that you would dispatch any type of job to and anyone you want to show up on the DMR.''
| + | [[File:Types good.png|1200px|RTENOTITLE]] |
| | | | |
| | | | |
| − |
| |
| − | [http://nebula.wsimg.com/bef19e254f0c3632aa74b0b7ad698d79?AccessKeyId=AA19C13E8A4EF537D068&disposition=0&alloworigin=1 http://nebula.wsimg.com/bef19e254f0c3632aa74b0b7ad698d79?AccessKeyId=AA19C13E8A4EF537D068&disposition=0&alloworigin=1]
| |
| − | <div class="mw-parser-output"> </div>
| |
| − | Add users to the DMR [http://www.thermogrid.org/dmr.html http://www.thermogrid.org/dmr.html]
| |
| − | <div class="mw-parser-output"> </div> </div> <youtube urlargs="rel=0">v9tl7JtHGkQ</youtube></div> </div> </div> </div> </div> </div> </div> </div></div></div>
| |
| − |
| |
| − | = Reading/Using the DMR =
| |
| − |
| |
| − | [https://help.thermogrid.com/images/3/30/DMR_Targets.xlsx DMR TARGETS]
| |
| | | | |
| | | | |
| − |
| |
| − | == DMR Summary Tab ==
| |
| − |
| |
| − | Type in your budget at the top in the cell monthly budget. Click the link next to "Working Days" and make sure all working days are grey and non working days and holidays are white. This will give you a summary of the entire company and what is needed per day to achieve the goal.
| |
| − |
| |
| − | <br/> The indicator will track what you would be on track for if the performance was at the expectation.
| |
| | | | |
| | | | |
| − | [http://nebula.wsimg.com/5dfde4433891b4c646f5560dea30f0f2?AccessKeyId=AA19C13E8A4EF537D068&disposition=0&alloworigin=1 http://nebula.wsimg.com/5dfde4433891b4c646f5560dea30f0f2?AccessKeyId=AA19C13E8A4EF537D068&disposition=0&alloworigin=1]</div> </div>
| |
| − | == DMR Sales Tab ==
| |
| − |
| |
| − | In the picture "Total Sales Calls" is actually the number of jobs dispatched to the individual.
| |
| − |
| |
| − | History will give you a history of everything booked, dispatched, moved etc.
| |
| − |
| |
| − | If the numbers do not add up you can click "recalculate"
| |
| − |
| |
| − | Red is below expectation, Yellow is above expectation but below goal, and green is above goal.
| |
| − |
| |
| − | Next call means sell it at that amount to get back on track to achieve your goal... then it goes to next 2 and 3 Calls/Jobs.
| |
| − |
| |
| − | Run rate is calculating what revenue will be in the end of the month if everything continues the way it is currently.
| |
| − |
| |
| − | '''''*To ensure all info shows up where it needs to make sure you check the items properly on the order submit page. For more info click Which boxes should I check.'''''
| |
| − |
| |
| − | [http://nebula.wsimg.com/3819d570de4739308843da1fc9b5bed0?AccessKeyId=AA19C13E8A4EF537D068&disposition=0&alloworigin=1 http://nebula.wsimg.com/3819d570de4739308843da1fc9b5bed0?AccessKeyId=AA19C13E8A4EF537D068&disposition=0&alloworigin=1]
| |
| | | | |
| | | | |
| − | </div> <div class="mw-parser-output"><div class="mw-parser-output">
| |
| − | == DMR Service Tab ==
| |
| | | | |
| − | When a job is dispatched to a tech it will add a number under the text on this report labelled "Dispatched Jobs" your report may be labeled something else and you can edit with the instructions above.
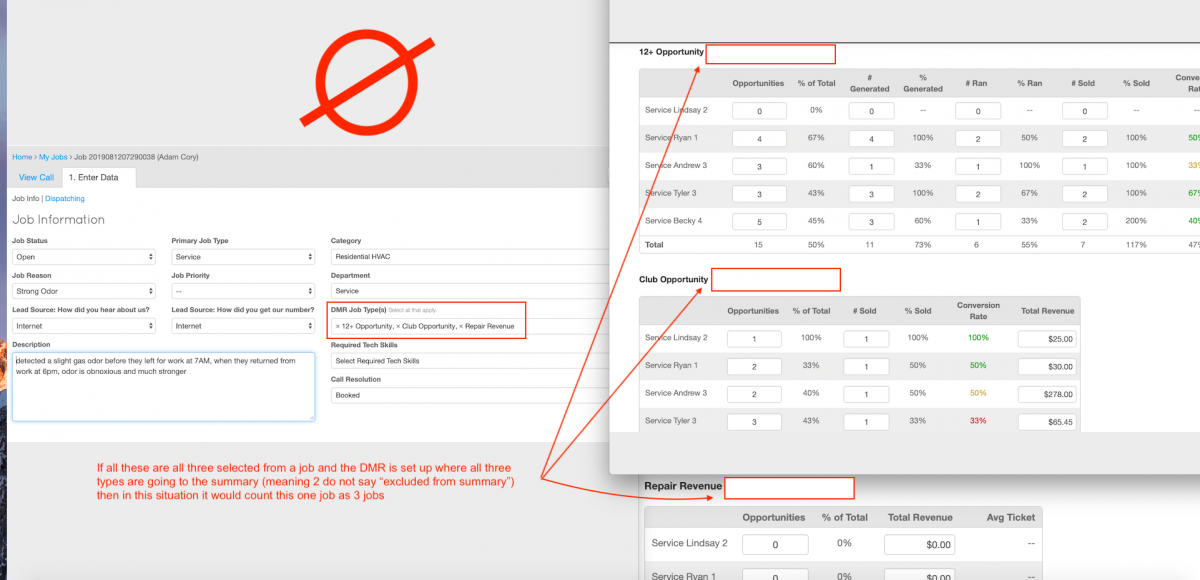
| + | [[File:Types bad.png|1200px|RTENOTITLE]] |
| − | | |
| − | When a tech adds an order to the call it will add a number under the column listed as orders created. The first average ticket is based on revenue versus jobs and the second average ticket is due to orders verses revenue. Run rate is calculating what revenue will be in the end of the month if everything continues the way it is currently. Number of callbacks may need to be manually put in.
| |
| − | | |
| − | '''''*To ensure all info shows up where it needs to make sure you check the items properly on the order submit page. For more info click Which boxes should I check.'''''
| |
| − | | |
| − | [http://nebula.wsimg.com/52f99def294cf730802d1605c034bf55?AccessKeyId=AA19C13E8A4EF537D068&disposition=0&alloworigin=1 http://nebula.wsimg.com/52f99def294cf730802d1605c034bf55?AccessKeyId=AA19C13E8A4EF537D068&disposition=0&alloworigin=1] | |
| | | | |
| | | | |
| − |
| |
| − | '''Opportunities:''' Total 12+ jobs dispatched to the tech as a lead.
| |
| − |
| |
| − | '''% of Total:''' % of 12+ jobs verses total jobs dispatched to the tech.
| |
| − |
| |
| − | '''# Generated:''' How many were generated into a sales lead... this happens when a sales job is added and it asks if it a tech lead. Must follow job flow for this all to tie together.
| |
| − |
| |
| − | '''% Generated:''' This is the % generated verses 12+ jobs dispatched.
| |
| − |
| |
| − | '''# Ran:''' This is the number of generated leads that were ran.. this happens when a sales rep adds an order to the call.
| |
| − |
| |
| − | '''% Ran:''' This is the % of leads ran verses total generated.
| |
| − |
| |
| − | '''# Sold:''' Number of leads sold.
| |
| − |
| |
| − | '''Conversion Rate:''' Total sold divided by total 12+ Dispatched
| |
| − |
| |
| − | '''Total Revenue:''' All sales revenue that came from generated 12+ jobs (sales person would check the box
| |
| − |
| |
| − | '''''*To ensure all info shows up where it needs to make sure you check the items properly on the order submit page. For more info click Which boxes should I check.'''''
| |
| − |
| |
| − | [http://nebula.wsimg.com/b539a3cc3e3f55d8d161cabd88475883?AccessKeyId=AA19C13E8A4EF537D068&disposition=0&alloworigin=1 http://nebula.wsimg.com/b539a3cc3e3f55d8d161cabd88475883?AccessKeyId=AA19C13E8A4EF537D068&disposition=0&alloworigin=1]
| |
| | | | |
| | | | |
| − |
| |
| − | '''Opportunities: '''Total Club Opp jobs dispatched to the tech.<br/> '''% of Total:''' % of 12+ jobs verses total jobs dispatched to the tech.
| |
| − |
| |
| − | '''# Sold: Number Sold:''' Number Sold
| |
| − |
| |
| − | '''Conversion Rate:''' Total sold divided by total 12+ Dispatched
| |
| − |
| |
| − | '''''*To ensure all info shows up where it needs to make sure you check the items properly on the order submit page. For more info click Which boxes should I check.'''''
| |
| − |
| |
| − | [http://nebula.wsimg.com/06358b4ccf78d4f1c5e2aaea40396e50?AccessKeyId=AA19C13E8A4EF537D068&disposition=0&alloworigin=1 http://nebula.wsimg.com/06358b4ccf78d4f1c5e2aaea40396e50?AccessKeyId=AA19C13E8A4EF537D068&disposition=0&alloworigin=1]
| |
| − | <div class="mw-parser-output"><div class="mw-parser-output"> </div> </div> </div> <div class="mw-parser-output">
| |
| − | == DMR Install Tab ==
| |
| − |
| |
| − | '''Opportunities: '''Total Install jobs dispatched to the tech as a lead.<br/> '''Total Revenue:''' Revenue Installed as a lead
| |
| − |
| |
| − | '''Average Ticket:''' Average Ticket
| |
| − |
| |
| − | '''Run Rate:''' Run rate is calculating what revenue will be in the end of the month if everything continues the way it is currently.
| |
| − |
| |
| − | '''Call Backs''': May need to be entered manually.
| |
| − |
| |
| − | '''''*To ensure all info shows up where it needs to make sure you check the items properly on the order submit page. For more info click Which boxes should I check.'''''
| |
| − |
| |
| − | '''''If the Install is tied to a sales job and order you do not need to check the box next to "Residential HVAC Installations Replacement" or IAQ on the submit page of the order, it will auto transfer to the DMR. '''''
| |
| − |
| |
| − | '''''If the install job does not have a sales job in the same call in fornt of it you will need to check the box "Residential HVAC Installations Replacement" or IAQ on the submit page of the order.'''''
| |
| − |
| |
| − | [http://nebula.wsimg.com/01e3f9a2f585cf016919615da4a65bcb?AccessKeyId=AA19C13E8A4EF537D068&disposition=0&alloworigin=1 http://nebula.wsimg.com/01e3f9a2f585cf016919615da4a65bcb?AccessKeyId=AA19C13E8A4EF537D068&disposition=0&alloworigin=1]
| |
| | | | |
| | | | |
| − | </div> <div class="mw-parser-output"><div class="mw-parser-output"><div class="mw-parser-output"><div class="mw-parser-output"><div class="mw-parser-output"><div class="mw-parser-output"><div class="mw-parser-output">
| |
| − | = Understanding How Numbers Flow in the DMR =
| |
| − |
| |
| − | <u>'''First Column'''</u>
| |
| − |
| |
| − | 1. The first column for Sales, Service, and Install (for install it will also add the revenue) will have a number show up for the individual when a job is dispatched. The Job info must be setup correctly. [http://www.thermogrid.org/dmr2.html SEE HERE]
| |
| − |
| |
| − | '''Example:''' If we have a job Scheduled for May and we dispatch it to a team member they will get an additional number in the first column of the DMR. If we want the number to be in April we would reschedule the job for April.
| |
| − |
| |
| − | <u>'''Second Column & Revenue'''</u>
| |
| − |
| |
| − | 2. For sales and service the second column comes from an order being submitted and it will tie it to the month the job is scheduled for.
| |
| − |
| |
| − | '''Example:''' If We have a job scheduled in May and a tech adds an order to the job and submits it, there will be an additional number added to second column in May.
| |
| − |
| |
| − | <u>'''If we need to move the revenue from one month to another'''</u>
| |
| − |
| |
| − | 1. Go to the "order" and change the status to open, this will pull the revenue and the number in the second column out of the DMR for the month in question.
| |
| − |
| |
| − | 2. Reschedule the job for the month you want the revenue to show up in and have the technician or sales rep resubmit the job.
| |
| − |
| |
| − | 3. To move revenue of an install all you have to do is move the install job to the month you want you do not need to do anything with the orders.
| |
| − |
| |
| − | <u>'''If we have a tech oncall and we need to add the order to acall and job not created yet.'''</u>
| |
| − |
| |
| − | 1. Go to the "order" and change the status to open
| |
| − |
| |
| − | 2. Create the call and the job for the client, then dispatch to the tech that performed the work at the time and day they did it. (Make sure the Catagory, Department, Job Type(s) are all correct)
| |
| − |
| |
| − | 3. Copy the job number
| |
| − |
| |
| − | 4. Go to the order the tech created previously on the client information screen and paste in the job you want the order to tie to.
| |
| − |
| |
| − | 5. Go to the submit page of the order and check the appropriate boxes and submit the order.
| |
| | | | |
| | | | |
| Line 219: |
Line 63: |
| | | | |
| | | | |
| − | '''<span style="font-size:large;">Matching appointments to the DMR</span>'''
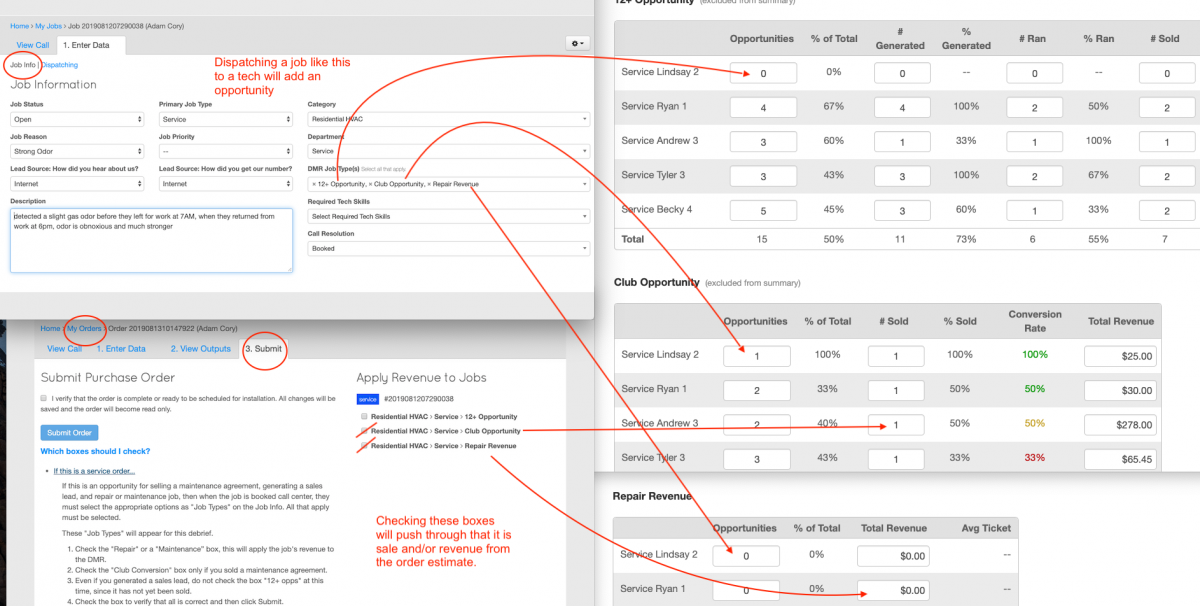
| + | [[File:Job info and Order match up.png|1200px|RTENOTITLE]] |
| | | | |
| − | When booking a job the category represents the category in the DMR report.
| + | |
| − | | |
| − | [http://www.thermogrid.org/dmr2.html http://www.thermogrid.org/dmr2.html]
| |
| − | </div>
| |
| − | <div class="mw-parser-output">
| |
| − | <div class="mw-parser-output">
| |
| − | <div class="mw-parser-output">
| |
| − | <div class="mw-parser-output">
| |
| − | <div class="mw-parser-output">
| |
| − | <div class="mw-parser-output"><div class="mw-parser-output">
| |
| − | = Screenshots =
| |
| | | | |
| | | | |
| − |
| |
| − | [[File:Catagory department.png|1200px|RTENOTITLE]]
| |
| | | | |
| | | | |
| Line 242: |
Line 74: |
| | | | |
| | | | |
| − |
| |
| − | [[File:Date, tech.png|1200px|RTENOTITLE]]
| |
| | | | |
| | | | |
| − | | + | [[File:MAtch Job Order DMR.png|1200px|RTENOTITLE]]</div> |
| | | | |
| | + | </div> |
| | | | |
| − |
| + | = Change Names of category (Calls, job page) = |
| | | | |
| − | [[File:Types good.png|1200px|RTENOTITLE]]
| + | This drop dow area is strictly for the DMR and for the Call Center Department. To change these you would go to Reports, Daily Management, Settings, Choose a Category, then go to types. The ones that will change this area are in the Call Center Department. |
| | | | |
| | | | |
| | | | |
| − | | + | This drop down area is strictly for the DMR and for the Service, Install or Sales Department. To change these you would go to Reports, Daily Management, Settings, Choose a Category, then go to types. The ones that will change this area are in the Service, Install or Sales Department. |
| | | | |
| | | | |
| Line 261: |
Line 92: |
| | | | |
| | | | |
| − | [[File:Types bad.png|1200px|RTENOTITLE]]
| + | The drop down area to the right for the category and department can be changed in the DMR as well. This all can be done by following the steps above. |
| | | | |
| | | | |
| | + | </div> <div class="mw-parser-output"><div class="mw-parser-output"><div class="mw-parser-output"><div class="mw-parser-output"><div class="mw-parser-output"><div class="mw-parser-output"><div class="mw-parser-output"><div class="mw-parser-output"><div class="mw-parser-output"><div class="mw-parser-output"> |
| | + | <div class="mw-parser-output"> |
| | + | <div class="mw-parser-output"> |
| | + | <div class="mw-parser-output"> |
| | + | = History and Reconciling = |
| | | | |
| − |
| + | To get to your Data Sources and History, simply click on the DMR and You will see the options on the top right of the Departments tab list. |
| | | | |
| − |
| + | [[File:DMR Data Sources and History.png]] |
| | | | |
| | | | |
| | + | <div class="mw-parser-output"> |
| | + | == Data Sources == |
| | | | |
| − | | + | This Page will display all instances of Data transferring to the DMR or not transferring to the DMR. This will display an Orange Warning/Notification on the Call/Job/Order to ensure there is a simple way to view and rectify the instance. |
| | | | |
| − | [[File:Job info and Order match up.png|1200px|RTENOTITLE]] | + | [[File:DMR data sources overview.png|RTENOTITLE]] |
| | | | |
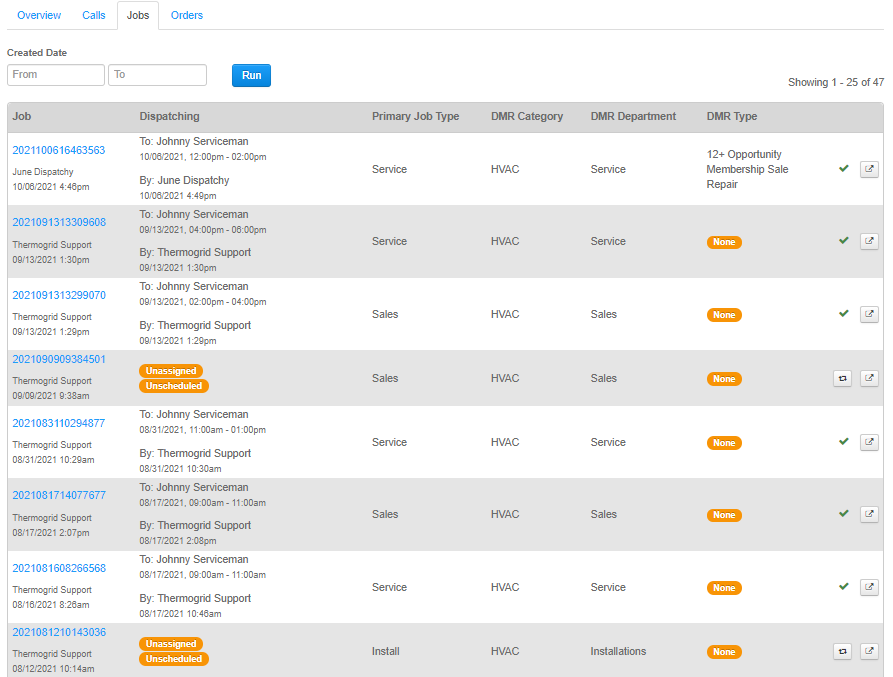
| − | | + | Once you see that there may be objects that need to be rectified; you can select the Call, Jobs or Orders Tab to view all data. This allows you to easily View Primary Job Type, Category, Department and The Type/Opportunities that were available for that Instance. |
| | | | |
| − | | + | By clicking on the Job Number you can adjust Types/Opportunities for that Job. By using the Button on the right you can instantly run a detailed report in DMR History for that Object. |
| | | | |
| − |
| + | [[File:DMR data sources jobs.png|RTENOTITLE]] |
| | | | |
| | | | |
| | + | </div> <div class="mw-parser-output"><div class="mw-parser-output"> |
| | + | == History == |
| | | | |
| − | | + | The History Option will allow you to Filter by: |
| | | | |
| − |
| + | *Month |
| − | [[File:MAtch Job Order DMR.png|1200px|RTENOTITLE]]</div>
| + | *User |
| − | | + | *Object |
| − | </div> | + | *DMR Category |
| | + | *DMR Department |
| | + | *DMR Type<br/> <br/> This will give you the tools necessary to double check and rectify an inconsistencies you may find in your DMR or verifying your expectations of the functionality. <br/> <br/> |
| | | | |
| − | = Change Names of category (Calls, job page) =
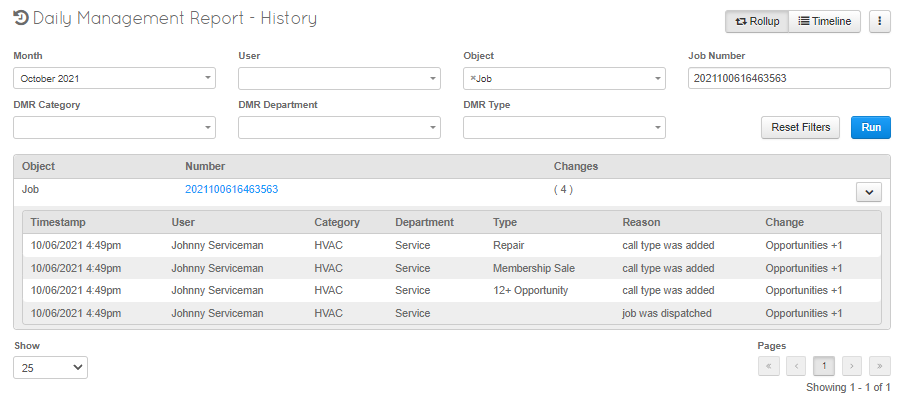
| + | You can see here that we have filtered by a Job Number. This has provided us with a timestamp of the interaction, the user it applies to, the Category, Department and Service; as well as the reason it was added and what changed in that instance. |
| | | | |
| − | This drop dow area is strictly for the DMR and for the Call Center Department. To change these you would go to Reports, Daily Management, Settings, Choose a Category, then go to types. The ones that will change this area are in the Call Center Department.
| + | You can use this tool to directly correlate the processes to the Report. |
| | | | |
| − |
| + | [[File:DMR History.png|RTENOTITLE]] |
| − | | |
| − | This drop down area is strictly for the DMR and for the Service, Install or Sales Department. To change these you would go to Reports, Daily Management, Settings, Choose a Category, then go to types. The ones that will change this area are in the Service, Install or Sales Department.
| |
| | | | |
| | | | |
| | | | |
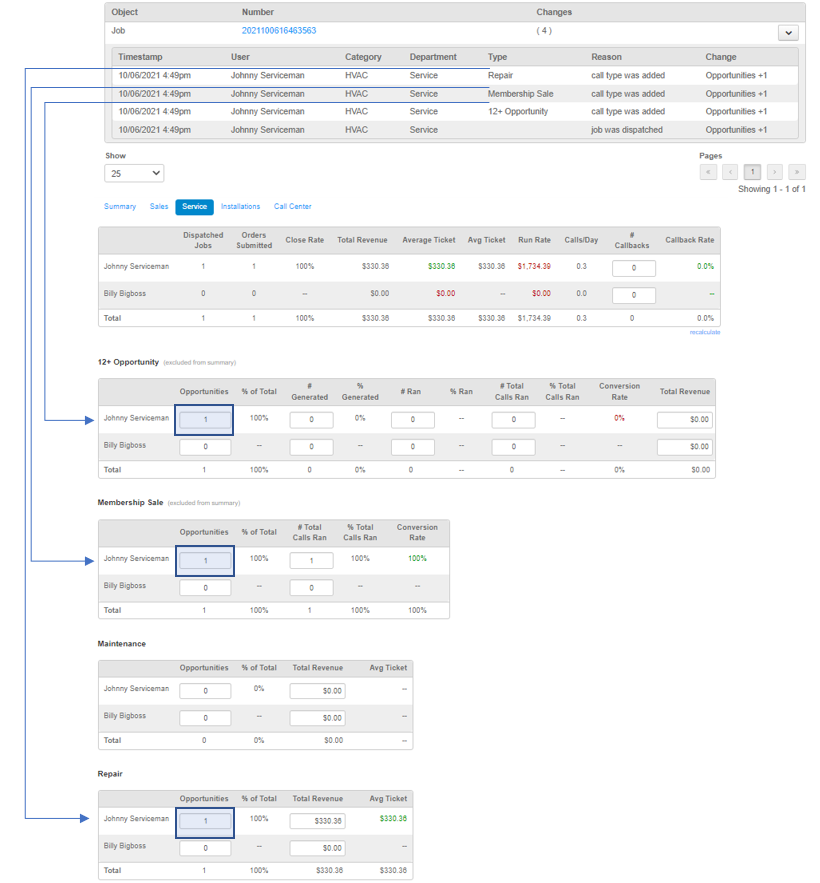
| − | | + | ''DMR Correlation from opportunities on the Job object above <span style="color:#bdc3c7;">(Dispatched Job was not Included, just the selected Opportunities from the Job)</span>'' |
| | | | |
| − | The drop down area to the right for the category and department can be changed in the DMR as well. This all can be done by following the steps above.
| + | [[File:DMR History connection.png|RTENOTITLE]] |
| | + | </div> </div> </div> |
| | | | |
| − |
| + | <div class="mw-parser-output"> |
| − | </div> <div class="mw-parser-output"><div class="mw-parser-output"><div class="mw-parser-output"><div class="mw-parser-output"><div class="mw-parser-output"><div class="mw-parser-output"><div class="mw-parser-output"><div class="mw-parser-output"><div class="mw-parser-output"><div class="mw-parser-output">
| + | <div class="mw-parser-output"> |
| | = Common Challenges = | | = Common Challenges = |
| | | | |
| − | <span style="font-size:medium;">'''Data not showng up in the DMR.'''</span> | + | <span style="font-size:medium;">'''Data not showing up in the DMR.'''</span> |
| | | | |
| − | 1. Check the job is dispatched o the tech or representative. | + | 1. Check the job is dispatched on the proper tech or representative. |
| | | | |
| − | *If an order created already and submited, unsubmit the order then assign the job to the tech. | + | *If an order created already and submitted, unsubmit the order then assign the job to the tech. |
| | | | |
| − | 2. Check on the "job info" page, make sure it has all info on the right. Category, Department, and Job type(s) | + | 2. Check on the "Job info" page, make sure it has all info on the right. Category, Department, and Job type(s) |
| | | | |
| − | *If an order was already submited, unsubmit the order then add the Category, Department, and Job type(s), now you can resubmit. | + | *If an order was already submitted, unsubmit the order then add the Category, Department, and Job type(s), now you can resubmit. |
| | | | |
| | 3. Check that the tech or Representative was the one that created the order. | | 3. Check that the tech or Representative was the one that created the order. |
| | | | |
| − | *You can have them recreate their own ordr or you can manaly type te data into the DMR. | + | *You can have them recreate their own order or you can manually type te data into the DMR. |
| | | | |
| | | | |
| | | | |
| − | <span style="font-size:large;">'''The Job didn't have the Type(s) on it when the tech or representative submited their order.'''</span> | + | <span style="font-size:large;">'''The Job didn't have the Type(s) on it when the tech or representative submitted their order.'''</span> |
| | | | |
| − | *If an order was already submited, unsubmit the order then add the Category, Department, and Job type(s), now you can resubmit. | + | *If an order was already submitted, unsubmit the order then add the Category, Department, and Job type(s), now you can resubmit. |
| | | | |
| | | | |
| | | | |
| − | 1. How to track down missing data that should be in the DMR
| + | '''How to track down missing data that should be in the DMR:''' Use the History and Reconciliation Instruction above. |
| | | | |
| − | Click: Reports and then orders. Change created by to the representatives name you are looking for. Here you can find all orders created by a rep. Open, Submitted Etc.
| + | |
| − | | |
| − | To find jobs go to the jobs page and put representatives name and date rage to find all jobs dispatched.
| |
| − | | |
| − | By looking in these areas you can see what the DMR should display.
| |
| | | | |
| | | | |
| − | | + | </div> |
| − | 2. Need To change data from 1 month to another [https://help.thermogrid.com/index.php/Daily_Management_Report#Understanding_How_Numbers_Flow_in_the_DMR Understanding How Numbers Flow in the DMR] 3. Tech oncall need numbers to hit DMR [https://help.thermogrid.com/index.php/Daily_Management_Report#Understanding_How_Numbers_Flow_in_the_DMR Understanding How Numbers Flow in the DMR]
| |
| − | </div> </div> </div> </div> </div> </div> </div> </div> </div> </div> </div> </div> </div> </div> </div> </div> </div> </div> </div> </div> </div> </div> </div> </div></div></div>
| |
