Difference between revisions of "NavBar - Calls"
| (36 intermediate revisions by the same user not shown) | |||
| Line 1: | Line 1: | ||
<div class="mw-parser-output"><div class="mw-parser-output"><div class="mw-parser-output"><div class="mw-parser-output"><div class="mw-parser-output"><div class="mw-parser-output"> | <div class="mw-parser-output"><div class="mw-parser-output"><div class="mw-parser-output"><div class="mw-parser-output"><div class="mw-parser-output"><div class="mw-parser-output"> | ||
| | ||
| + | <div class="mw-parser-output"> | ||
<div class="mw-parser-output"> | <div class="mw-parser-output"> | ||
= User Interface = | = User Interface = | ||
| Line 15: | Line 16: | ||
<div class="mw-parser-output"> | <div class="mw-parser-output"> | ||
| + | == Status Filter == | ||
| + | |||
| + | [[File:Status filter.png]] | ||
| + | |||
| + | The status Filter is a customizable field that can be used to manage the status of the Call. | ||
| + | |||
| + | Some companies will be as simple as Open or Closed. But, In some scenarios the Call must have multiple stages tracked or specific statuses depending on how you are managing your company. This is edited in [[1._NavBar_-_Administration|Administration]] under Manage Dropdowns. | ||
| + | </div> | ||
| + | |||
| + | <div class="mw-parser-output"> | ||
| + | == Search Calls == | ||
| + | |||
| + | [[File:Search call.png]] | ||
| + | |||
| + | This Search function will allow you to filter your calls based off specific Criteria. If you have a Special Number, Note, Phrase, Code or anything you would like to use to reference this call at a later date, input that information into the Call Details and The system will be able to locate the Call based on that criteria. | ||
| + | </div> | ||
| + | |||
| + | == Order by == | ||
| + | |||
| + | Give you the ability to sort the Calls based off of any of the options below | ||
| + | |||
| + | [[File:Order by.png]] | ||
<div class="mw-parser-output"> | <div class="mw-parser-output"> | ||
| + | |||
| + | | ||
| + | |||
= Definition = | = Definition = | ||
| Line 27: | Line 53: | ||
</div> | </div> | ||
| + | <div class="mw-parser-output"> | ||
| + | <div class="mw-parser-output"> | ||
| + | <div class="mw-parser-output"> | ||
<div class="mw-parser-output"> | <div class="mw-parser-output"> | ||
<div class="mw-parser-output"> | <div class="mw-parser-output"> | ||
<div class="mw-parser-output"> | <div class="mw-parser-output"> | ||
= Creating a Call = | = Creating a Call = | ||
| + | |||
| + | From the Calendar use the Add > Add Call option on the top right. | ||
[[File:Add call.png|RTENOTITLE]] | [[File:Add call.png|RTENOTITLE]] | ||
| − | + | | |
| + | <div class="mw-parser-output"> </div> </div> | ||
| + | |||
| + | = Call Interface = | ||
| + | |||
| + | The Call Breaks down into 5-6 sections depending on it VoIP is Active. (Audio will not be seen if VoIP is not Active) | ||
| + | |||
| + | [[File:Call UI.png]] | ||
| + | |||
| + | '''Client Detai'''ls = Clients Name, Address, Phone Number, Email, Notes, Addresses and any other information that needs to be tracked under the client | ||
| + | |||
| + | '''Call Details '''= DMR Category, Notes/Information about the Request of the Call | ||
| + | |||
| + | '''Audio '''= Recorded Audio from VoIP | ||
| + | |||
| + | '''Jobs '''= The Jobs attached to this Call | ||
| + | |||
| + | '''Orders '''= The Orders Attached to this Call | ||
| + | |||
| + | '''Advanced '''= Option to Archive the Call | ||
| + | </div> | ||
= Client Details = | = Client Details = | ||
| − | + | <div class="mw-parser-output"><div class="mw-parser-output"> | |
<div class="mw-parser-output"> | <div class="mw-parser-output"> | ||
<div class="mw-parser-output"> | <div class="mw-parser-output"> | ||
| − | == | + | == Existing Client (option) == |
| − | <div class="mw-parser-output"> | + | <div class="mw-parser-output"><div class="mw-parser-output"> |
| − | + | Use the provided fields to search for client information | |
[[File:Call client select.png|RTENOTITLE]] | [[File:Call client select.png|RTENOTITLE]] | ||
| Line 59: | Line 110: | ||
[[File:Edit Client.png|RTENOTITLE]] | [[File:Edit Client.png|RTENOTITLE]] | ||
| − | <div class="mw-parser-output"> </div> </div> </div> | + | <div class="mw-parser-output"> </div> </div> </div> <div class="mw-parser-output"> </div> </div> <div class="mw-parser-output"> </div> </div> <div class="mw-parser-output"> </div> </div> |
| − | |||
<div class="mw-parser-output"> | <div class="mw-parser-output"> | ||
| − | If it is a new client you can type in the client information and click the orange button Create New Client. | + | <div class="mw-parser-output"> |
| + | == New Client (option) == | ||
| + | <div class="mw-parser-output"> </div> <div class="mw-parser-output"> | ||
| + | If it is a new client you can type in the client information and click the orange button Create New Client. This will save all Customer information to your Client List | ||
[[File:New Client.png|RTENOTITLE]] | [[File:New Client.png|RTENOTITLE]] | ||
| + | <div class="mw-parser-output"> </div> </div> <div class="mw-parser-output"> </div> </div> | ||
| + | |||
<div class="mw-parser-output"> | <div class="mw-parser-output"> | ||
| − | == | + | == Units == |
| + | |||
| + | If your Client has a Unit that they are going to have service performed on, you have the option to add what ever unit information is available. When a field staff member arrives at the location they will be able to update any missing or incorrect information about the unit. | ||
| − | + | This Unit(s) will always stay attached to the Address it has been created on. | |
[[File:Unit Selection.png|RTENOTITLE]] | [[File:Unit Selection.png|RTENOTITLE]] | ||
| Line 75: | Line 132: | ||
| | ||
| − | [[File:Units on call.png|RTENOTITLE]] | + | [[File:Units on call.png|RTENOTITLE]] </div> |
| + | <div class="mw-parser-output"> </div> </div> <div class="mw-parser-output"> </div> </div></div> | ||
| − | == | + | == History == |
If you want to see the clients history in the client details you can click the button History. You will see a tab for Calls, Jobs, and Orders. Each number is able to be clicked on to see all the details of it. | If you want to see the clients history in the client details you can click the button History. You will see a tab for Calls, Jobs, and Orders. Each number is able to be clicked on to see all the details of it. | ||
| Line 86: | Line 144: | ||
[[File:Call history.png|RTENOTITLE]] | [[File:Call history.png|RTENOTITLE]] | ||
| + | <div class="mw-parser-output"><div class="mw-parser-output"><div class="mw-parser-output"> </div> </div> </div> </div> | ||
| − | + | <div class="mw-parser-output"> | |
| + | <div class="mw-parser-output"> | ||
| + | = Call Details = | ||
| − | + | [[File:Call details.png|RTENOTITLE]] | |
| + | <div class="mw-parser-output"> | ||
| + | == Category == | ||
| − | + | [[File:Select category.png|RTENOTITLE]] | |
| − | + | These are your DMR Category. This does Not Need to be applied if you're not using DMR (Daily Management Report) To Learn more about the DMR [[DMR_SOP_&_Training.docx|Click Here]] | |
| − | + | == Types == | |
| − | | + | [[File:Select Types.png|RTENOTITLE]] |
| + | |||
| + | These are your DMR Types for your Call Center. This does Not Need to be applied if you're not using DMR (Daily Management Report) To Learn more about the DMR [[DMR_SOP_&_Training.docx|Click Here]] | ||
| + | |||
| + | == Call Description == | ||
| + | |||
| + | [[File:Call description.png|RTENOTITLE]] | ||
| + | |||
| + | The Notes that are in pure in this field will directly transfer to the Job Details. The Customer will not see These Notes, they are for the Field Staff member looking over the Job Assigned to them | ||
| + | <div class="mw-parser-output"> | ||
| + | == Club Memberships / Service Agreements == | ||
| + | |||
| + | [[File:Membership info.png|RTENOTITLE]] | ||
| − | + | If the client has a membership you will be able to see it right next to the Call Details if you need to set one up for the client you can click Manage Memberships. | |
| − | + | == Attachments == | |
| − | + | Files can be attached to the Call for Easy reference. If there are files already uploaded to a call they will show below with a Number of the total in parenthesis. | |
| − | + | [[File:Attach.png|RTENOTITLE]] | |
| + | </div> </div> <div class="mw-parser-output"> | ||
| + | <div class="mw-parser-output"> | ||
| + | <div class="mw-parser-output"> | ||
| + | = Jobs = | ||
| − | + | All The Jobs that are attached to the Call will be listed here. | |
| | ||
| − | |||
| − | + | | |
| − | + | To add a Job to a Call simply click the "Add Job" button and a list of your Primary Job Type will be displayed. To edit Primary Job types use [[NavBar_-_Administration|Manage Dropdowns]] | |
| − | + | [[File:Primary Job on Call.png]] | |
| | ||
| − | + | To Learn more about The Job Page and Jobs in general [[NavBar_-_Jobs|Click Here]] | |
| | ||
| − | </div> <div class="mw-parser-output"> | + | </div> </div> <div class="mw-parser-output"> </div> </div></div></div> |
| − | = | + | |
| + | = Advanced / Archive = | ||
| − | + | ThermoGrid Does NOT Delete Calls, we Archive them for later reference if necessary. | |
| − | |||
| − | |||
| − | + | [[File:Archive call.png]] | |
| − | + | </div> | |
Latest revision as of 16:18, 25 August 2021
Contents
User Interface
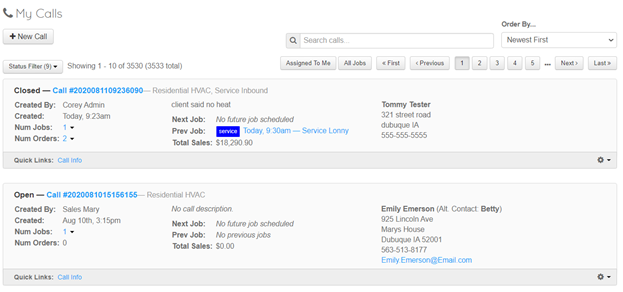
Click on the Calls Tab/Button on the Navigation Bar, This will bring you to your calls page. You can also add a call from this page but it would be recommended that the Call be added from the calendar with the "Add" button
Here is an example of what the call page will look like.
Status Filter
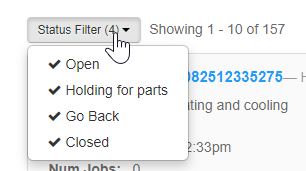
The status Filter is a customizable field that can be used to manage the status of the Call.
Some companies will be as simple as Open or Closed. But, In some scenarios the Call must have multiple stages tracked or specific statuses depending on how you are managing your company. This is edited in Administration under Manage Dropdowns.
Search Calls
This Search function will allow you to filter your calls based off specific Criteria. If you have a Special Number, Note, Phrase, Code or anything you would like to use to reference this call at a later date, input that information into the Call Details and The system will be able to locate the Call based on that criteria.
Order by
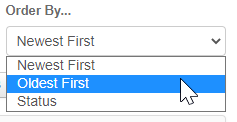
Give you the ability to sort the Calls based off of any of the options below
Definition
What is a Call?
A Call is any scenario where a Client reaches out to your company desiring Service, Estimates, Repairs, Maintenance, or any other services your company may provide. Calls will be managed as the Main or "Parent" Object to all of your Jobs and Orders. In some scenarios a Client reaches out for service, but the service ends up turning into a sales quote as well. The Client now has made One (1) Call and Two (2) Jobs should have been created, one for service and one for sale. so that Two (2) Orders can be created. Even though there were 2 Jobs, Each with an Order attached to them, we still only manage this under One call. Training will cover this more in depth and you can also watch a video on this process Here.
Call Interface
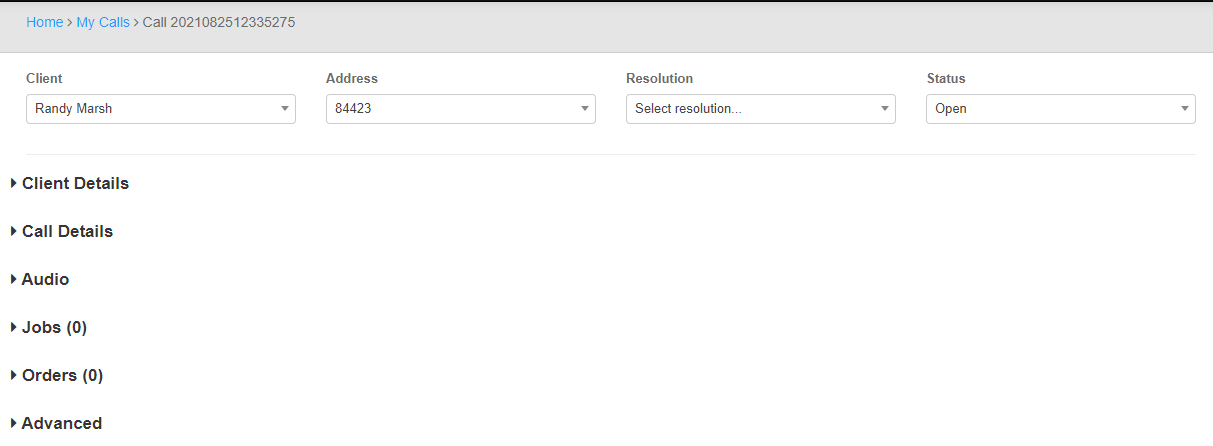
The Call Breaks down into 5-6 sections depending on it VoIP is Active. (Audio will not be seen if VoIP is not Active)
Client Details = Clients Name, Address, Phone Number, Email, Notes, Addresses and any other information that needs to be tracked under the client
Call Details = DMR Category, Notes/Information about the Request of the Call
Audio = Recorded Audio from VoIP
Jobs = The Jobs attached to this Call
Orders = The Orders Attached to this Call
Advanced = Option to Archive the Call
Client Details
Existing Client (option)
Use the provided fields to search for client information
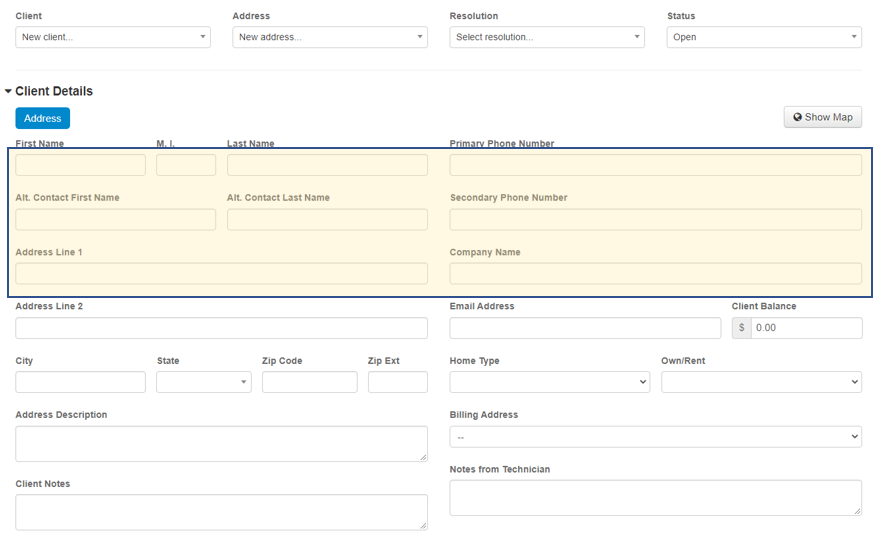
Select / Search for Client: Type in a clients name and it will search the entire client base for them and Display a Location. (If the client has a location that is not listed, more more information to filter down results)
First Name, Last Name, Primary Phone Number, Company Name and Address Line 1 will do a search for an existing client, only 5 clients will display at a time so if you do not see the client initially continue to type more info in and it will continue to filter them.
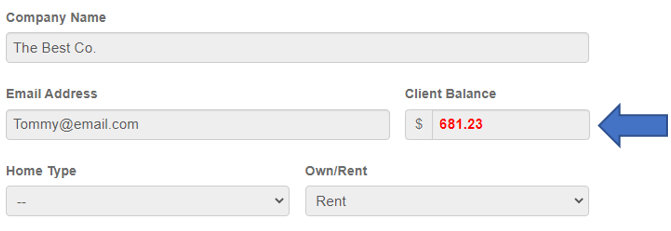
If this is an existing client it will display any existing balance the client has under Client Balance, it will be red.
If any Changes need to be made to the Client Information or address there is an option to Edit the Data on either Directly from the Call. (This will change all Call, Job and Order Information attached to this client.)
New Client (option)
If it is a new client you can type in the client information and click the orange button Create New Client. This will save all Customer information to your Client List
Units
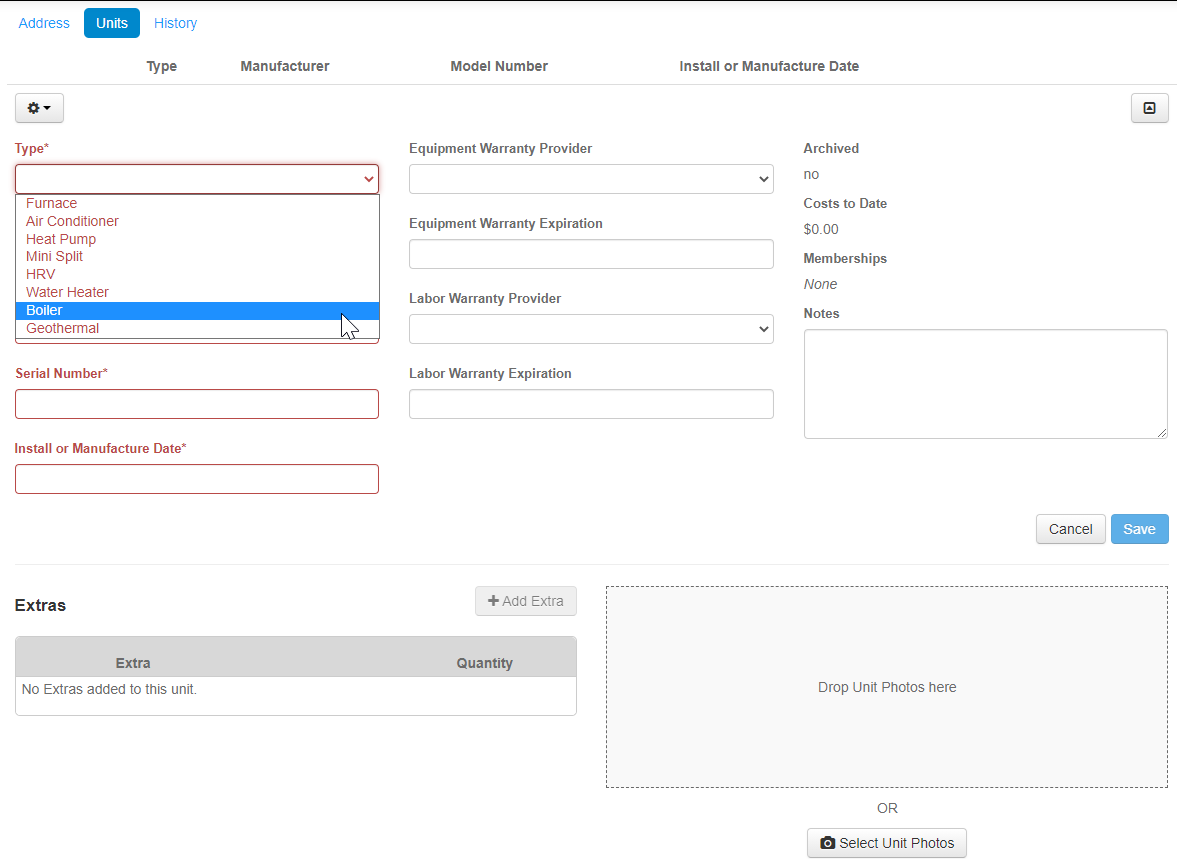
If your Client has a Unit that they are going to have service performed on, you have the option to add what ever unit information is available. When a field staff member arrives at the location they will be able to update any missing or incorrect information about the unit.
This Unit(s) will always stay attached to the Address it has been created on.
History
If you want to see the clients history in the client details you can click the button History. You will see a tab for Calls, Jobs, and Orders. Each number is able to be clicked on to see all the details of it.
Call Details
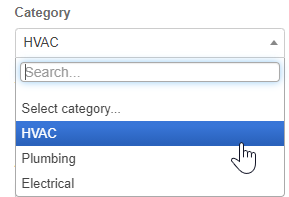
Category
These are your DMR Category. This does Not Need to be applied if you're not using DMR (Daily Management Report) To Learn more about the DMR Click Here
Types
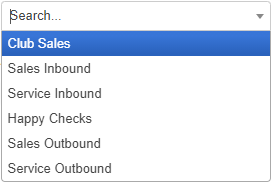
These are your DMR Types for your Call Center. This does Not Need to be applied if you're not using DMR (Daily Management Report) To Learn more about the DMR Click Here
Call Description
The Notes that are in pure in this field will directly transfer to the Job Details. The Customer will not see These Notes, they are for the Field Staff member looking over the Job Assigned to them
Club Memberships / Service Agreements
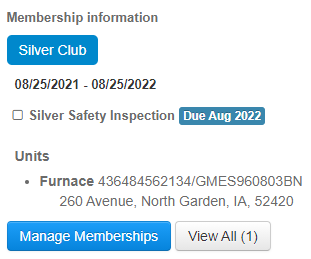
If the client has a membership you will be able to see it right next to the Call Details if you need to set one up for the client you can click Manage Memberships.
Attachments
Files can be attached to the Call for Easy reference. If there are files already uploaded to a call they will show below with a Number of the total in parenthesis.
Jobs
All The Jobs that are attached to the Call will be listed here.
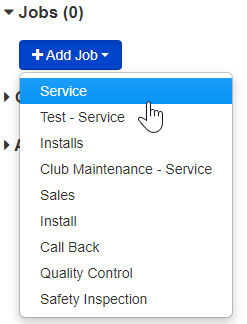
To add a Job to a Call simply click the "Add Job" button and a list of your Primary Job Type will be displayed. To edit Primary Job types use Manage Dropdowns
To Learn more about The Job Page and Jobs in general Click Here
Advanced / Archive
ThermoGrid Does NOT Delete Calls, we Archive them for later reference if necessary.

