Difference between revisions of "Daily Management Report"
| (5 intermediate revisions by the same user not shown) | |||
| Line 96: | Line 96: | ||
| | ||
</div> <div class="mw-parser-output"><div class="mw-parser-output"><div class="mw-parser-output"><div class="mw-parser-output"><div class="mw-parser-output"><div class="mw-parser-output"><div class="mw-parser-output"><div class="mw-parser-output"><div class="mw-parser-output"><div class="mw-parser-output"> | </div> <div class="mw-parser-output"><div class="mw-parser-output"><div class="mw-parser-output"><div class="mw-parser-output"><div class="mw-parser-output"><div class="mw-parser-output"><div class="mw-parser-output"><div class="mw-parser-output"><div class="mw-parser-output"><div class="mw-parser-output"> | ||
| + | <div class="mw-parser-output"> | ||
<div class="mw-parser-output"> | <div class="mw-parser-output"> | ||
<div class="mw-parser-output"> | <div class="mw-parser-output"> | ||
= History and Reconciling = | = History and Reconciling = | ||
| + | To get to your Data Sources and History, simply click on the DMR and You will see the options on the top right of the Departments tab list. | ||
| + | |||
| + | [[File:DMR Data Sources and History.png]] | ||
| + | |||
| + | | ||
| + | <div class="mw-parser-output"> | ||
== Data Sources == | == Data Sources == | ||
This Page will display all instances of Data transferring to the DMR or not transferring to the DMR. This will display an Orange Warning/Notification on the Call/Job/Order to ensure there is a simple way to view and rectify the instance. | This Page will display all instances of Data transferring to the DMR or not transferring to the DMR. This will display an Orange Warning/Notification on the Call/Job/Order to ensure there is a simple way to view and rectify the instance. | ||
| − | [[File:DMR data sources overview.png]] | + | [[File:DMR data sources overview.png|RTENOTITLE]] |
| − | Once you | + | Once you see that there may be objects that need to be rectified; you can select the Call, Jobs or Orders Tab to view all data. This allows you to easily View Primary Job Type, Category, Department and The Type/Opportunities that were available for that Instance. |
By clicking on the Job Number you can adjust Types/Opportunities for that Job. By using the Button on the right you can instantly run a detailed report in DMR History for that Object. | By clicking on the Job Number you can adjust Types/Opportunities for that Job. By using the Button on the right you can instantly run a detailed report in DMR History for that Object. | ||
| − | [[File:DMR data sources jobs.png]] | + | [[File:DMR data sources jobs.png|RTENOTITLE]] |
| | ||
| + | </div> <div class="mw-parser-output"><div class="mw-parser-output"> | ||
| + | == History == | ||
| + | |||
| + | The History Option will allow you to Filter by: | ||
| + | |||
| + | *Month | ||
| + | *User | ||
| + | *Object | ||
| + | *DMR Category | ||
| + | *DMR Department | ||
| + | *DMR Type<br/> <br/> This will give you the tools necessary to double check and rectify an inconsistencies you may find in your DMR or verifying your expectations of the functionality. <br/> <br/> | ||
| + | |||
| + | You can see here that we have filtered by a Job Number. This has provided us with a timestamp of the interaction, the user it applies to, the Category, Department and Service; as well as the reason it was added and what changed in that instance. | ||
| − | + | You can use this tool to directly correlate the processes to the Report. | |
| + | |||
| + | [[File:DMR History.png|RTENOTITLE]] | ||
| | ||
| − | |||
| + | ''DMR Correlation from opportunities on the Job object above <span style="color:#bdc3c7;">(Dispatched Job was not Included, just the selected Opportunities from the Job)</span>'' | ||
| + | |||
| + | [[File:DMR History connection.png|RTENOTITLE]] | ||
| + | </div> </div> </div> | ||
| + | |||
| + | <div class="mw-parser-output"> | ||
| + | <div class="mw-parser-output"> | ||
= Common Challenges = | = Common Challenges = | ||
| − | <span style="font-size:medium;">'''Data not | + | <span style="font-size:medium;">'''Data not showing up in the DMR.'''</span> |
| − | 1. Check the job is dispatched | + | 1. Check the job is dispatched on the proper tech or representative. |
| − | *If an order created already and | + | *If an order created already and submitted, unsubmit the order then assign the job to the tech. |
| − | 2. Check on the " | + | 2. Check on the "Job info" page, make sure it has all info on the right. Category, Department, and Job type(s) |
| − | *If an order was already | + | *If an order was already submitted, unsubmit the order then add the Category, Department, and Job type(s), now you can resubmit. |
3. Check that the tech or Representative was the one that created the order. | 3. Check that the tech or Representative was the one that created the order. | ||
| − | *You can have them recreate their own | + | *You can have them recreate their own order or you can manually type te data into the DMR. |
| | ||
| − | <span style="font-size:large;">'''The Job didn't have the Type(s) on it when the tech or representative | + | <span style="font-size:large;">'''The Job didn't have the Type(s) on it when the tech or representative submitted their order.'''</span> |
| − | *If an order was already | + | *If an order was already submitted, unsubmit the order then add the Category, Department, and Job type(s), now you can resubmit. |
| | ||
| − | + | '''How to track down missing data that should be in the DMR:''' Use the History and Reconciliation Instruction above. | |
| − | + | | |
| − | |||
| − | |||
| − | |||
| − | |||
| | ||
| − | |||
| − | |||
</div> | </div> | ||
Latest revision as of 07:41, 7 October 2021
Contents
Setup - SOP
Full SOP
ThermoGRID_-_Administration_-_Set-Up_11_-_Daily_Management_Report.docx
Screenshots
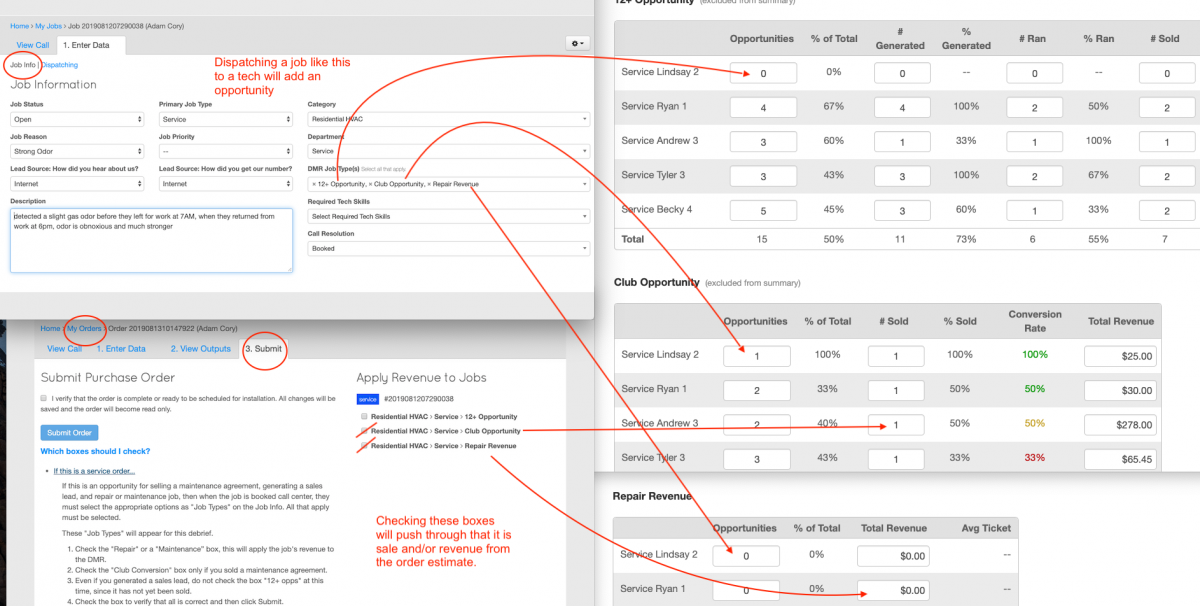
Change Names of category (Calls, job page)
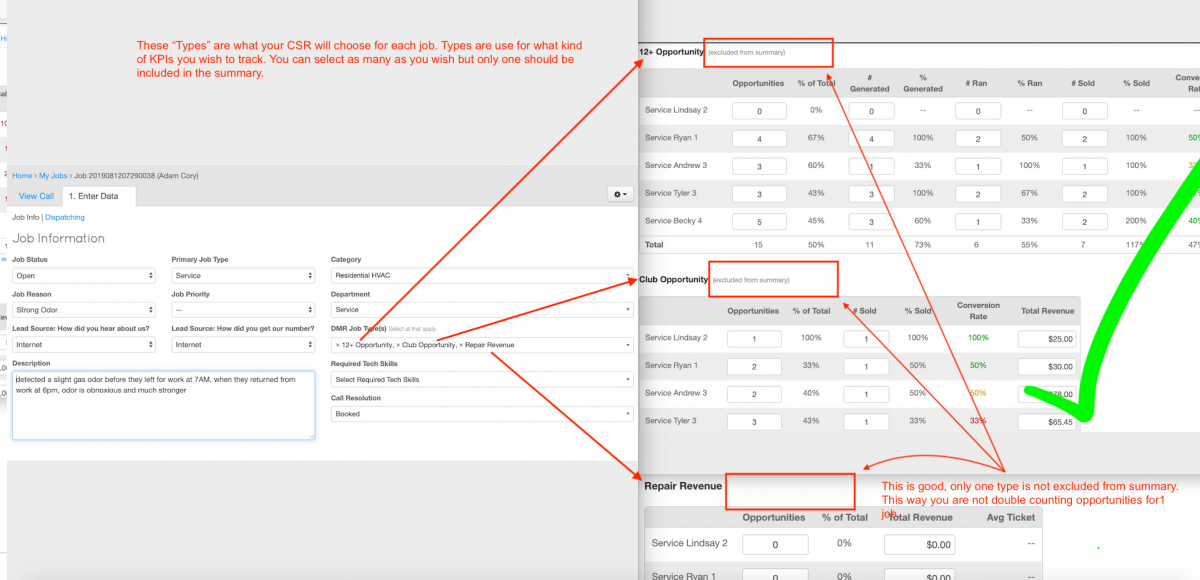
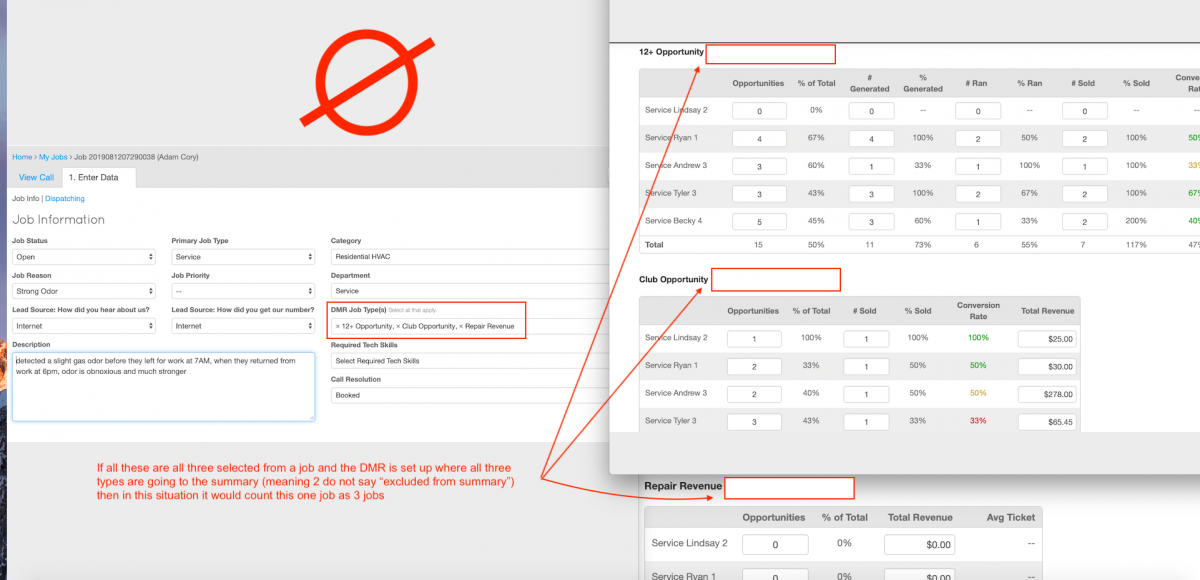
This drop dow area is strictly for the DMR and for the Call Center Department. To change these you would go to Reports, Daily Management, Settings, Choose a Category, then go to types. The ones that will change this area are in the Call Center Department.
This drop down area is strictly for the DMR and for the Service, Install or Sales Department. To change these you would go to Reports, Daily Management, Settings, Choose a Category, then go to types. The ones that will change this area are in the Service, Install or Sales Department.
The drop down area to the right for the category and department can be changed in the DMR as well. This all can be done by following the steps above.
History and Reconciling
To get to your Data Sources and History, simply click on the DMR and You will see the options on the top right of the Departments tab list.
Data Sources
This Page will display all instances of Data transferring to the DMR or not transferring to the DMR. This will display an Orange Warning/Notification on the Call/Job/Order to ensure there is a simple way to view and rectify the instance.
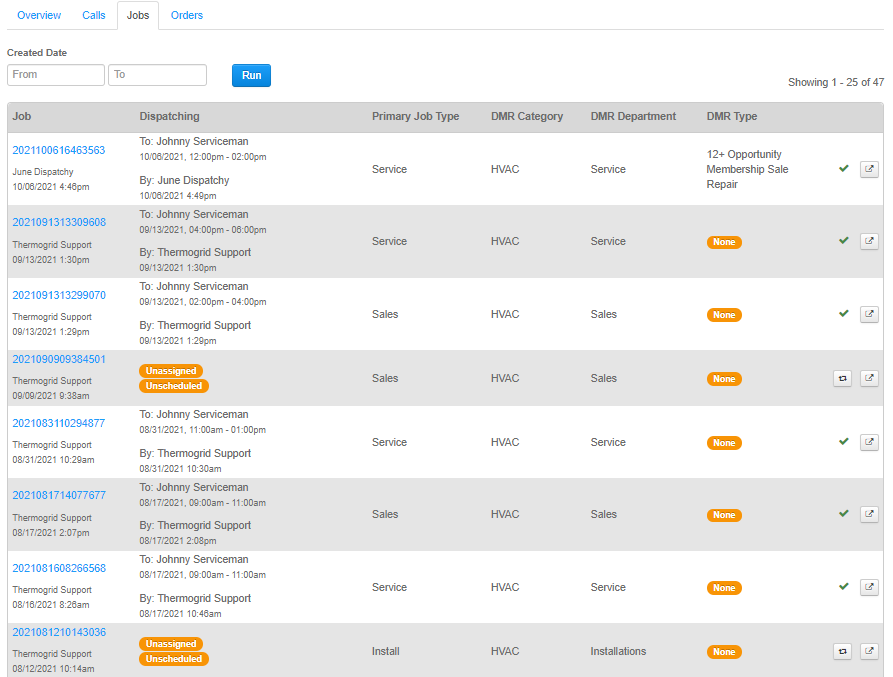
Once you see that there may be objects that need to be rectified; you can select the Call, Jobs or Orders Tab to view all data. This allows you to easily View Primary Job Type, Category, Department and The Type/Opportunities that were available for that Instance.
By clicking on the Job Number you can adjust Types/Opportunities for that Job. By using the Button on the right you can instantly run a detailed report in DMR History for that Object.
History
The History Option will allow you to Filter by:
- Month
- User
- Object
- DMR Category
- DMR Department
- DMR Type
This will give you the tools necessary to double check and rectify an inconsistencies you may find in your DMR or verifying your expectations of the functionality.
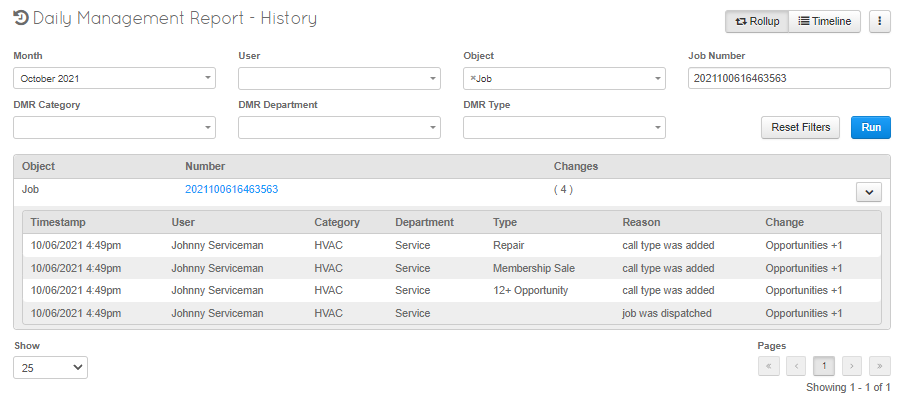
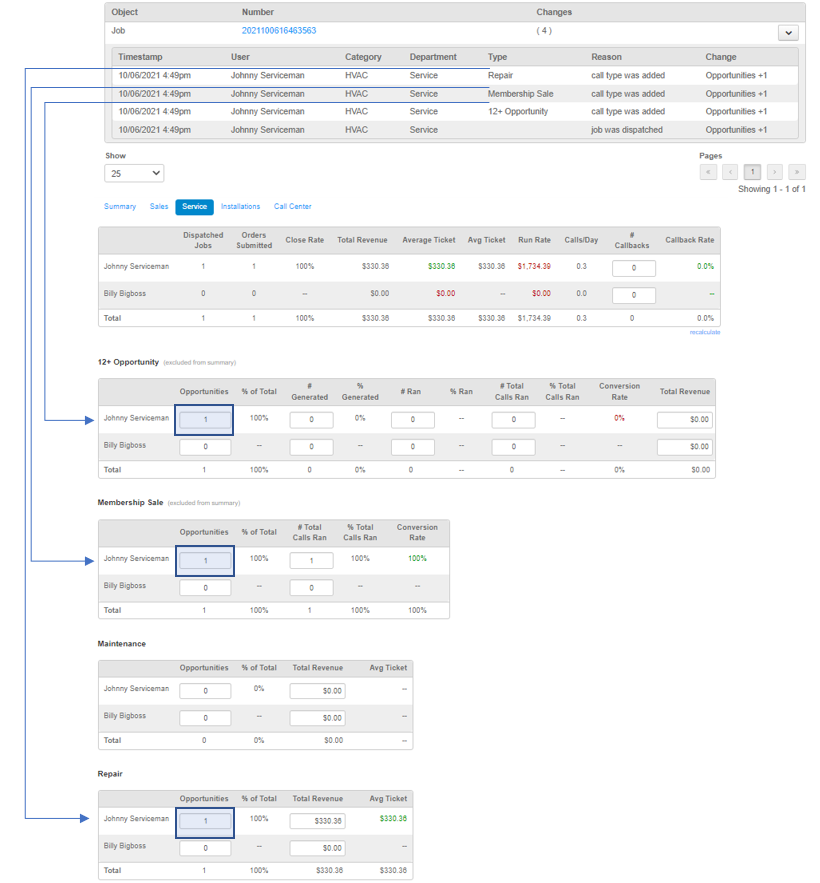
You can see here that we have filtered by a Job Number. This has provided us with a timestamp of the interaction, the user it applies to, the Category, Department and Service; as well as the reason it was added and what changed in that instance.
You can use this tool to directly correlate the processes to the Report.
DMR Correlation from opportunities on the Job object above (Dispatched Job was not Included, just the selected Opportunities from the Job)
Common Challenges
Data not showing up in the DMR.
1. Check the job is dispatched on the proper tech or representative.
- If an order created already and submitted, unsubmit the order then assign the job to the tech.
2. Check on the "Job info" page, make sure it has all info on the right. Category, Department, and Job type(s)
- If an order was already submitted, unsubmit the order then add the Category, Department, and Job type(s), now you can resubmit.
3. Check that the tech or Representative was the one that created the order.
- You can have them recreate their own order or you can manually type te data into the DMR.
The Job didn't have the Type(s) on it when the tech or representative submitted their order.
- If an order was already submitted, unsubmit the order then add the Category, Department, and Job type(s), now you can resubmit.
How to track down missing data that should be in the DMR: Use the History and Reconciliation Instruction above.


