Difference between revisions of "VoIP"
| (23 intermediate revisions by 2 users not shown) | |||
| Line 1: | Line 1: | ||
<div class="mw-parser-output"><div class="mw-parser-output"><div class="mw-parser-output"><div class="mw-parser-output"><div class="mw-parser-output"> | <div class="mw-parser-output"><div class="mw-parser-output"><div class="mw-parser-output"><div class="mw-parser-output"><div class="mw-parser-output"> | ||
| + | <div class="mw-parser-output"> | ||
<div class="mw-parser-output"> | <div class="mw-parser-output"> | ||
<div class="mw-parser-output"> | <div class="mw-parser-output"> | ||
| Line 18: | Line 19: | ||
You as a business must have a proper voicemail for any number on your account. A proper vm is one that will automatically end a vm when there is no one speaking. I you do not have a auto terminate voicemail you may have a 2 hour delay at receiving the vm and you may be charged for a 2 hour call each time there is a vm. | You as a business must have a proper voicemail for any number on your account. A proper vm is one that will automatically end a vm when there is no one speaking. I you do not have a auto terminate voicemail you may have a 2 hour delay at receiving the vm and you may be charged for a 2 hour call each time there is a vm. | ||
| − | </div> | + | <div class="mw-parser-output"> |
| + | <div class="mw-parser-output"> | ||
| + | <div class="mw-parser-output"> | ||
| + | <div class="mw-parser-output"> | ||
| + | <div class="mw-parser-output"> | ||
| + | <div class="mw-parser-output"> | ||
| + | <div class="mw-parser-output"> | ||
| + | <div class="mw-parser-output"> | ||
| + | = Change your browser settings: = | ||
| + | <div class="mw-parser-output"> | ||
| + | <u>'''What's Changing'''</u> | ||
| + | |||
| + | In an upcoming version of the Google Chrome browser, Google will be tightening restrictions around when audio and video content is allowed to play. For desktop browsers, Chrome will only allow sites to play audio and video automatically if it passes what it calls a "Media Engagement Index" (MEI). While the formula for meeting the MEI threshold is proprietary, the general idea is that the more a user interacts with a website, the higher their MEI score will be for that site. | ||
| + | |||
| + | <u>'''What it will impact'''</u> | ||
| + | |||
| + | This change will have the possibility of impacting our Voice over Internet Protocol (VoIP) integration in the browser client. Whenever a page loads, if a user does not have a high enough MEI score, ThermoGRID will not be able to auto play audio for sounds such as incoming call ringtones, dial pad buttons, etc. | ||
| + | |||
| + | This will also effect any other product or services you use that automatically do things. | ||
| + | |||
| + | <u>'''Our efforts to cause you to be aware'''</u> | ||
| + | |||
| + | To mitigate this, we will be pushing out a feature that turns the phone icon red when it is unable to auto-play audio. When the icon is red, the user will not receive any incoming calls in their browser. To be able to take calls, a user can click the phone icon to allow it to be able to play audio as it normally would. | ||
| + | |||
| + | If you notice that you are seeing the phone icon turn red frequently, Chrome does offer an option to turn off this restriction. To turn off this restriction: | ||
| + | |||
| + | <u>'''Steps to resolve'''</u> | ||
| + | |||
| + | 1) Type "chrome://flags/#autoplay-policy" into your address bar. (Just type in what is in the quotes nothing else... NO "www.") | ||
| + | |||
| + | 2) Change this setting from "Default" to "No user gesture is required." | ||
| + | |||
| + | 3) Close and restart Chrome. | ||
| + | </div> | ||
| + | '''<span style="font-size:large;">Other settings:</span>''' | ||
| + | |||
| + | #Login to ThermoGRID | ||
| + | #Click paddle lock in top left address bar. | ||
| + | #Site Settings | ||
| + | #Scroll down to sound | ||
| + | #Change automatic default to Allow | ||
</div> | </div> | ||
| + | <div class="mw-parser-output"> | ||
| + | <div class="mw-parser-output"> | ||
= Set up Numbers = | = Set up Numbers = | ||
| Line 29: | Line 72: | ||
When you send in this application make sure you attach a current statement/bill from your current provider that shows the numbers are yours and make sure the billing info matches on both documents. | When you send in this application make sure you attach a current statement/bill from your current provider that shows the numbers are yours and make sure the billing info matches on both documents. | ||
| − | Before porting numbers buy a random number in | + | Before porting numbers buy a random number in ThermoGrid. This will ensure you know what to expect when it comes to using our VoIP system. <u>Once you port your numbers it is not fast nor easy to port back.</u> |
| | ||
| Line 35: | Line 78: | ||
'''New Numbers:''' | '''New Numbers:''' | ||
| − | + | Go to Administration > Manage Communication > Communication Integrations | |
| − | <div class="mw-parser-output"> </div> < | + | |
| + | [[File:Admin Voip.png|RTENOTITLE]] | ||
| + | |||
| + | On the Communication Integration Page you will be able to see: | ||
| + | |||
| + | *Your list of Phone Numbers | ||
| + | *Usage | ||
| + | *Recordings | ||
| + | *Voicemail Prompts | ||
| + | |||
| + | [[File:Voip Page.png|RTENOTITLE]] | ||
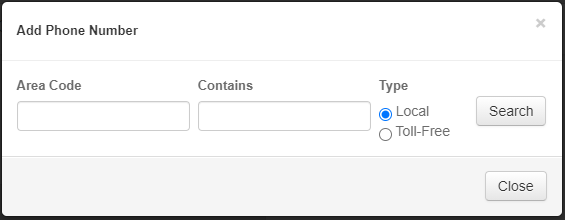
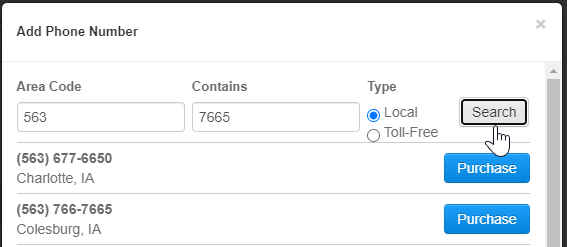
| + | <div class="mw-parser-output">Click the Add number Button to Choose a new Number for your Company. </div> <div class="mw-parser-output">[[File:Add number.png|RTENOTITLE]]</div> <div class="mw-parser-output"> </div> <div class="mw-parser-output">A Modal Will Appear that has an Option for Area Code and And Option to Get a number that contains a certain characters: </div> <div class="mw-parser-output">[[File:Choose Number.png|RTENOTITLE]]</div> <div class="mw-parser-output"> </div> <div class="mw-parser-output"> Lets say I wanted the word "Pool" I would search for 7665 in the "Contains" field and click Search</div> <div class="mw-parser-output">[[File:Search Number.png|RTENOTITLE]]</div> <div class="mw-parser-output"> </div> <div class="mw-parser-output">From Here you can Purchase these numbers and use them for incoming or outgoing calls in ThermoGrid. </div> <div class="mw-parser-output"> </div> | ||
| + | [https://help.thermogrid.com/index.php/Rates Rates] | ||
| + | |||
| + | <div class="mw-parser-output"> | ||
| + | = Usage = | ||
| + | |||
| + | Click on the Dropdown arrow next the The Usage Title to view your current Usage. You have the option to use the Date Fields to filter out specific timeframes. | ||
| + | |||
| + | [[File:Voip Usage.png|RTENOTITLE]] | ||
| + | |||
| + | | ||
| + | |||
| + | = Recordings = | ||
| + | |||
| + | All Call Recordings can be easily viewed from here, Use the Arrow to play and the trashcan to delete the recording. | ||
| + | |||
| + | [[File:Voip Recordings.png]] | ||
| + | |||
| + | | ||
| + | </div> | ||
| + | |||
| + | <div class="mw-parser-output"> | ||
= Set up Voicemail = | = Set up Voicemail = | ||
| Line 43: | Line 118: | ||
Click: | Click: | ||
| − | + | Administration > Manage Communications > Communication Integrations > Voicemail Prompts | |
| − | + | ||
| − | + | *Here you can set up a voicemail by typing in text "+New Text Prompt" or uploading an mp3 (must be mp3) "+New Recording Prompt | |
| − | + | *When adding a text prompt you can put a title in this is just a reference name for the voicemail. Then you can add the Prompt this is what the system will say as your voicemail. Then Create. | |
| − | + | *When adding the Recording you can put in the title of what you want to call this voicemail then upload an mp3. Then Create<br/> [[File:Voip Voicemail.png]] | |
| − | + | ||
| − | + | <br/> After you have added your voicemail prompt click the edit symbol, (pencil) next to a number you want to add your vm to. You can have different voicemails for each number if you choose. | |
| + | |||
| + | | ||
| − | + | [[File:Edit Number.png]] | |
Once you are in the number you will see a drop down you can click that says "Voicemail", this is located under the call routing. | Once you are in the number you will see a drop down you can click that says "Voicemail", this is located under the call routing. | ||
| + | |||
| + | [[File:Add Voicemail.png]] | ||
Choose if you want to use the text or recording based on what you set up on the previous page. choose the prompt name that you called this voicemail on the previous page and add email address on who you want to receive the voicemails. You can add as many emails as you wish and they will all receive the recorded voicemail from your callers. | Choose if you want to use the text or recording based on what you set up on the previous page. choose the prompt name that you called this voicemail on the previous page and add email address on who you want to receive the voicemails. You can add as many emails as you wish and they will all receive the recorded voicemail from your callers. | ||
| | ||
| − | </div> | + | </div> |
| + | |||
| + | <div class="mw-parser-output"> | ||
| + | <div class="mw-parser-output"> | ||
= Call Forwarding = | = Call Forwarding = | ||
After your numbers are ported in or new ones are setup click: | After your numbers are ported in or new ones are setup click: | ||
| − | + | Administration > Manage Communications > Communication Integrations > Pencil (Edit) next to the number | |
| − | |||
| − | |||
| − | |||
| − | Then you '''+Add Call Route '''and put in the Ring Duration | + | Then you '''+Add Call Route '''and put in the Ring Duration, The Type of Route, and the User or Number for the Call. |
| − | + | Types: | |
| − | *Company Phone = this would be the phone number in your company settings. | + | *Company Phone = this would be the phone number in your company settings. |
| − | *User Phone = This would be the cell phone number the user has tied to them. | + | *User Phone = This would be the cell phone number the user has tied to them. |
*User Browser = This will be the reps TG browser account. | *User Browser = This will be the reps TG browser account. | ||
| + | |||
| + | [[File:Add Call Route.png|RTENOTITLE]] | ||
| + | |||
| + | [[File:Manage Call Route.png|RTENOTITLE]] | ||
| + | |||
| + | '''please note that if the Ring Duration is too long the device might make the call go to voice mail before transferring to a new number. If you are not adding another number to transfer to after the first one this is not an issue.''' | ||
You can add Multiple Destinations on one route and it will ring to all at the same time. | You can add Multiple Destinations on one route and it will ring to all at the same time. | ||
| + | |||
| + | [[File:Manage Call Route Multiple.png|RTENOTITLE]] | ||
| + | |||
| + | To add the Next Route that will Ring after the First Just Choose "+ Add Call Route" again and repeat the Process | ||
| + | |||
| + | '''''<span style="background-color:#f1c40f;"> </span><u><span style="background-color:#f1c40f;">Caution!</span></u><span style="background-color:#f1c40f;"> Be careful not to create a loop! For example, if you set up a virtual number that forwards to the company phone number, and set up the company phone number to forward to the same virtual number, this will create a loop. Loops can create an infinite number of calls or texts by forwarding back and forth and accumulate a very large bill. You are responsible for any usage charges, including those created by creating a loop.</span>''''' | ||
| + | |||
| + | | ||
| | ||
| + | |||
| + | This is what a 1 Min Call would look like, it is routed after 30 seconds and will ring in the second route 30 Seconds. Routes can have multiple destinations as shown above. | ||
| + | |||
| + | [[File:2 Routed Calls.png]] | ||
| | ||
| | ||
| + | <div class="mw-parser-output"> </div> </div> | ||
| + | <div class="mw-parser-output"> | ||
= Marketing = | = Marketing = | ||
Do this to tie a phone number to a marketing campaign so it will automatically track it. | Do this to tie a phone number to a marketing campaign so it will automatically track it. | ||
| − | + | Administration > Manage Dropdowns > Job Data > Job Lead Sources | |
| + | |||
| + | [[File:Job Lead Sources Marketing.png]] | ||
| + | |||
| + | Then you can select the number with each lead source. By doing this when a client calls in on this lead source and a Job is created, the Job will already have the Prefilled data for the Lead Source. | ||
| − | + | [[File:Job Lead Sources Marketing Number.png]] | |
| − | |||
| − | |||
| − | |||
| − | + | | |
| + | <div class="mw-parser-output"><div class="mw-parser-output"><div class="mw-parser-output"><div class="mw-parser-output"><div class="mw-parser-output"><div class="mw-parser-output"><div class="mw-parser-output"> <div class="mw-parser-output"> </div> </div> </div> </div> </div> </div> </div> </div> </div> | ||
| + | |||
| + | <div class="mw-parser-output"> | ||
| + | = Text Forwarding = | ||
| | ||
| − | + | ||
| + | Instructions | ||
| + | |||
| + | #Administration > Manage Communications > Communication Integrations | ||
| + | #Under the "Phone Numbers" click the pencil to edit. | ||
| + | #Click Incoming Text/SMS | ||
| + | #+ Add SMS Route (Do NOT use a VoIP number to forward to)<br/> <br/> [[File:Voip Text.png]] | ||
| + | |||
| + | Add a Destination Type and Choose the Number, Hit Save. | ||
| + | |||
| + | [[File:Voip Text Save.png]] | ||
| + | </div> | ||
| + | |||
= Using VoIP = | = Using VoIP = | ||
| Line 105: | Line 221: | ||
[[Rates|Rates]] | [[Rates|Rates]] | ||
<div class="mw-parser-output"><div class="mw-parser-output"> | <div class="mw-parser-output"><div class="mw-parser-output"> | ||
| + | <div class="mw-parser-output"> | ||
<div class="mw-parser-output"> | <div class="mw-parser-output"> | ||
== Make a Call == | == Make a Call == | ||
| Line 113: | Line 230: | ||
#Begin Call | #Begin Call | ||
#From here you can create a N'''ew Call''' or select an E'''xisting Call''' | #From here you can create a N'''ew Call''' or select an E'''xisting Call''' | ||
| − | This will automatically record the call and attach it to the call you are adding a job to.</div> <div class="mw-parser-output"><div class="mw-parser-output">Make sure popups are enabled for your browser for this site or you will not be able to add a call.</div> </div> | + | This will automatically record the call and attach it to the call you are adding a job to.</div> <div class="mw-parser-output"><div class="mw-parser-output">Make sure popups are enabled for your browser for this site or you will not be able to add a call.</div> <div class="mw-parser-output">[[File:Voip Making a Call.png|1000px]]</div> </div> |
| − | |||
| − | |||
| | ||
| Line 121: | Line 236: | ||
If you place a call & get (no ringing) our own hold music- it's because the line is busy. | If you place a call & get (no ringing) our own hold music- it's because the line is busy. | ||
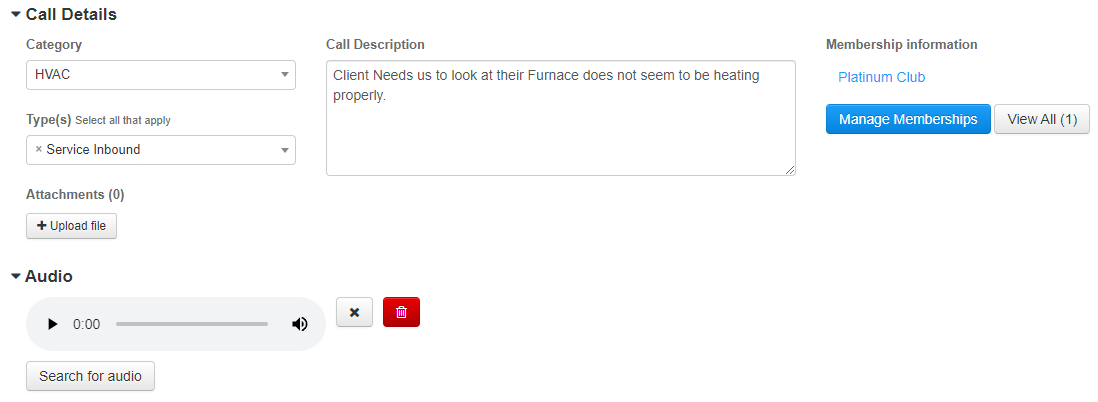
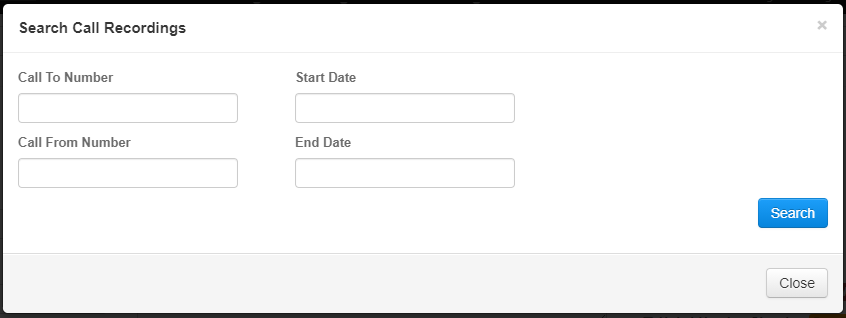
| − | <div class="mw-parser-output"> </div> </div> | + | <div class="mw-parser-output">[[File:Voip New Call.png]]</div> <div class="mw-parser-output">When you Select "New Call" a New Window will Open with the Phone Number in the "Primary Phone Number" Field and will search for the Client</div> <div class="mw-parser-output"> </div> <div class="mw-parser-output">[[File:Voip Client Search.png]]</div> <div class="mw-parser-output"> </div> <div class="mw-parser-output">When you select the Client you will be able to see the Audio on the Call as well as search for any other Recordings that may need to be attached to this Call. </div> <div class="mw-parser-output">[[File:Voip Recording on Call.png|border]]</div> <div class="mw-parser-output"><div class="mw-parser-output"> </div> <div class="mw-parser-output">If you are searching for a Call you can use these parameters:</div> |
| + | *Call to number | ||
| + | *Call from Number | ||
| + | *Start Date | ||
| + | *End Date | ||
| + | |||
| + | [[File:Search Call Recordings.png]] | ||
| + | </div> </div> | ||
== Take a Call == | == Take a Call == | ||
| Line 131: | Line 253: | ||
#From here you can create a N'''ew Call''' or select an E'''xisting Call''' | #From here you can create a N'''ew Call''' or select an E'''xisting Call''' | ||
| − | This will automatically record the call and attach it to the call you are adding a job to. | + | This will automatically record the call and attach it to the call you are adding a job to. Make sure popups are enabled for your browser for this site or you will not be able to add a call. |
| − | Make sure popups are enabled for your browser for this site or you will not be able to add a call. | ||
Latest revision as of 09:41, 29 October 2021
Contents
Before we begin
Let your ThermoGRID representative know what your current operation looks like to ensure we can provide the same or let you know how it will operate with us. It is recommended to have a mainline for your business and use the VoIP system to have multiple numbers, track marketing, and record calls so they can be auto added to your jobs in ThermoGRID.
Before porting numbers buy a random number in ThermoGRID. This will ensure you know what to expect when it comes to using our VoIP system. Once you port your numbers it is not fast nor easy to port back. With this number you purchase you will get full training and be able to fully test the features and be ready for your numbers to go live.
You as a business must have a proper voicemail for any number on your account. A proper vm is one that will automatically end a vm when there is no one speaking. I you do not have a auto terminate voicemail you may have a 2 hour delay at receiving the vm and you may be charged for a 2 hour call each time there is a vm.
Change your browser settings:
What's Changing
In an upcoming version of the Google Chrome browser, Google will be tightening restrictions around when audio and video content is allowed to play. For desktop browsers, Chrome will only allow sites to play audio and video automatically if it passes what it calls a "Media Engagement Index" (MEI). While the formula for meeting the MEI threshold is proprietary, the general idea is that the more a user interacts with a website, the higher their MEI score will be for that site.
What it will impact
This change will have the possibility of impacting our Voice over Internet Protocol (VoIP) integration in the browser client. Whenever a page loads, if a user does not have a high enough MEI score, ThermoGRID will not be able to auto play audio for sounds such as incoming call ringtones, dial pad buttons, etc.
This will also effect any other product or services you use that automatically do things.
Our efforts to cause you to be aware
To mitigate this, we will be pushing out a feature that turns the phone icon red when it is unable to auto-play audio. When the icon is red, the user will not receive any incoming calls in their browser. To be able to take calls, a user can click the phone icon to allow it to be able to play audio as it normally would.
If you notice that you are seeing the phone icon turn red frequently, Chrome does offer an option to turn off this restriction. To turn off this restriction:
Steps to resolve
1) Type "chrome://flags/#autoplay-policy" into your address bar. (Just type in what is in the quotes nothing else... NO "www.")
2) Change this setting from "Default" to "No user gesture is required."
3) Close and restart Chrome.
Other settings:
- Login to ThermoGRID
- Click paddle lock in top left address bar.
- Site Settings
- Scroll down to sound
- Change automatic default to Allow
Set up Numbers
Existing numbers:
To port numbers from a different carrier fill out this document Here
When you send in this application make sure you attach a current statement/bill from your current provider that shows the numbers are yours and make sure the billing info matches on both documents.
Before porting numbers buy a random number in ThermoGrid. This will ensure you know what to expect when it comes to using our VoIP system. Once you port your numbers it is not fast nor easy to port back.
New Numbers:
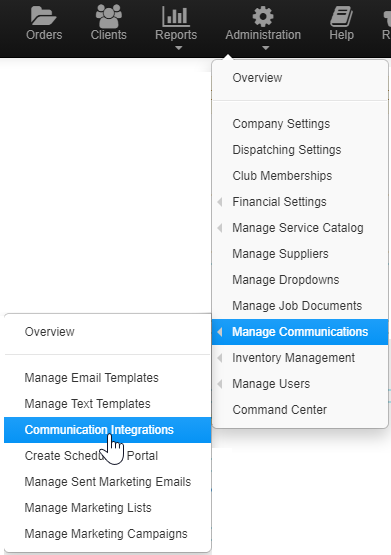
Go to Administration > Manage Communication > Communication Integrations
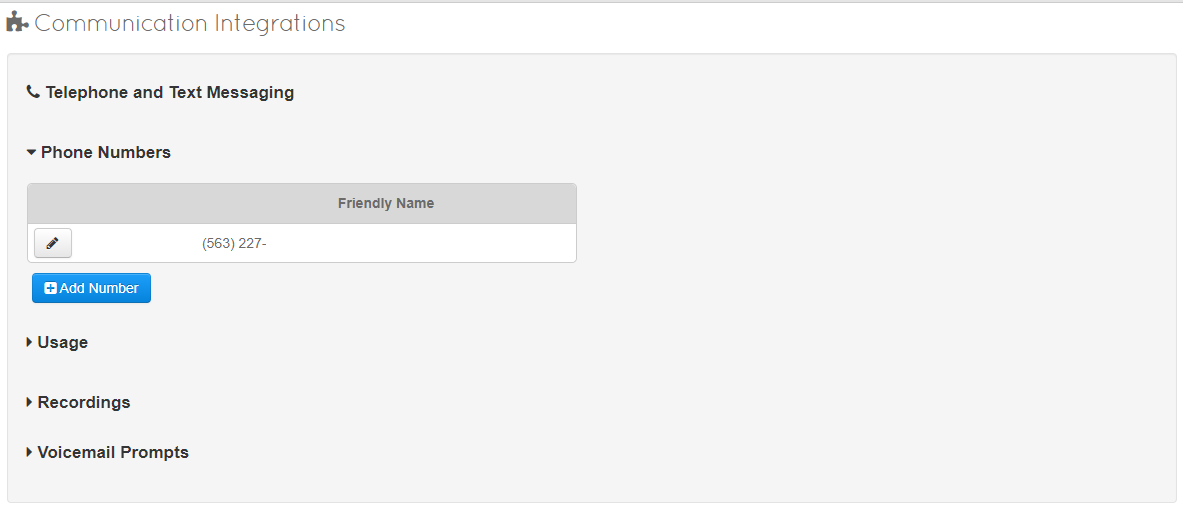
On the Communication Integration Page you will be able to see:
- Your list of Phone Numbers
- Usage
- Recordings
- Voicemail Prompts
Usage
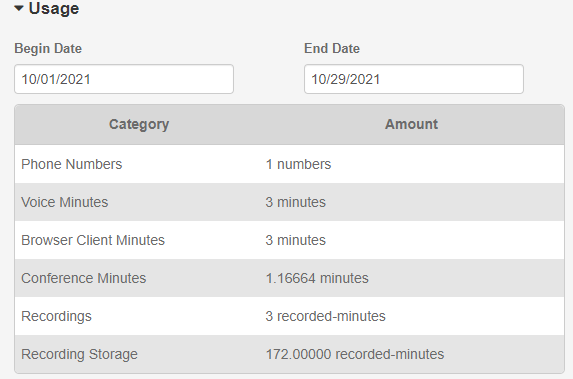
Click on the Dropdown arrow next the The Usage Title to view your current Usage. You have the option to use the Date Fields to filter out specific timeframes.
Recordings
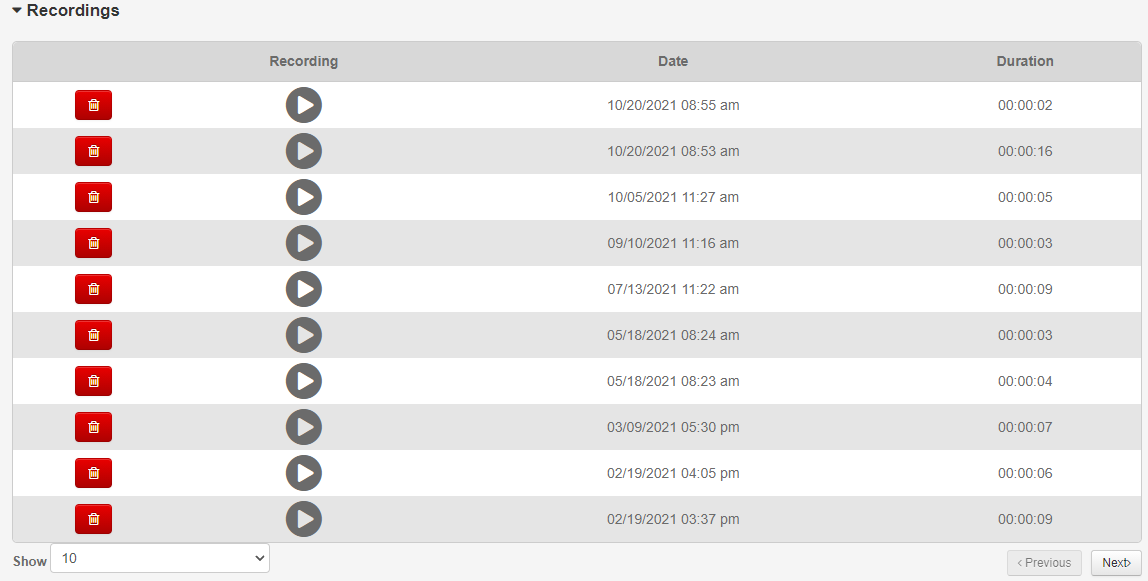
All Call Recordings can be easily viewed from here, Use the Arrow to play and the trashcan to delete the recording.
Set up Voicemail
Click:
Administration > Manage Communications > Communication Integrations > Voicemail Prompts
- Here you can set up a voicemail by typing in text "+New Text Prompt" or uploading an mp3 (must be mp3) "+New Recording Prompt
- When adding a text prompt you can put a title in this is just a reference name for the voicemail. Then you can add the Prompt this is what the system will say as your voicemail. Then Create.
- When adding the Recording you can put in the title of what you want to call this voicemail then upload an mp3. Then Create

After you have added your voicemail prompt click the edit symbol, (pencil) next to a number you want to add your vm to. You can have different voicemails for each number if you choose.
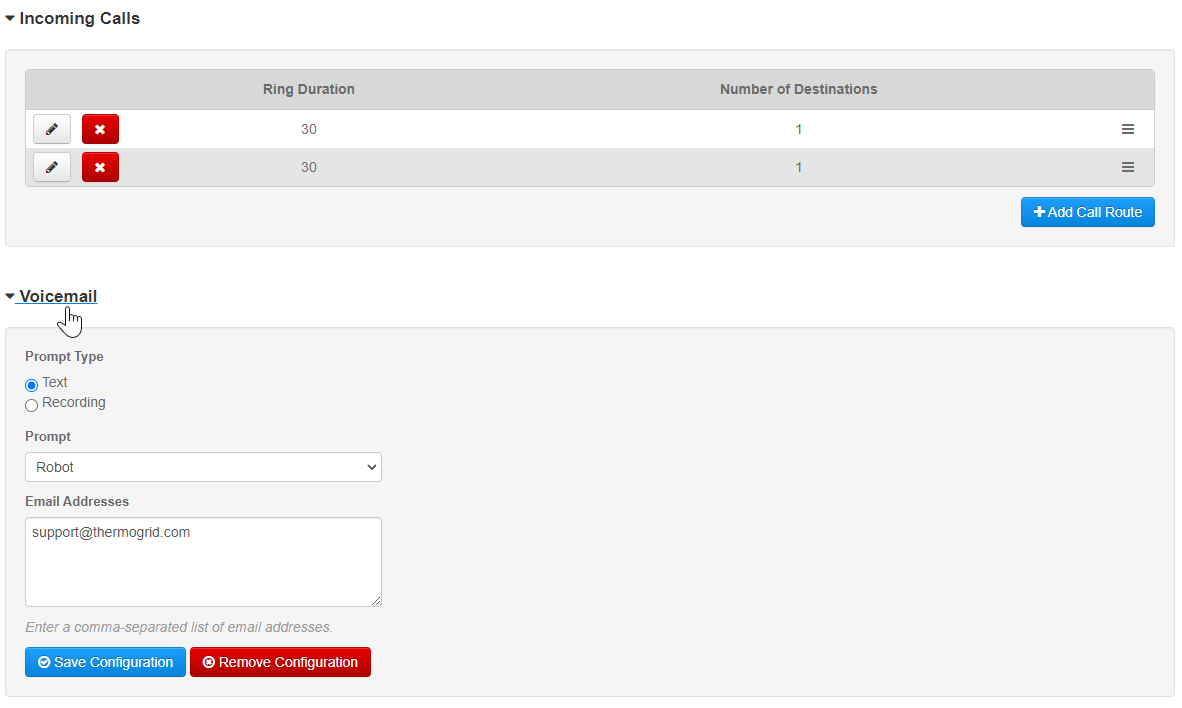
Once you are in the number you will see a drop down you can click that says "Voicemail", this is located under the call routing.
Choose if you want to use the text or recording based on what you set up on the previous page. choose the prompt name that you called this voicemail on the previous page and add email address on who you want to receive the voicemails. You can add as many emails as you wish and they will all receive the recorded voicemail from your callers.
Call Forwarding
After your numbers are ported in or new ones are setup click:
Administration > Manage Communications > Communication Integrations > Pencil (Edit) next to the number
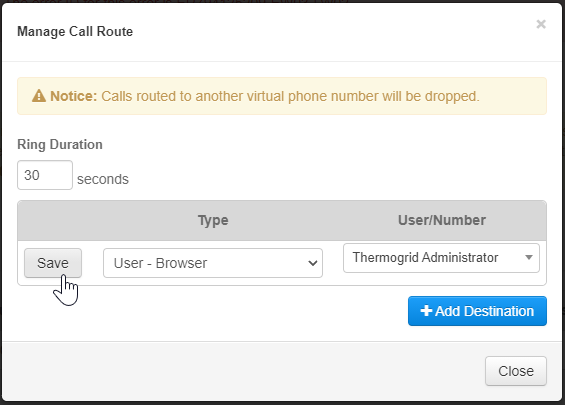
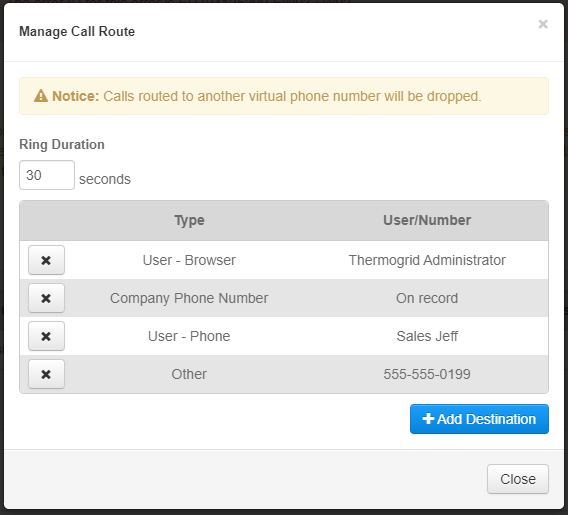
Then you +Add Call Route and put in the Ring Duration, The Type of Route, and the User or Number for the Call.
Types:
- Company Phone = this would be the phone number in your company settings.
- User Phone = This would be the cell phone number the user has tied to them.
- User Browser = This will be the reps TG browser account.
please note that if the Ring Duration is too long the device might make the call go to voice mail before transferring to a new number. If you are not adding another number to transfer to after the first one this is not an issue.
You can add Multiple Destinations on one route and it will ring to all at the same time.
To add the Next Route that will Ring after the First Just Choose "+ Add Call Route" again and repeat the Process
Caution! Be careful not to create a loop! For example, if you set up a virtual number that forwards to the company phone number, and set up the company phone number to forward to the same virtual number, this will create a loop. Loops can create an infinite number of calls or texts by forwarding back and forth and accumulate a very large bill. You are responsible for any usage charges, including those created by creating a loop.
This is what a 1 Min Call would look like, it is routed after 30 seconds and will ring in the second route 30 Seconds. Routes can have multiple destinations as shown above.
Marketing
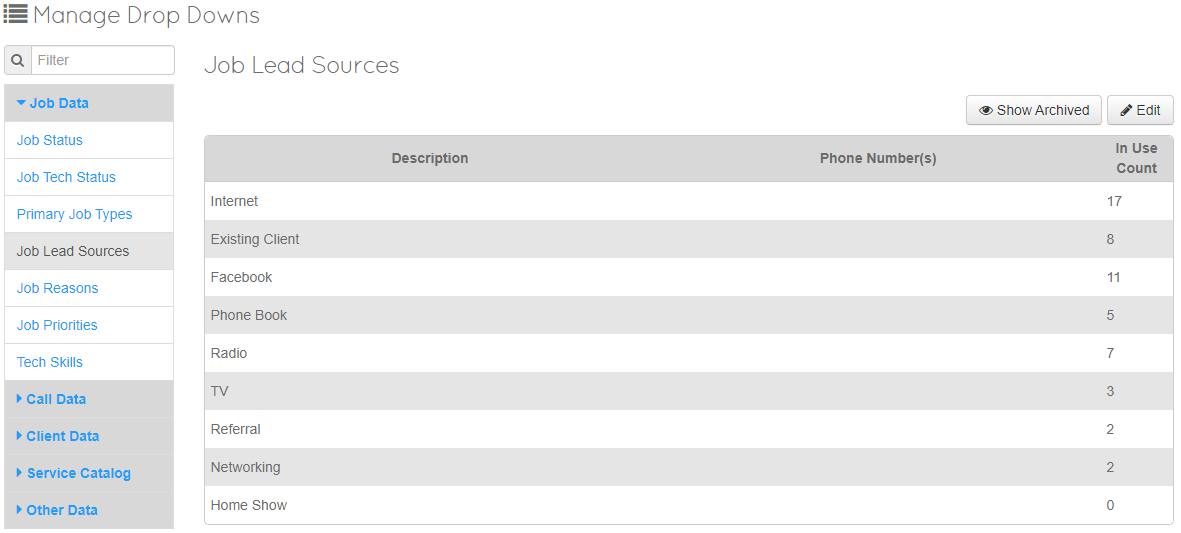
Do this to tie a phone number to a marketing campaign so it will automatically track it.
Administration > Manage Dropdowns > Job Data > Job Lead Sources
Then you can select the number with each lead source. By doing this when a client calls in on this lead source and a Job is created, the Job will already have the Prefilled data for the Lead Source.
Text Forwarding
Instructions
- Administration > Manage Communications > Communication Integrations
- Under the "Phone Numbers" click the pencil to edit.
- Click Incoming Text/SMS
- + Add SMS Route (Do NOT use a VoIP number to forward to)

Add a Destination Type and Choose the Number, Hit Save.
Using VoIP
Make sure popups are enabled for your browser for this site or you will not be able to add a call.
Make a Call
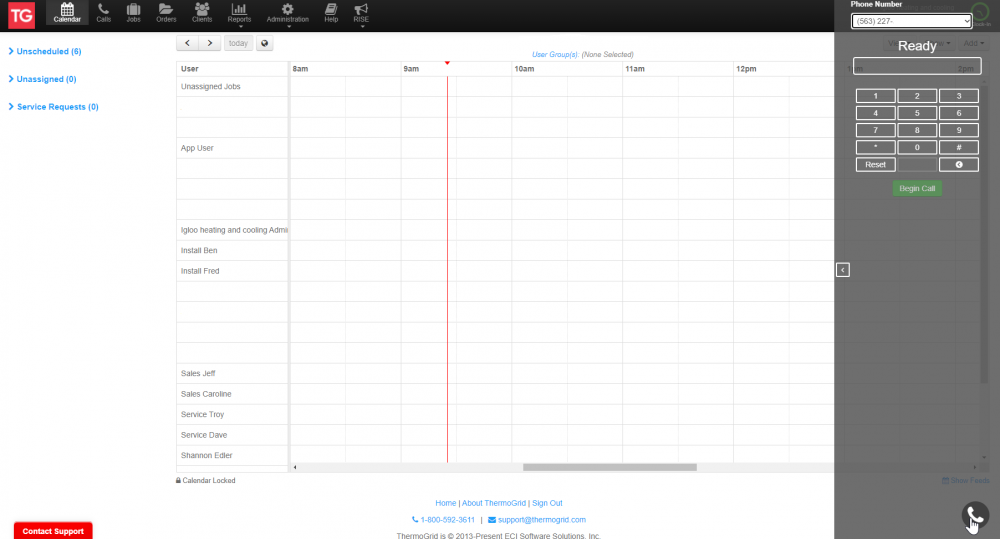
- Click the phone icon in the bottom right of the screen.
- Select a number you wish to call from.
- Dial a number
- Begin Call
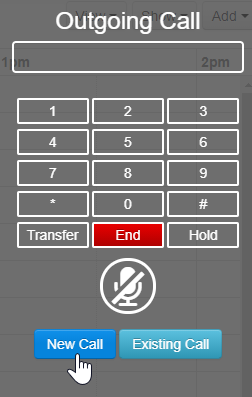
- From here you can create a New Call or select an Existing Call
Getting hold music when making a call.
If you place a call & get (no ringing) our own hold music- it's because the line is busy.
Take a Call
When a client calls your VoIP number it will pop up on your browser and ring.
Click answer
- From here you can create a New Call or select an Existing Call
