Difference between revisions of "App"
| (23 intermediate revisions by the same user not shown) | |||
| Line 1: | Line 1: | ||
| − | + | <div class="mw-parser-output"><div class="mw-parser-output"><div class="mw-parser-output"><div class="mw-parser-output"> | |
| − | <div class="mw-parser-output"> | ||
| − | <div class="mw-parser-output"> | ||
| − | <div class="mw-parser-output"> | ||
= Getting Started = | = Getting Started = | ||
<div class="mw-parser-output"> | <div class="mw-parser-output"> | ||
| Line 12: | Line 9: | ||
| | ||
| − | <div class="mw-parser-output"><div class="mw-parser-output"><div class="mw-parser-output"><div class="mw-parser-output"><div class="mw-parser-output"> | + | <div class="mw-parser-output"><div class="mw-parser-output"><div class="mw-parser-output"><div class="mw-parser-output"><div class="mw-parser-output"><div class="mw-parser-output"><div class="mw-parser-output"><div class="mw-parser-output"><div class="mw-parser-output"><div class="mw-parser-output"><div class="mw-parser-output"><div class="mw-parser-output"><div class="mw-parser-output"> |
| + | <div class="mw-parser-output"> | ||
== <span style="font-size:xx-large;">Android</span> == | == <span style="font-size:xx-large;">Android</span> == | ||
| − | </div> <div class="mw-parser-output"><div class="mw-parser-output"> | + | </div> <div class="mw-parser-output"><div class="mw-parser-output"><div class="mw-parser-output"><div class="mw-parser-output"><div class="mw-parser-output"><div class="mw-parser-output"> |
| − | === How to Uninstall Previous Beta === | + | <div class="mw-parser-output"><div class="mw-parser-output"> |
| + | === <span style="font-size:large;">How to Uninstall Previous Beta</span><!-- overflow:auto; to fix collapsed display, because the toggle link has float:right; --> === | ||
| + | ''expand the section below'' | ||
| + | <div class="toccolours mw-collapsible mw-collapsed" style="width:800px; overflow:auto;"> | ||
#Long Press on the ThermoGrid app icon and select App Info (This can also be done through settings) | #Long Press on the ThermoGrid app icon and select App Info (This can also be done through settings) | ||
#Go to “Storage & Cache” | #Go to “Storage & Cache” | ||
| Line 24: | Line 25: | ||
#Click "Ok" if you get pop up to verify<br/> <br/> [[File:Android Uninstall steps 123 Smaller.png|x500px|RTENOTITLE]] | #Click "Ok" if you get pop up to verify<br/> <br/> [[File:Android Uninstall steps 123 Smaller.png|x500px|RTENOTITLE]] | ||
#[[File:Android Uninstall steps 456 Smaller.png|x500px|RTENOTITLE]] | #[[File:Android Uninstall steps 456 Smaller.png|x500px|RTENOTITLE]] | ||
| − | <div class="mw-parser-output"><div class="mw-parser-output"><div class="mw-parser-output"><div class="mw-parser-output"><div class="mw-parser-output"> | + | </div> <div class="mw-parser-output"><div class="mw-parser-output"><div class="mw-parser-output"><div class="mw-parser-output"><div class="mw-parser-output"><div class="mw-parser-output"> </div> </div> </div> </div> </div> </div> </div> </div> </div> <div class="mw-parser-output"><div class="mw-parser-output"><div class="mw-parser-output"> </div> </div> </div> </div> <div class="mw-parser-output"> </div> </div> </div> </div> <div class="mw-parser-output"> </div> </div></div> |
| − | <div class="mw-parser-output"> | + | |
| − | === How to Install ThermoGrid === | + | === <span style="font-size:xx-large;">How to Install ThermoGrid (Android)</span> === |
| + | |||
| + | ---- | ||
[[File:Google-play-badge.png|387x150px|Google-play-badge.png|link=https://play.google.com/store/apps/details?id=com.thermogrid.thermogrid]] | [[File:Google-play-badge.png|387x150px|Google-play-badge.png|link=https://play.google.com/store/apps/details?id=com.thermogrid.thermogrid]] | ||
| Line 46: | Line 49: | ||
#Paste the API Key in the App and Login <br/> <br/> [[File:06. Administration.png|300x500px|06. Administration.png]] [[File:06. AdminManageUser.png|300x500px|06. AdminManageUser.png]] [[File:06. API Page.png|300x500px|06. API Page.png]] [[File:06. Create API Key.png|300x500px|06. Create API Key.png]] [[File:06. Select User.png|300x500px|06. Select User.png]] | #Paste the API Key in the App and Login <br/> <br/> [[File:06. Administration.png|300x500px|06. Administration.png]] [[File:06. AdminManageUser.png|300x500px|06. AdminManageUser.png]] [[File:06. API Page.png|300x500px|06. API Page.png]] [[File:06. Create API Key.png|300x500px|06. Create API Key.png]] [[File:06. Select User.png|300x500px|06. Select User.png]] | ||
#<br/> [[File:06. zGenerate API.png|300x500px|06. zGenerate API.png]] [[File:06. zzCopy API.png|300x500px|06. zzCopy API.png]] [[File:06. zzPaste API.png|300x500px|06. zzPaste API.png]] [[File:07. AgreetoTaC.png|300x500px|07. AgreetoTaC.png]]<br/> <br/> <br/> <br/> <br/> <br/> <br/> <br/> <br/> <br/> <br/> <br/> | #<br/> [[File:06. zGenerate API.png|300x500px|06. zGenerate API.png]] [[File:06. zzCopy API.png|300x500px|06. zzCopy API.png]] [[File:06. zzPaste API.png|300x500px|06. zzPaste API.png]] [[File:07. AgreetoTaC.png|300x500px|07. AgreetoTaC.png]]<br/> <br/> <br/> <br/> <br/> <br/> <br/> <br/> <br/> <br/> <br/> <br/> | ||
| + | </div> </div> </div> </div> </div> </div> </div> </div> </div> </div> </div> </div> <div class="mw-parser-output"><div class="mw-parser-output"><div class="mw-parser-output"> </div> </div> </div> </div> </div></div> | ||
| − | </div> | + | == <span style="font-size:xx-large;">iOS</span> == |
| − | </ | + | <div class="mw-parser-output"><div class="mw-parser-output"><div class="mw-parser-output"><div class="mw-parser-output"> |
| + | === <span style="font-size:large;">How to Uninstall Previous Beta</span> === | ||
| − | + | ''expand the section below'' | |
| | ||
| − | <div class="mw-parser-output"><div class="mw-parser-output"> | + | <div class="mw-parser-output"><div class="mw-parser-output"><div class="mw-parser-output"><div class="mw-parser-output"><div class="mw-parser-output"><!-- overflow:auto; to fix collapsed display, because the toggle link has float:right; --> <div class="toccolours mw-collapsible mw-collapsed" style="width:700px; overflow:auto;"> |
| − | === | ||
| − | |||
| − | |||
| − | |||
#Select “ThermoGrid” from your Apps list. <br/> [[File:IOS Test Flight List.png|border|280x500px|IOS Test Flight List.png]]<br/> | #Select “ThermoGrid” from your Apps list. <br/> [[File:IOS Test Flight List.png|border|280x500px|IOS Test Flight List.png]]<br/> | ||
#Under “Developer,” tap “Stop Testing” and scroll down<br/> [[File:IOS Click on TG.png|280x500px|IOS Click on TG.png]] [[File:IOS Select Stop Testing.png|280x500px|IOS Select Stop Testing.png]] [[File:IOS Stop Testing.png|280x500px|IOS Stop Testing.png]]<br/> | #Under “Developer,” tap “Stop Testing” and scroll down<br/> [[File:IOS Click on TG.png|280x500px|IOS Click on TG.png]] [[File:IOS Select Stop Testing.png|280x500px|IOS Select Stop Testing.png]] [[File:IOS Stop Testing.png|280x500px|IOS Stop Testing.png]]<br/> | ||
| Line 66: | Line 67: | ||
| | ||
| − | <div class="mw-parser-output"><div class="mw-parser-output"><div class="mw-parser-output"><div class="mw-parser-output"><div class="mw-parser-output"><div class="mw-parser-output"><div class="mw-parser-output"><div class="mw-parser-output"><div class="mw-parser-output"> | + | <div class="mw-parser-output"><div class="mw-parser-output"><div class="mw-parser-output"><div class="mw-parser-output"><div class="mw-parser-output"><div class="mw-parser-output"><div class="mw-parser-output"><div class="mw-parser-output"><div class="mw-parser-output"><div class="mw-parser-output"> </div> </div> |
| − | === How to Install ThermoGrid === | + | Open TestFlight<br/> [[File:IOS Home Screen.png|280x500px|IOS Home Screen.png]] |
| + | </div> </div> </div> </div> </div> </div> </div> </div> </div> </div> </div> </div> </div> </div> </div> </div> | ||
| + | | ||
| + | |||
| + | | ||
| + | |||
| + | | ||
| + | |||
| + | | ||
| + | |||
| + | | ||
| + | |||
| + | | ||
| + | |||
| + | | ||
| + | </div> </div> | ||
| + | <div class="mw-parser-output"> | ||
| + | === <span style="font-size:xx-large;">How to Install ThermoGrid (iOS)</span> === | ||
| + | |||
| + | ---- | ||
Download Test Flight and ThermoGrid Directly from the App Store: | Download Test Flight and ThermoGrid Directly from the App Store: | ||
| Line 96: | Line 116: | ||
| | ||
| + | </div> | ||
| − | |||
| − | |||
| − | |||
| − | |||
| − | |||
| − | |||
| − | |||
| − | |||
| − | |||
| − | |||
= App Usage and Functionality = | = App Usage and Functionality = | ||
| − | |||
<div class="mw-parser-output"> | <div class="mw-parser-output"> | ||
== What is a Beta App? == | == What is a Beta App? == | ||
| Line 119: | Line 129: | ||
You may experience unintended behavior such as crashes or some functionality restriction, Please understand that this may happen with any app in a beta phase and is not isolated to ThermoGrid. | You may experience unintended behavior such as crashes or some functionality restriction, Please understand that this may happen with any app in a beta phase and is not isolated to ThermoGrid. | ||
| − | <div class="mw-parser-output"><div class="mw-parser-output"><div class="mw-parser-output"><div class="mw-parser-output"><div class="mw-parser-output"> </div> </div> </div> </div> </div> </div> | + | <div class="mw-parser-output"><div class="mw-parser-output"><div class="mw-parser-output"><div class="mw-parser-output"><div class="mw-parser-output"> </div> </div> </div> </div> </div> </div> <div class="mw-parser-output"> |
| − | |||
<div class="mw-parser-output"> | <div class="mw-parser-output"> | ||
== Feedback == | == Feedback == | ||
| Line 126: | Line 135: | ||
If you would like to send in a review, request or any general feedback please Click the button below | If you would like to send in a review, request or any general feedback please Click the button below | ||
| − | [[File:Send Feedback.png|Send Feedback.png|link=mailto:support@thermogrid.com?subject= | + | [[File:Send Feedback.png|Send Feedback.png|link=mailto:support@thermogrid.com?subject=ThermoGrid%20Beta%20App%20Feedback]] |
| | ||
| − | <div class="mw-parser-output"> </div> </div> | + | <div class="mw-parser-output"> </div> </div></div> |
== Using the App == | == Using the App == | ||
This next section will go over some basic pages on the App ''(This was done on Android, IPhone will be almost identical except pages are at the bottom)'' | This next section will go over some basic pages on the App ''(This was done on Android, IPhone will be almost identical except pages are at the bottom)'' | ||
| + | <div class="mw-parser-output"> | ||
<div class="mw-parser-output"> | <div class="mw-parser-output"> | ||
=== Calendar === | === Calendar === | ||
The Calendar Page will display slightly different than you Calendar in ThermoGrid Web Based. Instead of a "By the Hour" Calendar you will have all Jobs and Events listed Here. | The Calendar Page will display slightly different than you Calendar in ThermoGrid Web Based. Instead of a "By the Hour" Calendar you will have all Jobs and Events listed Here. | ||
| + | |||
| + | The Jobs and Events will display some information about the Object. | ||
| + | |||
| + | We can see: | ||
| + | |||
| + | * Scheduled Time and Date of the Job | ||
| + | *A Short Description | ||
| + | *Tech Status | ||
| + | *Sync Status | ||
[[File:03. Calendar Main Android.jpg|x700px|03. Calendar Main Android.jpg]] | [[File:03. Calendar Main Android.jpg|x700px|03. Calendar Main Android.jpg]] | ||
| Line 143: | Line 162: | ||
You are able to add Events / Time Off Requests / Compensation requests directly to the Calendar with the "+" Button in the bottom right. | You are able to add Events / Time Off Requests / Compensation requests directly to the Calendar with the "+" Button in the bottom right. | ||
| − | [[File:02. Calendar Add Object Android.jpg|x700px]] | + | [[File:02. Calendar Add Object Android.jpg|x700px|02. Calendar Add Object Android.jpg]] |
| − | </div> <div class="mw-parser-output"> | + | </div> <div class="mw-parser-output"><div class="mw-parser-output"><div class="mw-parser-output"> </div> </div> </div> </div> |
| − | <div class="mw-parser-output"> | + | |
| − | <div class="mw-parser-output"> | ||
=== Jobs === | === Jobs === | ||
| Line 165: | Line 183: | ||
Use the same "+" Down in the bottom right corner to create a new Job | Use the same "+" Down in the bottom right corner to create a new Job | ||
| − | [[File:05. Create New Job.jpg|x700px]] | + | [[File:05. Create New Job.jpg|x700px|05. Create New Job.jpg]] |
From here you can select: | From here you can select: | ||
| Line 174: | Line 192: | ||
*Assigned Tech | *Assigned Tech | ||
*Schedule Time/Date | *Schedule Time/Date | ||
| − | + | <div class="mw-parser-output"><div class="mw-parser-output"> | |
| − | <div class="mw-parser-output"> | ||
| − | <div class="mw-parser-output"> | ||
=== Selecting or Creating a Client === | === Selecting or Creating a Client === | ||
| Line 184: | Line 200: | ||
Once you have the Client, Select or Create the Address | Once you have the Client, Select or Create the Address | ||
| − | + | [[File:06. Client Select Android.jpg|x700px|06. Client Select Android.jpg]]</div> | |
| − | [[File:06. Client Select Android.jpg|x700px|06. Client Select Android.jpg]] </div> | ||
| − | |||
If you do not see the Address in this pick list, use the "+" to create a new Address. | If you do not see the Address in this pick list, use the "+" to create a new Address. | ||
'''*NEW FEATURE*''' Auto Suggestions - As long as your device location is turned on you will be allowed to use the Auto Suggestion feature which will auto fill from the "Select Address" dropdown on the top of the Page. | '''*NEW FEATURE*''' Auto Suggestions - As long as your device location is turned on you will be allowed to use the Auto Suggestion feature which will auto fill from the "Select Address" dropdown on the top of the Page. | ||
| − | [[File:08. Automatic address Search Android.jpg|x700px]] | + | [[File:08. Automatic address Search Android.jpg|x700px|08. Automatic address Search Android.jpg]] |
| | ||
| Line 197: | Line 211: | ||
Otherwise just add an address as you typically would. | Otherwise just add an address as you typically would. | ||
| − | [[File:07. New Address Android.jpg|x700px]] | + | [[File:07. New Address Android.jpg|x700px|07. New Address Android.jpg]] |
Input all Address info as well as home type and Description if possible | Input all Address info as well as home type and Description if possible | ||
| − | [[File:09. Home Type Android.jpg|x700px]] | + | [[File:09. Home Type Android.jpg|x700px|09. Home Type Android.jpg]] |
| − | [[File:10. Address Input Android.jpg|x700px]] | + | [[File:10. Address Input Android.jpg|x700px|10. Address Input Android.jpg]] |
Hit Save When Complete | Hit Save When Complete | ||
| Line 211: | Line 225: | ||
Once you have your address input you can easily select Primary Job Type, Reason, and Assigned Tech | Once you have your address input you can easily select Primary Job Type, Reason, and Assigned Tech | ||
| − | [[File:11.JT Input Android.jpg|x400px]][[File:12. Job Reason Select Android.jpg|x400px]][[File:13. Assign Technition Android.jpg|x400px]] | + | [[File:11.JT Input Android.jpg|x400px|11.JT Input Android.jpg]][[File:12. Job Reason Select Android.jpg|x400px|12. Job Reason Select Android.jpg]][[File:13. Assign Technition Android.jpg|x400px|13. Assign Technition Android.jpg]] |
Click Add Job to create this. | Click Add Job to create this. | ||
| Line 222: | Line 236: | ||
| | ||
| − | </div> | + | </div> <div class="mw-parser-output"><div class="mw-parser-output"> |
| − | |||
| − | <div class="mw-parser-output"> | ||
| − | <div class="mw-parser-output"> | ||
=== Orders === | === Orders === | ||
| Line 235: | Line 246: | ||
''Expanded'' | ''Expanded'' | ||
| + | ''[[File:15. Orders Details Android.jpg|x700px|15. Orders Details Android.jpg]]''</div> </div> <div class="mw-parser-output"> | ||
| + | === Menu === | ||
| − | + | The menu page will allow you to view your user sync data, Sync Orders and remove the account if necessary. | |
| − | |||
| − | |||
| − | |||
| − | + | [[File:16. Settings.jpg|x500px|16. Settings.jpg]][[File:17. Syncing Orders.jpg|x500px|17. Syncing Orders.jpg]] | |
| − | + | [[File:18. Account Syncing Android.jpg|x500px|18. Account Syncing Android.jpg]][[File:19. Syncing Options Android.jpg|x500px|19. Syncing Options Android.jpg]] | |
| − | </div> | + | </div> </div> </div> </div> </div> </div> |
Latest revision as of 09:08, 21 September 2021
Getting Started
Welcome to the ThermoGrid App, The intention of this App was to allow Ease of Use in the Field for anyone with out Cellular Service and those who prefer the Layout of a Modern App. The App is and will be still in a Beta Phase as more and more Features are continually added.
We are looking to our Clients for Feedback on anything you experience with this New app.
Note: There are features that are currently unavailable (Such as Job Documents)
Android
How to Uninstall Previous Beta
expand the section below
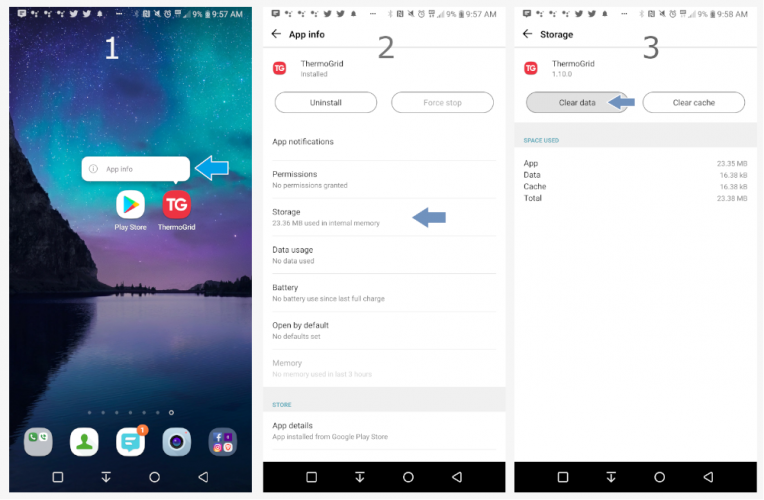
- Long Press on the ThermoGrid app icon and select App Info (This can also be done through settings)
- Go to “Storage & Cache”
- Tap “Clear Storage/Data"
- Click "Ok" if you get pop up to verify
- Uninstall App
- Click "Ok" if you get pop up to verify


How to Install ThermoGrid (Android)
![]()
OR
Go to your Play Store

- Search for ThermoGrid
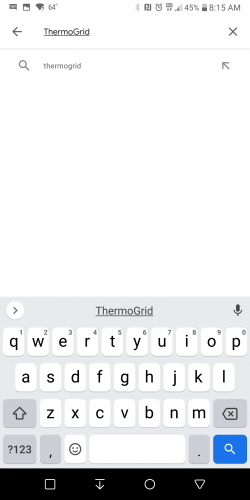
- Click/Tap Install
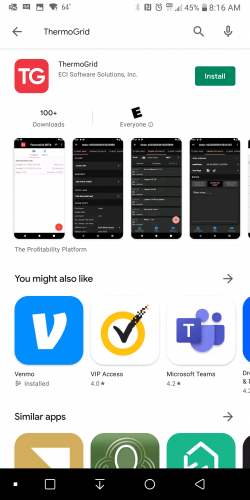
- Click/Tap Open when the Install is complete
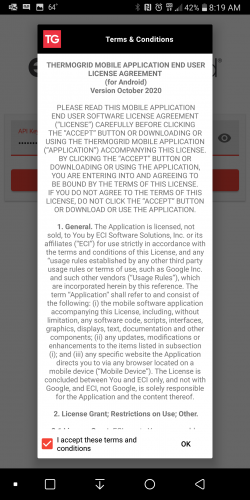
- This will give you a screen that says "API Key" your API Key Can be Created by an Administrator or Managed under your User > My Account > Edit > New API Key

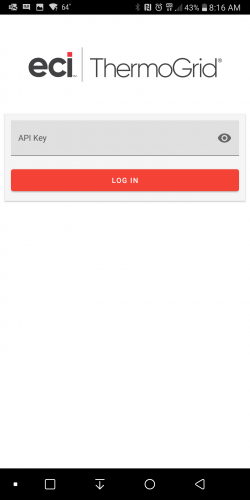
- This will give you a screen that says "API Key" your API Key Can be Created by an Administrator or Managed under your User > My Account > Edit > New API Key
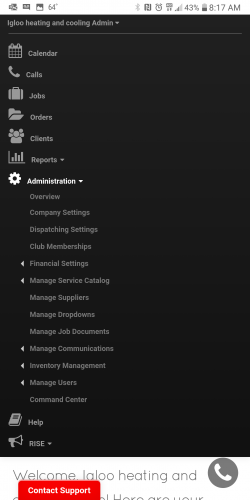
- Go to your web-based ThermoGrid Account, Either Create an API Key or Use one that is already existing. This can be done on a Desktop, Laptop or your Mobile device.
(WARNING: All users API should be treated like a Password)
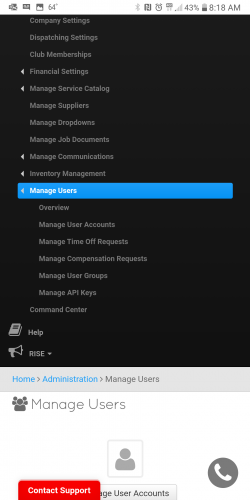
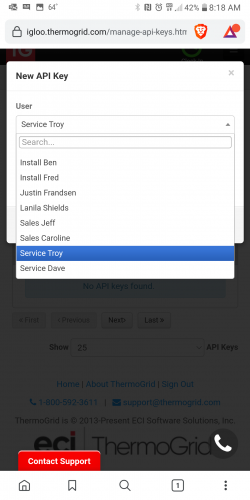
- To create this, go to Administration > Manage Users > Manage API Keys
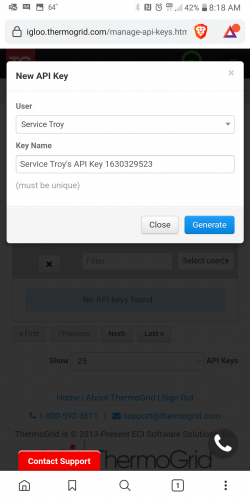
- Click/Tap "+ New API Key"
- Select The User
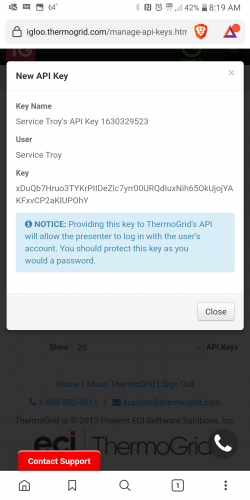
- Click/Tap "Generate"
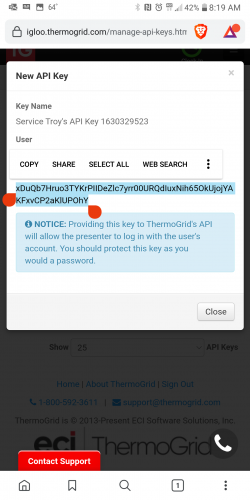
- Copy the API Key (The Very Large Set of Numbers and Letters)
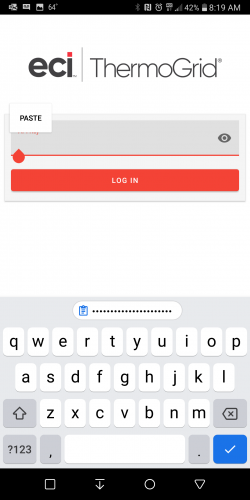
- Paste the API Key in the App and Login


iOS
How to Uninstall Previous Beta
expand the section below
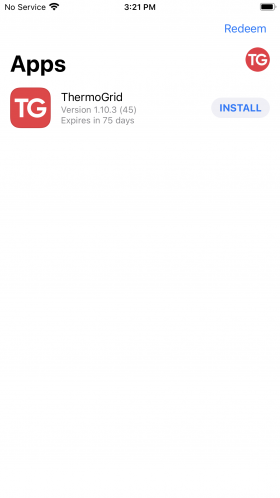
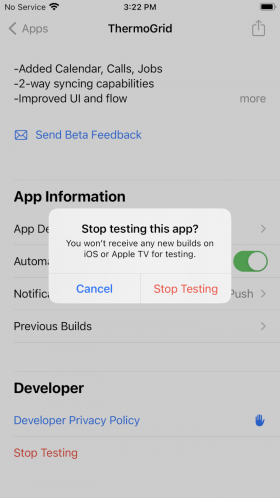
- Select “ThermoGrid” from your Apps list.
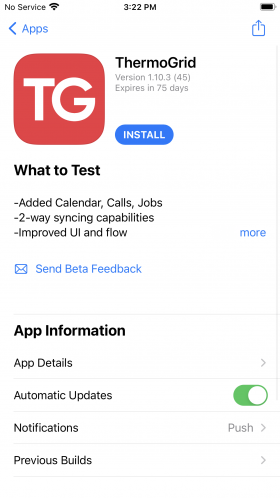
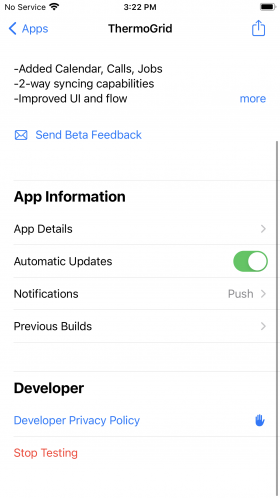
- Under “Developer,” tap “Stop Testing” and scroll down
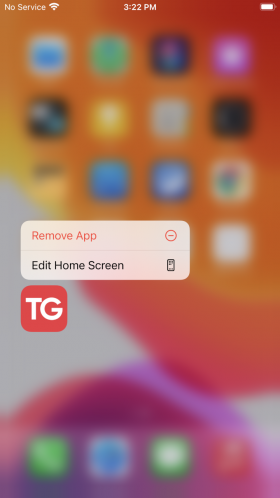
- Go back to your home screen
- Long Press on the ThermoGrid app icon and Tap “Delete/Remove App”


Use this Button or Follow the join link to install the app
![]()
Join Link: https://testflight.apple.com/join/2eJmqRZ9
Open TestFlight

How to Install ThermoGrid (iOS)
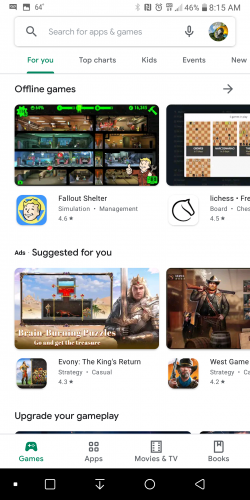
Download Test Flight and ThermoGrid Directly from the App Store:
![]()
OR
1. Open the App Store
![]()
2. Search for TestFlight

3. Download TestFlight
4. Use This Link to Download ThermoGrid: https://testflight.apple.com/join/2eJmqRZ9
App Usage and Functionality
What is a Beta App?
Google Defines Early access and Beta Apps as: "Early access apps are apps that haven’t been released yet. Beta apps are newer and more experimental versions of apps that are already released. Early access and beta apps may be less stable than most apps. For example, the app might crash or some features might not work properly."
What does this mean to you?
This means the ThermoGrid Team is working diligently to ensure that every possible robust function in ThermoGrid is also available offline on your Mobile Device. As we release more and more offline functionality, the App will need to be updated and sometimes extra steps may need to be taken to ensure functionality. (Such as Clearing Cache or Data).
You may experience unintended behavior such as crashes or some functionality restriction, Please understand that this may happen with any app in a beta phase and is not isolated to ThermoGrid.
Feedback
If you would like to send in a review, request or any general feedback please Click the button below

Using the App
This next section will go over some basic pages on the App (This was done on Android, IPhone will be almost identical except pages are at the bottom)
Calendar
The Calendar Page will display slightly different than you Calendar in ThermoGrid Web Based. Instead of a "By the Hour" Calendar you will have all Jobs and Events listed Here.
The Jobs and Events will display some information about the Object.
We can see:
- Scheduled Time and Date of the Job
- A Short Description
- Tech Status
- Sync Status

You are able to add Events / Time Off Requests / Compensation requests directly to the Calendar with the "+" Button in the bottom right.

Jobs
This Page will show the Open Jobs that are scheduled within the last 3 Days.

You can click on any Job to view details or add Orders to that Job. (Scroll to view more info)
Just as in ThermoGrid Web The same Details are available and the Call can be accessed from here.
This is also where you will change Technician status.

Adding a Job:
Use the same "+" Down in the bottom right corner to create a new Job

From here you can select:
- Client
- Primary Job Type
- Job Reason
- Assigned Tech
- Schedule Time/Date
Selecting or Creating a Client
Click on "Please Select Client" Start typing the Clients name, If its a new client use the "+" Button on the bottom Right

Once you have the Client, Select or Create the Address

If you do not see the Address in this pick list, use the "+" to create a new Address.
*NEW FEATURE* Auto Suggestions - As long as your device location is turned on you will be allowed to use the Auto Suggestion feature which will auto fill from the "Select Address" dropdown on the top of the Page.

Otherwise just add an address as you typically would.

Input all Address info as well as home type and Description if possible


Hit Save When Complete
Once you have your address input you can easily select Primary Job Type, Reason, and Assigned Tech


Click Add Job to create this.
Orders
This will be a simple overview of the orders page. By Clicking the drop-down on any order, you are able to see more order details. Clicking directly on the order will bring you into the order itself. (working on the order will be covered under another area in the Help Center)

Expanded

Menu
The menu page will allow you to view your user sync data, Sync Orders and remove the account if necessary.


