Difference between revisions of "NavBar - Reports"
m (Travis moved page Reports to NavBar - Reports without leaving a redirect) |
|||
| (37 intermediate revisions by 2 users not shown) | |||
| Line 1: | Line 1: | ||
| + | <div class="mw-parser-output"><div class="mw-parser-output"><div class="mw-parser-output"><div class="mw-parser-output"><div class="mw-parser-output"><div class="mw-parser-output"> | ||
<div class="mw-parser-output"> | <div class="mw-parser-output"> | ||
= Commissions = | = Commissions = | ||
| − | <div class="mw-parser-output"><div class="mw-parser-output"> | + | <div class="mw-parser-output"><div class="mw-parser-output">The commissions report allows you to do an overview of:</div> |
| − | + | *Sales | |
| + | *Average Order | ||
| + | *Closing Percentage | ||
| + | *Dollars per lead | ||
| + | </div> | ||
| + | If you are not using the [[Daily_Management_Report]], this will provide quick feedback. | ||
| − | + | [[File:Commission report.png]] | |
| + | <div class="mw-parser-output"> </div> </div> | ||
| − | | + | <div class="mw-parser-output"> |
| + | <div class="mw-parser-output"> | ||
| + | <div class="mw-parser-output"> | ||
| + | = <span style="font-size:xx-large;">Orders</span> = | ||
| + | |||
| + | <span style="font-size:large;">The Orders Report allows you to Search and Filter down Orders to get data from multiple criteria on any order. </span> | ||
| + | |||
| + | <span style="font-size:large;">[[File:Order report options.png|RTENOTITLE]]</span> | ||
| + | |||
| + | <span style="font-size:medium;">'''Item Filter''': Allows you to search for specific items sold in your catalog.</span> | ||
| + | |||
| + | <span style="font-size:medium;">'''Primary Job Type :''' allows you to choose a primary job type and run a report based off of it.</span> | ||
| + | |||
| + | <span style="font-size:medium;">'''Lead Source:''' How did you hear about us?: Allows a report to be ran based off of Marketing Sources</span> | ||
| + | |||
| + | <span style="font-size:medium;">'''Lead Source:''' How did you get our num?: Allows a report to be ran based off of Marketing Sources</span> | ||
| + | |||
| + | <span style="font-size:medium;">'''Order Status''': Allows you to search by the current state of the Invoice / Estimate / Order</span> | ||
| + | |||
| + | <span style="font-size:medium;">'''Payment Status:''' Allows you to search by the current state of payment on an Invoice / Order</span> | ||
| + | |||
| + | <span style="font-size:medium;">'''Costing Complete:''' Allows you to search by the current state of Job Costing done on the Order</span> | ||
| − | <span style="font-size: | + | <span style="font-size:medium;">'''Start Date: '''Set a Date Range</span> |
| − | ''' | + | <span style="font-size:medium;">'''End Date:''' Set a Date Range</span> |
| − | ''' | + | '''<span style="font-size:medium;">Date Type:</span>'''<span style="font-size:medium;">There can be multiple type of dates in ThermoGrid, such as the Date an Order was Created or the Date it was Costed. This allows you to choose between those options. </span> |
| − | ''' | + | '''<span style="font-size:medium;">Created By:</span>'''<span style="font-size:medium;">Give you the option to filter based on User</span> |
| − | + | | |
| − | + | <span style="font-size:large;">Example of Report:</span> | |
| − | + | <span style="font-size:large;">[[File:Order report resultss.png|RTENOTITLE]]</span> | |
| − | + | | |
| − | + | </div> | |
| − | </div> <div class="mw-parser-output"><div class="mw-parser-output"><div class="mw-parser-output"><div class="mw-parser-output"><div | + | <div class="mw-parser-output"><div class="mw-parser-output"><div class="mw-parser-output"><div class="mw-parser-output"> </div> </div> </div> </div> </div> |
| − | |||
| − | + | = <span style="font-size:xx-large;">Payroll</span> = | |
| − | + | In ThermoGrid the Payroll report is used as a reference point for doing payroll and not as a direct connection into your Users bank account. | |
| − | |||
| − | |||
| − | |||
What you can see here: | What you can see here: | ||
| − | <span style="font-size: | + | == <span style="font-size:x-large;">Orders:</span> == |
| + | |||
| + | All Orders with Date earned on Job Costing will show up on the Orders in Payroll. ''In the Image below you can see an explanation from the [https://help.thermogrid.com/index.php/Main_Page#Closing_Orders.2C_Jobs.2C_Calls Job Costing] page on how Date earned ties into Payroll.'' | ||
| + | |||
| + | Any Orders in the List can Easily be reviewed by clicking on the Order Number. | ||
| + | |||
| + | [[File:Date earned.png|border|Date earned.png]] | ||
| + | |||
| + | <div class="mw-parser-output"> | ||
| + | == <span style="font-size:x-large;">Commission & Task-based Labor</span> == | ||
'''Commission''' = If the rep is paid commission their commission will show up here. | '''Commission''' = If the rep is paid commission their commission will show up here. | ||
| − | *Check mark on the left = This will default checked and if you are going to pay the rep for the job leave it checked and click '''"Mark Orders As Paid". I'''f | + | * |
| + | |||
| + | Check mark on the left = This will default checked and if you are going to pay the rep for the job leave it checked and click '''"Mark Orders As Paid". I'''f you are not paying on a job or two just uncheck and the order will show up in the next payroll.<br/> [[File:Mark order as paid.png|RTENOTITLE]] | ||
'''Labor''' = If the rep is on task pay they will have a labor amount show up here. | '''Labor''' = If the rep is on task pay they will have a labor amount show up here. | ||
| − | *Checkmark on the left = This will default checked and if you are going to pay the rep for the job leave it checked and click '''"Mark Orders As Paid". I'''f | + | *Checkmark on the left = This will default checked and if you are going to pay the rep for the job leave it checked and click '''"Mark Orders As Paid". I'''f you are not paying on a job or two just uncheck and the order will show up in the next payroll.<br/> [[File:Labor and com2.png|RTENOTITLE]] |
If they are not showing up for commission or labor they should receive check 2 things: | If they are not showing up for commission or labor they should receive check 2 things: | ||
| − | 1. User Setting is set to task or both. [https://help.thermogrid.com/index.php/ | + | 1. User Setting is set to task or both. [https://help.thermogrid.com/index.php/NavBar_-_Administration#Manage_Users Manage Users] |
| + | |||
| + | | ||
| + | |||
| + | [[File:Pay type.png|RTENOTITLE]] | ||
2. Click order number to the left and make sure they are selected as "Technician who performed the labor" for labor or "Sales Technician" for sales commission or "Technician who generated lead" for lead generation fee. | 2. Click order number to the left and make sure they are selected as "Technician who performed the labor" for labor or "Sales Technician" for sales commission or "Technician who generated lead" for lead generation fee. | ||
| − | <span style="font-size: | + | [[File:Tech labor.png|RTENOTITLE]] |
| + | |||
| + | | ||
| + | |||
| + | | ||
| + | </div> | ||
| + | |||
| + | == <span style="font-size:x-large;">Time Keeping:</span> == | ||
| + | |||
| + | '''Regular Hours''' = These are all the hours that are not overtime or PTO in the date range you selected and the time clocked on the [https://help.thermogrid.com/index.php/Timesheets Timesheets]. | ||
| + | |||
| + | '''Overtime Hours''' = These are all hours marked as overtime based on [https://help.thermogrid.com/index.php/1._Tab_Administration#Payroll_Settings Payroll Settings] and the time clocked on the [https://help.thermogrid.com/index.php/Timesheets Timesheets]. | ||
| + | |||
| + | '''Total Hours''' = This is the total Hourly, PTO, UPTO, & Total. | ||
| − | + | '''Job Hours''' = Time clocked in to jobs, if you click the number it will show you the hours by the Job Type so you can departmentalize your labor. | |
| − | + | '''Efficiency''' = This shows you the percentage of time clocked into jobs vs total time clocked in to the day. If they are at 50% this means they are only on jobs half of the time they are clocked in at work. | |
| − | + | '''Revenue Per Hour''' = This is all the revenue they bring in divided by all hours they clocked in. | |
| − | + | '''Minimum Wage''' = If someone is on task pay this will track minimum wage for you to keep you legal. | |
| − | + | '''User Wages''' = This is how much they will get paid based on their hourly rate... [https://help.thermogrid.com/index.php/1._Tab_Administration#Manage_Users Manage Users] | |
| − | + | ''optional if user is requesting time off in pay period:'' | |
| − | + | '''Paid Time Off''' = This is hours they get paid on based on the PTO they have in their account... [https://help.thermogrid.com/index.php/1._Tab_Administration#Manage_Users Manage Users] | |
| − | + | '''Unpaid Time Off''' = This will be the total time they took off that was not covered under PTO. | |
| + | <div class="mw-parser-output"><div class="mw-parser-output"><div class="mw-parser-output"> </div> </div> </div> | ||
| + | == <span style="font-size:x-large;">Compensation Requests:</span> == | ||
| − | + | <span style="font-size:small;"> this will show all compensation request from the user the date of the request the amount the number of requests and if they are paid or unpaid. you are able to Click on the Comp request button te review any compensation requests that are pending or need to be edited.</span> | |
| − | + | <span style="font-size:small;">[[File:Comp request.png|RTENOTITLE]]</span> | |
| + | <div class="mw-parser-output"> </div> </div> </div> </div></div> | ||
<div class="mw-parser-output"> | <div class="mw-parser-output"> | ||
= Memberships = | = Memberships = | ||
| − | + | <div class="mw-parser-output"> | |
| + | == Status: == | ||
| − | + | A Status Report allows you to easily see any memberships or specific memberships in their current state. | |
| − | |||
| − | + | [[File:Membership status.png|border|Membership status.png]] | |
| − | + | You can search within any available criteria, such as: | |
| − | + | '''Start date''': Dates for new memberships and for any renewed membership | |
| − | + | '''Expiration date''': Memberships that expired in this timeframe. | |
| − | + | '''Cancellation date:''' Memberships that canceled in this timeframe. | |
| − | + | '''Last Contacted Date:''' This is a manually entered field on the membership that can be reported on. | |
| − | + | '''Plans''': allows you to choose the plans you want to run a report on | |
| − | + | '''Expired''': Allows you to choose if memberships end would be before todays date | |
| − | + | '''Canceled: '''Allows you to search through Clients who have canceled their membership | |
| − | + | '''Fulfilled''': whether or not all visits on a membership has been completed. | |
| − | + | | |
| − | + | Quick Reports | |
| − | + | Quick reports allow you to easily choose a report that pre-populates all settings for a result. | |
| − | + | options: | |
| − | + | [[File:Quick report status.png|RTENOTITLE]] | |
| − | + | | |
| | ||
| + | |||
| + | == Visits: == | ||
| + | |||
| + | A Visits Report allows you to easily see any visits or specific visits in their current state. | ||
| + | |||
| + | [[File:Membership visits.png|border]] | ||
| + | |||
| + | These are the filters available for your Visits: | ||
| + | |||
| + | *Due Date | ||
| + | *Plans | ||
| + | *Visit | ||
| + | *Status | ||
| + | *Last Contacted | ||
| + | *Unit Install or Manufacture Date | ||
| + | *Unit Types<br/> | ||
| + | |||
| + | '''''Report Example''''' | ||
| + | |||
| + | ''Shows:'' | ||
| + | |||
| + | *Client | ||
| + | *Unit address | ||
| + | *Plan | ||
| + | *Visit | ||
| + | *Due Date | ||
| + | *Last Contacted | ||
| + | *Age of System | ||
| + | *Completion Status | ||
| + | |||
| + | '''[[File:Status report.png]]''' | ||
| | ||
| − | + | '''Quick Reports: S'''et Defaults to accomplish common tasks. | |
| + | |||
| + | [[File:Quick report visits.png]] | ||
| | ||
| − | + | == Clients: == | |
| + | |||
| + | The Clients option allows you to filter down by a general client level rather than a specific visit or membership | ||
| − | + | [[File:Membership clients.png|border]] | |
| | ||
| − | + | You can also use a Quick report to find the Result you are looking for | |
| + | |||
| + | [[File:Quick report clients.png]] | ||
| − | + | | |
| − | + | | |
| − | + | | |
| − | |||
| − | |||
</div> | </div> | ||
| + | <div class="mw-parser-output"> | ||
| + | <div class="mw-parser-output"> | ||
= Inventory = | = Inventory = | ||
| − | == | + | These Reports will allow you to quickly review your inventory. |
| + | |||
| + | *Re-Order Report - This will show all Items currently Pending Delivery or on an unreceived Inventory Order | ||
| + | *Current Stock Report - Allows you to see the current stock of a location | ||
| + | *Surplus Quantity Report - Will show any surplus in your inventory based on Min/Max Quantity and Quantity on hand | ||
| + | *Variance Report - Breaks down the Surplus quality even further into total variance amounts <br/> <br/> [[File:Inventory reports.png]]<br/> <br/> Variance report Example: <br/> <br/> [[File:Varience report.png]] | ||
| + | |||
| + | | ||
| + | |||
| + | | ||
| + | </div> | ||
| + | |||
| + | <div class="mw-parser-output"> | ||
| + | <div class="mw-parser-output"> | ||
| + | = Timesheets = | ||
| + | |||
| + | The timesheet report allows you to look at daily timekeeping or time keeping on specific jobs. Allows you to filter weekly, monthly, within a year, your own custom dates or by user. | ||
| − | + | The initial time chart will show you how many hours were logged in in a day based on all user. You're then able to start breaking down more information based on filter criteria. | |
| − | + | [[File:Timekeeping main.png|border|Timekeeping main.png]] | |
| − | + | This will also table out this data by day and hours per day | |
| − | + | [[File:Time table.png|RTENOTITLE]] | |
| − | + | | |
| − | + | below the Time Table you will have your Timecards. Timecards are a direct connection to Clocking In and Clocking Out of Jobs. This can be done with either the Tech Status or the Standard Clock and Job Dropdown. | |
| − | + | This is where you can edit the Clock in and Out of a User. To Edit simply click the Pencil/Edit Button on the Left hand side of the page and will open up the Below option to Type a comment about why the time was overridden. | |
| − | + | [[File:Adjust time.png|border|center|Adjust time.png]] | |
| + | [[File:Timecard.png|RTENOTITLE]] | ||
| + | |||
| + | | ||
| + | |||
| + | | ||
| + | |||
| + | | ||
| + | |||
| + | | ||
| + | |||
| + | | ||
| + | |||
| + | | ||
| + | |||
| + | Legacy: [[Timesheets|Timesheets]] | ||
| + | </div> | ||
| + | |||
| + | <div class="mw-parser-output"> | ||
| + | <div class="mw-parser-output"> | ||
<div class="mw-parser-output"> | <div class="mw-parser-output"> | ||
| − | = | + | = Daily Management Report = |
| + | |||
| + | Link to [[Daily_Management_Report|Daily Management Report]] Page | ||
| + | </div> | ||
<div class="mw-parser-output"> | <div class="mw-parser-output"> | ||
<div class="mw-parser-output"> | <div class="mw-parser-output"> | ||
| + | = Equipment Age Report = | ||
| + | |||
| + | Equipment Aid report allows you to easily see an installer manufacture date, warranty and unit age data. (as well as your own custom options) | ||
| + | |||
| + | | ||
| + | |||
| + | *Equipment Type - Filter based on different Equipment | ||
| + | *Equipment Warranty Type | ||
| + | *Labor Warranty Type | ||
| + | *Begin Install or Manufacture Date | ||
| + | *End Install or Manufacture Date | ||
| + | *Membership Status - ''Units attached to Memberships'' | ||
| + | *Begin Equipment Warranty Exp. Date | ||
| + | *End Equipment Warranty Exp. Date | ||
| + | *Begin Labor Warranty Exp. Date | ||
| + | *End Labor Warranty Exp. Date | ||
| + | |||
| + | [[File:Equipment Age.png|RTENOTITLE]] </div> | ||
| + | </div> | ||
| + | |||
<div class="mw-parser-output"> | <div class="mw-parser-output"> | ||
| − | + | = Unit Cost Report = | |
| − | + | ||
| − | + | It's very simple report can be ran to see if a clients Unit is cost effective. In some instances a Equipment can become a costly investment if it is constantly having issues, this report will show high cost units so you can reach out to clients and possibly schedule a sales appointment. | |
| + | |||
| + | You can also contact all clients with a [[Marketing|Marketing ]]Campaign or export to excel | ||
| + | |||
| + | | ||
| + | |||
| + | This report will only be populated if technicians are selecting the units when they are creating an order. If you do not have any data in this report it is because units are not being properly selected when a service call is ran. | ||
| + | |||
| + | To select this use the Unit dropdown under notes. | ||
| + | |||
| + | [[File:Select unit.png]] | ||
| + | |||
| + | This will also show up on the Client Agreement for that Order. | ||
| + | |||
| + | [[File:Unit worked on.png]] | ||
| + | |||
| + | | ||
| + | |||
| + | | ||
| + | |||
| + | | ||
| + | |||
| + | ''Report Example:'' | ||
| + | |||
| + | [[File:Units report.png]] | ||
| + | |||
| + | | ||
| − | + | | |
| + | </div> | ||
| + | <div class="mw-parser-output"> | ||
| + | <div class="mw-parser-output"> | ||
| + | <div class="mw-parser-output"> | ||
| + | <div class="mw-parser-output"> | ||
| + | = Payments Report = | ||
| + | <div class="mw-parser-output"><div class="mw-parser-output"><div class="mw-parser-output"><div class="mw-parser-output"><div class="mw-parser-output"><div class="mw-parser-output"><div class="mw-parser-output"><div class="mw-parser-output"><div class="mw-parser-output"><div class="mw-parser-output"><div class="mw-parser-output"> | ||
<span style="font-size:medium;">From here you can see a lot of areas including:</span> | <span style="font-size:medium;">From here you can see a lot of areas including:</span> | ||
| Line 188: | Line 371: | ||
*Payment Type | *Payment Type | ||
*Credit Card Transactions (And Status) | *Credit Card Transactions (And Status) | ||
| + | *[[File:Refine payments.png|RTENOTITLE]] | ||
'''<span style="font-size:medium;">How to use the report.</span>''' | '''<span style="font-size:medium;">How to use the report.</span>''' | ||
| Line 226: | Line 410: | ||
<li>'''Options''' - (Reoccurring Payment)</li> | <li>'''Options''' - (Reoccurring Payment)</li> | ||
</ul> | </ul> | ||
| + | |||
| + | | ||
| + | |||
| + | <span style="color:#2980b9;">'''<span style="font-size:large;">In a Payment Report you may notice that there are <span style="background-color:#ffffcc;">Multiple Payments for 1 Order.</span> This is the Record on the Order Estimate and the Processed Payment(s) on the Client Agreement. </span>'''</span> | ||
| + | |||
| + | [[File:Example payment report.png|RTENOTITLE]] | ||
| + | |||
| + | | ||
| + | |||
| + | | ||
<span style="font-size:large;">'''* Example Reports'''</span> | <span style="font-size:large;">'''* Example Reports'''</span> | ||
| Line 261: | Line 455: | ||
*Under the section General put in todays date in "From" and the last day of the month in "To" | *Under the section General put in todays date in "From" and the last day of the month in "To" | ||
*Apply Filters | *Apply Filters | ||
| − | </div> </div> </div></ | + | </div> </div> </div> </div> </div> </div> </div> </div> </div> </div> </div> </div></div></div></div> |
| − | </div> | ||
| − | </div> | ||
Latest revision as of 09:04, 7 October 2021
Contents
Commissions
- Sales
- Average Order
- Closing Percentage
- Dollars per lead
If you are not using the Daily_Management_Report, this will provide quick feedback.

Orders
The Orders Report allows you to Search and Filter down Orders to get data from multiple criteria on any order.

Item Filter: Allows you to search for specific items sold in your catalog.
Primary Job Type : allows you to choose a primary job type and run a report based off of it.
Lead Source: How did you hear about us?: Allows a report to be ran based off of Marketing Sources
Lead Source: How did you get our num?: Allows a report to be ran based off of Marketing Sources
Order Status: Allows you to search by the current state of the Invoice / Estimate / Order
Payment Status: Allows you to search by the current state of payment on an Invoice / Order
Costing Complete: Allows you to search by the current state of Job Costing done on the Order
Start Date: Set a Date Range
End Date: Set a Date Range
Date Type:There can be multiple type of dates in ThermoGrid, such as the Date an Order was Created or the Date it was Costed. This allows you to choose between those options.
Created By:Give you the option to filter based on User
Example of Report:

Payroll
In ThermoGrid the Payroll report is used as a reference point for doing payroll and not as a direct connection into your Users bank account.
What you can see here:
Orders:
All Orders with Date earned on Job Costing will show up on the Orders in Payroll. In the Image below you can see an explanation from the Job Costing page on how Date earned ties into Payroll.
Any Orders in the List can Easily be reviewed by clicking on the Order Number.

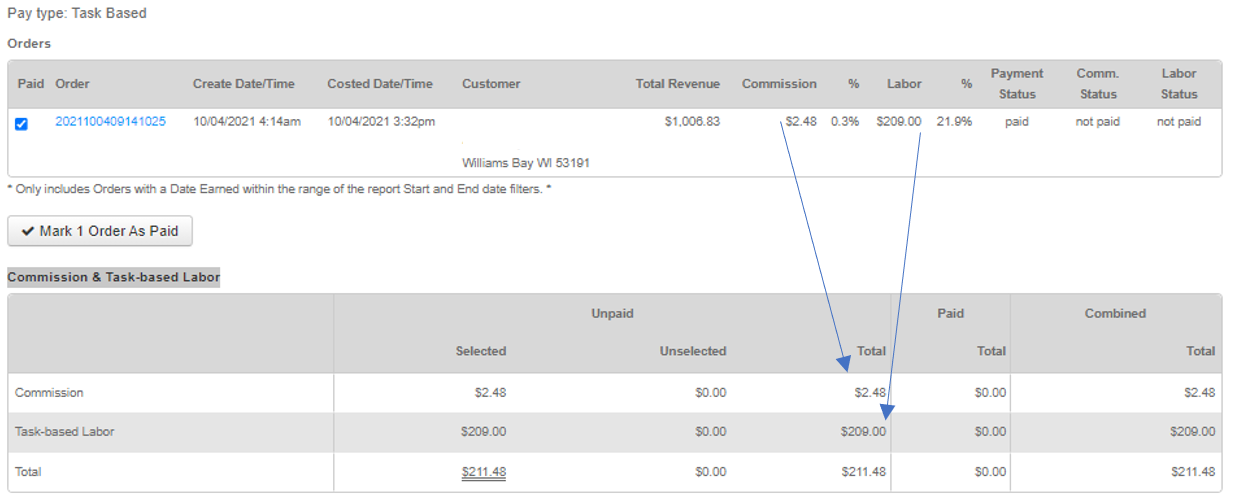
Commission & Task-based Labor
Commission = If the rep is paid commission their commission will show up here.
Check mark on the left = This will default checked and if you are going to pay the rep for the job leave it checked and click "Mark Orders As Paid". If you are not paying on a job or two just uncheck and the order will show up in the next payroll.

Labor = If the rep is on task pay they will have a labor amount show up here.
- Checkmark on the left = This will default checked and if you are going to pay the rep for the job leave it checked and click "Mark Orders As Paid". If you are not paying on a job or two just uncheck and the order will show up in the next payroll.

If they are not showing up for commission or labor they should receive check 2 things:
1. User Setting is set to task or both. Manage Users

2. Click order number to the left and make sure they are selected as "Technician who performed the labor" for labor or "Sales Technician" for sales commission or "Technician who generated lead" for lead generation fee.

Time Keeping:
Regular Hours = These are all the hours that are not overtime or PTO in the date range you selected and the time clocked on the Timesheets.
Overtime Hours = These are all hours marked as overtime based on Payroll Settings and the time clocked on the Timesheets.
Total Hours = This is the total Hourly, PTO, UPTO, & Total.
Job Hours = Time clocked in to jobs, if you click the number it will show you the hours by the Job Type so you can departmentalize your labor.
Efficiency = This shows you the percentage of time clocked into jobs vs total time clocked in to the day. If they are at 50% this means they are only on jobs half of the time they are clocked in at work.
Revenue Per Hour = This is all the revenue they bring in divided by all hours they clocked in.
Minimum Wage = If someone is on task pay this will track minimum wage for you to keep you legal.
User Wages = This is how much they will get paid based on their hourly rate... Manage Users
optional if user is requesting time off in pay period:
Paid Time Off = This is hours they get paid on based on the PTO they have in their account... Manage Users
Unpaid Time Off = This will be the total time they took off that was not covered under PTO.
Compensation Requests:
this will show all compensation request from the user the date of the request the amount the number of requests and if they are paid or unpaid. you are able to Click on the Comp request button te review any compensation requests that are pending or need to be edited.

Memberships
Status:
A Status Report allows you to easily see any memberships or specific memberships in their current state.

You can search within any available criteria, such as:
Start date: Dates for new memberships and for any renewed membership
Expiration date: Memberships that expired in this timeframe.
Cancellation date: Memberships that canceled in this timeframe.
Last Contacted Date: This is a manually entered field on the membership that can be reported on.
Plans: allows you to choose the plans you want to run a report on
Expired: Allows you to choose if memberships end would be before todays date
Canceled: Allows you to search through Clients who have canceled their membership
Fulfilled: whether or not all visits on a membership has been completed.
Quick Reports
Quick reports allow you to easily choose a report that pre-populates all settings for a result.
options:

Visits:
A Visits Report allows you to easily see any visits or specific visits in their current state.

These are the filters available for your Visits:
- Due Date
- Plans
- Visit
- Status
- Last Contacted
- Unit Install or Manufacture Date
- Unit Types
Report Example
Shows:
- Client
- Unit address
- Plan
- Visit
- Due Date
- Last Contacted
- Age of System
- Completion Status

Quick Reports: Set Defaults to accomplish common tasks.

Clients:
The Clients option allows you to filter down by a general client level rather than a specific visit or membership

You can also use a Quick report to find the Result you are looking for

Inventory
These Reports will allow you to quickly review your inventory.
- Re-Order Report - This will show all Items currently Pending Delivery or on an unreceived Inventory Order
- Current Stock Report - Allows you to see the current stock of a location
- Surplus Quantity Report - Will show any surplus in your inventory based on Min/Max Quantity and Quantity on hand
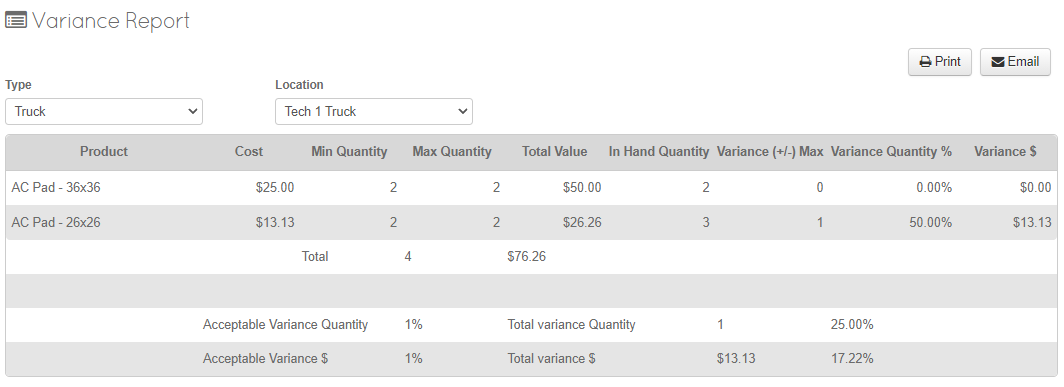
- Variance Report - Breaks down the Surplus quality even further into total variance amounts

Variance report Example:


Timesheets
The timesheet report allows you to look at daily timekeeping or time keeping on specific jobs. Allows you to filter weekly, monthly, within a year, your own custom dates or by user.
The initial time chart will show you how many hours were logged in in a day based on all user. You're then able to start breaking down more information based on filter criteria.

This will also table out this data by day and hours per day

below the Time Table you will have your Timecards. Timecards are a direct connection to Clocking In and Clocking Out of Jobs. This can be done with either the Tech Status or the Standard Clock and Job Dropdown.
This is where you can edit the Clock in and Out of a User. To Edit simply click the Pencil/Edit Button on the Left hand side of the page and will open up the Below option to Type a comment about why the time was overridden.


Legacy: Timesheets
Daily Management Report
Link to Daily Management Report Page
Equipment Age Report
Equipment Aid report allows you to easily see an installer manufacture date, warranty and unit age data. (as well as your own custom options)
- Equipment Type - Filter based on different Equipment
- Equipment Warranty Type
- Labor Warranty Type
- Begin Install or Manufacture Date
- End Install or Manufacture Date
- Membership Status - Units attached to Memberships
- Begin Equipment Warranty Exp. Date
- End Equipment Warranty Exp. Date
- Begin Labor Warranty Exp. Date
- End Labor Warranty Exp. Date

Unit Cost Report
It's very simple report can be ran to see if a clients Unit is cost effective. In some instances a Equipment can become a costly investment if it is constantly having issues, this report will show high cost units so you can reach out to clients and possibly schedule a sales appointment.
You can also contact all clients with a Marketing Campaign or export to excel
This report will only be populated if technicians are selecting the units when they are creating an order. If you do not have any data in this report it is because units are not being properly selected when a service call is ran.
To select this use the Unit dropdown under notes.

This will also show up on the Client Agreement for that Order.

Report Example:

Payments Report
From here you can see a lot of areas including:
- Payments Taken
- Payments Coming Up
- Revenue From Agreements
- Revenue From Invoices
Search By:
- Orders (Order Number)
- Memberships (Types)
- Date
- Client Name
- Company Name
- Payment Type
- Credit Card Transactions (And Status)

How to use the report.
First get familiar with the page.
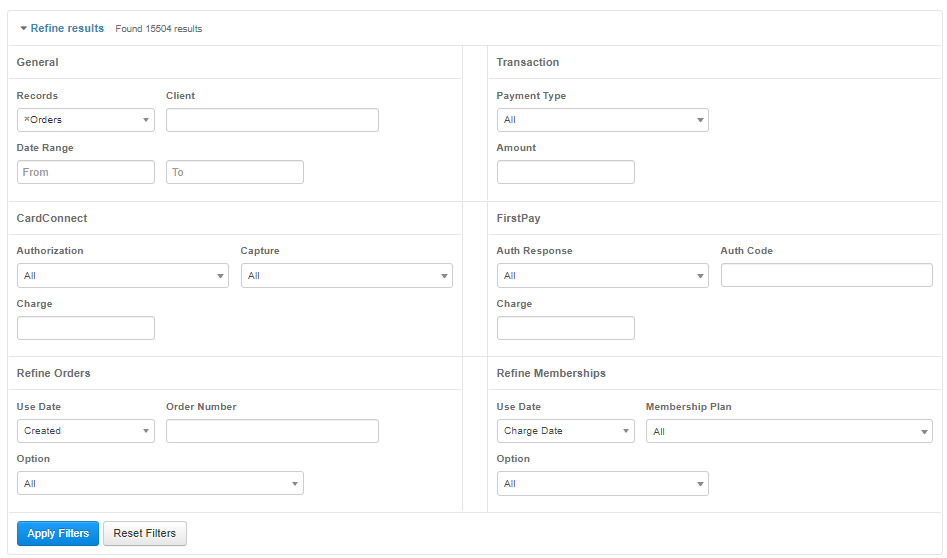
Click Refine results
This will drop down 4 sections for filtering down a search.
1. General
- Records = Choose Orders or Invoices
- Client = Search By Client name or Company Name
- Date Range = Select date range for payments you wish to see
- Type = Payment Type (Cash, Check, Credit Card. Financing)
2. Transaction (Credit Card Processing)
- Authorization (Approved, Retry, Declined)
- Captured (Accepted, Queued for Capture, Authorized, Rejected Etc.)
- Charge (Amount charged to the client by credit card)
- Amount (This is the Amount area on Order Estimate. This could be other payment types other than Credit Cards)
3. Refine Orders
- Use date ( Created, submitted, Job Costed, Installation) What ever date type you select is what it will search by.
- Order Number (This will search for or include the order number in your results, if you just want to see the one order that matches make sure you select Orders under Records in the General Section)
- Option (Payment Method from the Order Estimate)
4. Refine Memberships
- Use Date - (Charge Date)
- Membership Plan - ( Type of membership yu want to search for)
- Options - (Reoccurring Payment)
In a Payment Report you may notice that there are Multiple Payments for 1 Order. This is the Record on the Order Estimate and the Processed Payment(s) on the Client Agreement.

* Example Reports
Example 1:
Want to see all revenue that came in month to date by credit cards.
- Click Refine results
- Under the section General put in the first of this month in "From" and current date in "To"
- Change "Type" to Credit Card
- Apply Filters
This will be all payment Methods setup as credit card. To setup payment types to the proper type go to:
Example 2:
Want to make sure your techs Authorized payments for credit cards so you get the payment?
- Click Refine results
- Under the section Transactions change Authorization to "Approved" and Capture to "Queued for Capture"
- Apply Filters
This will show you payments that are just waiting for you to click Capture to make the payment go through.
Example 3:
You want to see all subscription/scheduled payments that will go from now til the end of the month?
- Click Refine results
- Under the section General change Records to "Memberships"
- Under the section General put in todays date in "From" and the last day of the month in "To"
- Apply Filters