Difference between revisions of "NavBar - Administration"
| (55 intermediate revisions by the same user not shown) | |||
| Line 1: | Line 1: | ||
<div class="mw-parser-output"><div class="mw-parser-output"><div class="mw-parser-output"><div class="mw-parser-output"><div class="mw-parser-output"><div class="mw-parser-output"><div class="mw-parser-output"><div class="mw-parser-output"><div class="mw-parser-output"><div class="mw-parser-output"><div class="mw-parser-output"><div class="mw-parser-output"><div class="mw-parser-output"><div class="mw-parser-output"><div class="mw-parser-output"><div class="mw-parser-output"><div class="mw-parser-output"><div class="mw-parser-output"><div class="mw-parser-output"><div class="mw-parser-output"><div class="mw-parser-output"><div class="mw-parser-output"><div class="mw-parser-output"><div class="mw-parser-output"> | <div class="mw-parser-output"><div class="mw-parser-output"><div class="mw-parser-output"><div class="mw-parser-output"><div class="mw-parser-output"><div class="mw-parser-output"><div class="mw-parser-output"><div class="mw-parser-output"><div class="mw-parser-output"><div class="mw-parser-output"><div class="mw-parser-output"><div class="mw-parser-output"><div class="mw-parser-output"><div class="mw-parser-output"><div class="mw-parser-output"><div class="mw-parser-output"><div class="mw-parser-output"><div class="mw-parser-output"><div class="mw-parser-output"><div class="mw-parser-output"><div class="mw-parser-output"><div class="mw-parser-output"><div class="mw-parser-output"><div class="mw-parser-output"> | ||
| + | <div class="mw-parser-output"> | ||
= '''Company Settings[[File:Selecting Company Settings.png|left|Selecting Company Settings.png]]''' = | = '''Company Settings[[File:Selecting Company Settings.png|left|Selecting Company Settings.png]]''' = | ||
| Line 6: | Line 7: | ||
*<span style="font-size:12.0pt"><span style="line-height:107%">Select the Edit icon on the top right of the screen</span></span> | *<span style="font-size:12.0pt"><span style="line-height:107%">Select the Edit icon on the top right of the screen</span></span> | ||
*<span style="font-size:12.0pt"><span style="line-height:107%">You can edit/adjust any of the information you have entered</span></span> | *<span style="font-size:12.0pt"><span style="line-height:107%">You can edit/adjust any of the information you have entered</span></span> | ||
| − | *<span style="font-size:12.0pt"><span style="line-height:107%">Save the information</span></span> | + | *<span style="font-size:12.0pt"><span style="line-height:107%">Save the information</span></span> |
<div class="mw-parser-output"><div class="mw-parser-output"> | <div class="mw-parser-output"><div class="mw-parser-output"> | ||
---- | ---- | ||
| + | <div class="mw-parser-output"> | ||
| + | <div class="mw-parser-output"> | ||
| + | <div class="mw-parser-output"> | ||
| + | <div class="mw-parser-output"> | ||
| + | [[File:Company Settings Main.png|right|top|900x900px|Company Settings Main.png]] | ||
| + | </div> | ||
| − | == | + | <div class="mw-parser-output"> |
| + | == Address Settings == | ||
This is where you enter all the information about your company. This is what will show up on you invoices for your clients. | This is where you enter all the information about your company. This is what will show up on you invoices for your clients. | ||
There is also a section here to type in your terms and conditions. | There is also a section here to type in your terms and conditions. | ||
| + | |||
| + | | ||
| + | |||
| + | | ||
| + | |||
| + | | ||
| + | |||
| + | | ||
---- | ---- | ||
| | ||
| − | </div> </div> <div class="mw-parser-output"> | + | </div> </div> <div class="mw-parser-output"><div class="mw-parser-output"> </div> </div> </div></div> |
| − | == | + | [[Category:Pages with broken file links]] |
| + | |||
| + | == Contact Information Settings == | ||
This information will be displayed on the company invoice. | This information will be displayed on the company invoice. | ||
| Line 29: | Line 47: | ||
| | ||
| − | + | | |
| − | == | + | == Commissions and Order Settings == |
'''Order Options''' - Here you can rename, add, remove options that pre populate on the Order Estimate page where you price out the client. Just follow the format defaulted in your account to edit these options. | '''Order Options''' - Here you can rename, add, remove options that pre populate on the Order Estimate page where you price out the client. Just follow the format defaulted in your account to edit these options. | ||
| Line 45: | Line 63: | ||
| | ||
| − | </div> <div class="mw-parser-output"> | + | </div> <div class="mw-parser-output"><div class="mw-parser-output"><div class="mw-parser-output"> </div> </div> </div> </div> |
| − | <div class="mw-parser-output"> | + | == Payroll Settings == |
| − | == | ||
| − | '''[[File:Payroll Settings.png]]''' | + | '''[[File:Payroll Settings.png|RTENOTITLE]]''' |
'''Overtime paid after''' - You can choose if you need to pay overtime after 8 hours in a day or 40 hours in a week here. this will be different state to state, please ask your accountant. | '''Overtime paid after''' - You can choose if you need to pay overtime after 8 hours in a day or 40 hours in a week here. this will be different state to state, please ask your accountant. | ||
| Line 62: | Line 79: | ||
</div> | </div> | ||
| − | <div class="mw-parser-output"><div class="mw-parser-output"> </div> </div> </div> | + | <div class="mw-parser-output"><div class="mw-parser-output"> </div> </div> </div></div> |
| − | |||
== '''QuickBooks Settings''' == | == '''QuickBooks Settings''' == | ||
| Line 91: | Line 107: | ||
| | ||
| − | </div> </div> </div> </div> </div> </div> | + | </div> </div> </div> </div> </div> </div> <div class="mw-parser-output"><div class="mw-parser-output"> |
| − | <div class="mw-parser-output"> | + | == Customer Notification Settings (about upcoming jobs) == |
| − | == | ||
Here you can change the settings of your text messages and emails for upcoming jobs and appointments for clients. Choose to send '''E-mail''', '''Text''', or '''Both''' and add the times in which you wish the messages to be sent. | Here you can change the settings of your text messages and emails for upcoming jobs and appointments for clients. Choose to send '''E-mail''', '''Text''', or '''Both''' and add the times in which you wish the messages to be sent. | ||
| Line 100: | Line 115: | ||
| | ||
| − | <div class="mw-parser-output"> </div> </div> | + | <div class="mw-parser-output"> </div> </div> </div> <div class="mw-parser-output"> |
| − | + | == Inventory Management Settings == | |
| − | == | ||
'''Inventory Tracking''' - *''Please Contact ThermoGrid Support to Enable Inventory Management*'' | '''Inventory Tracking''' - *''Please Contact ThermoGrid Support to Enable Inventory Management*'' | ||
| Line 117: | Line 131: | ||
| | ||
| − | </div> </div> | + | </div> </div> </div> <div class="mw-parser-output"> |
| − | == | + | == Dispatch Settings == |
'''CC Dispatch Notifications''' = Anytime a job is dispatched it will CC any email listed here. | '''CC Dispatch Notifications''' = Anytime a job is dispatched it will CC any email listed here. | ||
| Line 127: | Line 141: | ||
---- | ---- | ||
| − | <div class="mw-parser-output"><div class="mw-parser-output"><div class="mw-parser-output"> | + | <div class="mw-parser-output"><div class="mw-parser-output"><div class="mw-parser-output"> </div> </div> </div> </div> <div class="mw-parser-output"> |
| − | == | + | == Calendar Settings == |
'''Default Job Duration''' = 120 min = a job showing up on the calendar for 2 hours long. | '''Default Job Duration''' = 120 min = a job showing up on the calendar for 2 hours long. | ||
| − | + | Means any primary job type you create or any that are in there using the default can be changed here to any timeframe. [https://help.thermogrid.com/index.php/1._Tab_Administration#Manage_Drop_Downs Manage Drop Downs] Here you can edit each job type times.</div> | |
| − | Means any primary job type you create or any that are in there using the default can be changed here to any timeframe. | ||
| − | [https://help.thermogrid.com/index.php/1._Tab_Administration#Manage_Drop_Downs Manage Drop Downs] Here you can edit each job type times.</div> | ||
*Timezone | *Timezone | ||
*Business Hours | *Business Hours | ||
| Line 141: | Line 153: | ||
| | ||
| − | </div> <div class="mw-parser-output"> | + | </div> <div class="mw-parser-output"><div class="mw-parser-output"> </div> </div> </div> |
| − | == | + | == Service Area Settings == |
Here you can put all the zip codes that you service. If an address it put in that does not match any of these it will inform call center that the job is outside yor service area. | Here you can put all the zip codes that you service. If an address it put in that does not match any of these it will inform call center that the job is outside yor service area. | ||
| Line 152: | Line 164: | ||
---- | ---- | ||
| − | | + | </div> </div> </div> |
| − | </div> </div> | + | </div> |
| + | |||
= '''Dispatch Settings''' = | = '''Dispatch Settings''' = | ||
| Line 221: | Line 234: | ||
[https://help.thermogrid.com/images/8/8f/ThermoGRID_-_Administration_-_Set-Up_5_-_Financial_Settings.docx ThermoGRID_-_Administration_-_Set-Up_5_-_Financial_Settings.docx] | [https://help.thermogrid.com/images/8/8f/ThermoGRID_-_Administration_-_Set-Up_5_-_Financial_Settings.docx ThermoGRID_-_Administration_-_Set-Up_5_-_Financial_Settings.docx] | ||
<div class="mw-parser-output"> | <div class="mw-parser-output"> | ||
| − | == | + | <div class="mw-parser-output"> |
| + | <div class="mw-parser-output"> | ||
| + | <div class="mw-parser-output"> | ||
| + | == <span style="font-size:x-large;">Commission Scale / bonus scale</span> == | ||
| − | Break down the different types of commission scales you would like to use for your staff, ThermoGrids Commission scale is based of the Salesperson/Person who created the order and has an option to split commission if the Sale was generated by a service tech. | + | Break down the different types of commission scales you would like to use for your staff, ThermoGrids Commission and Bonus scale is based of the Salesperson/Person who created the order and has an option to split commission nad Bonus if the Sale was generated by a service tech. |
| − | Each Item in your catalog Can be edited to include commission or not and your company settings will have a maximum commission amount. That amount should match the largest amount on your commission scale, this will ensure that your items are being calculated to maintain a GPM even with paying commission. | + | Each Item in your catalog Can be edited to include commission or not and your company settings will have a maximum commission amount. [https://help.thermogrid.com/index.php/NavBar_-_Administration#Commissions_and_Order_Settings Click Here to Learn how to Edit Maximum Commission] That amount should match the largest amount on your commission scale, this will ensure that your items are being calculated to maintain a GPM even with paying commission. |
| + | |||
| + | [[File:Commisison and bonus.png|RTENOTITLE]] | ||
| | ||
| + | |||
| + | '''<span style="font-size:large;">EXAMPLES: </span>''' | ||
'''If you want to give 10% commission on everything sold no matter what.''' | '''If you want to give 10% commission on everything sold no matter what.''' | ||
| Line 263: | Line 283: | ||
Tech % = .02 | Tech % = .02 | ||
| − | | + | ---- |
| + | |||
| + | If you want to pay on Gross Margin you can Create a Scale under Bonus. | ||
| + | |||
| + | <span style="font-size:medium;">''When does Bonus Get Applied? ''</span> | ||
| + | |||
| + | <span style="font-size:medium;">''Your Bonus Scale will be based off of the GPM % from the Job Costing, If the GPM meets a high enough percentage then ''</span> | ||
| + | |||
| + | <span style="font-size:medium;">''[[File:GPM.png]]''</span> | ||
| | ||
| − | |||
| − | |||
| − | |||
| − | |||
'''If you want to pay sales rep 2% if GM is over 55%''' | '''If you want to pay sales rep 2% if GM is over 55%''' | ||
| Line 288: | Line 312: | ||
Tech % = 0.00 | Tech % = 0.00 | ||
| − | + | ||
'''Example''' | '''Example''' | ||
| Line 308: | Line 332: | ||
Tech % = 0.00 | Tech % = 0.00 | ||
| − | </div> | + | |
| − | == | + | |
| + | </div> | ||
| + | |||
| + | == Payment Methods == | ||
<youtube urlargs="rel=0">26g7-WoRBCs</youtube> | <youtube urlargs="rel=0">26g7-WoRBCs</youtube> | ||
| Line 334: | Line 361: | ||
| | ||
| − | </div> </div> </div> <div class="mw-parser-output"><div class="mw-parser-output"> | + | </div> </div> </div> <div class="mw-parser-output"><div class="mw-parser-output"> </div> </div> </div> |
| − | == | + | |
| + | <div class="mw-parser-output"> | ||
| + | == Discounts & Fees == | ||
Edit | Edit | ||
| Line 346: | Line 375: | ||
'''Percent / Amount''' = Percentage if adding a certain percent or discounting a certain percent. Amount would be a dollar amount discount such as $200 | '''Percent / Amount''' = Percentage if adding a certain percent or discounting a certain percent. Amount would be a dollar amount discount such as $200 | ||
| − | '''Value''' = Put percents in like 10.00 = 10%, Amount = 200.00 = $200</div> <div class="mw-parser-output"><div class="mw-parser-output"><div class="mw-parser-output"> </div> </div> </div> </div> <div class="mw-parser-output"> </div> </div | + | '''Value''' = Put percents in like 10.00 = 10%, Amount = 200.00 = $200</div> <div class="mw-parser-output"><div class="mw-parser-output"><div class="mw-parser-output"> </div> </div> </div> </div> <div class="mw-parser-output"> </div> </div> <div class="mw-parser-output"><div class="mw-parser-output"><div class="mw-parser-output"><div class="mw-parser-output"><div class="mw-parser-output"><div class="mw-parser-output"> </div> </div> </div> </div> </div> </div> </div> |
| − | |||
| − | |||
| − | |||
<div class="mw-parser-output"> | <div class="mw-parser-output"> | ||
| + | == Payment Integrations == | ||
| + | <div class="mw-parser-output"><div class="mw-parser-output"><div class="mw-parser-output"><div class="mw-parser-output"><div class="mw-parser-output"><div class="mw-parser-output"><div class="mw-parser-output"><div class="mw-parser-output"><div class="mw-parser-output"> </div> </div> </div> </div> </div> </div> </div> </div> </div> To integrate with Credit Card Processing in ThermoGrid please download this [http://nebula.wsimg.com/2906a31c825bd663e6a1f433e3864a74?AccessKeyId=AA19C13E8A4EF537D068&disposition=0&alloworigin=1 Application]. Once you are completed filling out the application send it to Support and we will process the request. </div> </div> </div> <div class="mw-parser-output"><div class="mw-parser-output"> </div> </div> </div> | ||
| + | |||
= '''Manage Service Catalog''' = | = '''Manage Service Catalog''' = | ||
| − | < | + | <div class="mw-parser-output"> |
| + | == <span style="font-size: 16px;">Managing Items in ThermoGrid</span> == | ||
| + | |||
| + | Administration > Manage Service Catalog > Manage Service Catalog Items | ||
| + | |||
| + | [[File:Adding an Item 1.png]] | ||
| + | |||
| + | Either Add or Edit a Current Item | ||
| + | |||
| + | To Add Click on "+ New Item" or use the Pencil/Edit Icon on the Left of the Item to make changes to it | ||
| + | |||
| + | [[File:Adding an Item 2.png]] | ||
| | ||
| − | < | + | You will be Presented with this Screen: |
| + | |||
| + | [[File:Adding an Item Full.png]] | ||
| + | |||
| + | <div class="mw-parser-output"> | ||
| + | <div class="mw-parser-output"> | ||
| + | === Information === | ||
| + | |||
| + | The information section covers 10 Options about the Item Including: | ||
| + | |||
| + | *'''Type''' = The Service Type ''(Edited in Manage Dropdowns)'' | ||
| + | *'''Category''' = The Category that can be used to either Search for the Item in your Manage Service Catalog or Be used as a Section in your Service Catalog to List your Items. ''(Edited in Manage Dropdowns)'' | ||
| + | *'''QuickBooks Account''' = What Account do you want this to go to automatically in QuickBooks | ||
| + | *'''QuickBooks Class''' = What Class do you want this to go to automatically in QuickBooks | ||
| + | *'''Name''' = This is the display name inside of the service catalog when your technicians or field staff are choosing Items for an Order/Invoice/Estimate/Proposal ''(If no name is chosen the Description will be used)'' | ||
| + | *'''Description '''=Detailed information about the item, this could list of item features, dimensions or information that you would like to relay about the item.''' '''''(this can be seen with a drop-down in the service catalog)'' | ||
| + | *'''Brand ='''The Items Brand name | ||
| + | *'''Product Line '''= The Items Product Line (This will show on the Supplier Order) | ||
| + | *'''Model Number''' = The Items Model Number (This will show on the Supplier Order) | ||
| + | *'''Supplier Name''' = The Supplier that you typically get this Item from | ||
| + | |||
| + | [[File:Adding an Item Information.png|RTENOTITLE]] </div> | ||
| + | </div> | ||
| + | |||
| + | === Cost and Pricing === | ||
| + | |||
| + | Here you can edit your Cost of Equipment, Materials and Labor on an Item. | ||
| + | |||
| + | '''Equipment Cost''' = What you pay your supplier for this piece of equipment | ||
| + | |||
| + | '''Material Cost''' = What you pay your supplier for this material | ||
| + | |||
| + | '''Labor Cost''' = Your Labor Burden for this work being completed ''(If the Job takes 4 hours and your Field staff makes $25 hour, the Labor Cost is $100)'' | ||
| + | |||
| + | '''Retail Override Amount '''= If you do not want ThermoGrid to Calculate your pricing, Enter your desired selling price here. | ||
| + | |||
| + | '''Labor hours''' = How long should this Item/Task/Service Take? ''(.25 = 15 mins) '' | ||
| + | |||
| + | '''Tax Method''' = How will the Item Calculate Tax? | ||
| + | |||
| + | *'''None''' = No Sales Tax | ||
| + | *'''Include''' = Passes on the sales tax you paid for the item to the client/customer | ||
| + | *'''Separate''' = Calculate standard sales tax split from the Item on the Order/Invoice | ||
| + | |||
| + | [[File:Adding an Item Cost and Pricing.png]] | ||
| + | |||
| + | ''***Note*** IF you are using Supplier Orders NEVER include Equipment and Material cost Together on one Line Item. This will show your supplier an inaccurate expectation for the price you are going to pay, it will add your material cost on top of your equipment.'' | ||
| + | |||
| + | === Equipment Filters <span style="color:#c0392b;">(ADVANCED)</span> === | ||
| + | |||
| + | These Filters are used in the Service Catalog to Sort your Items for ease of use and Can be edited in "Manage Dropdowns" | ||
| + | |||
| + | [[File:Adding an Item equipment Filters.png]] | ||
| + | |||
| + | Here are the correlations between Types, Categories and Filters. | ||
| + | |||
| + | [[File:Adding an Item service filters.png]] | ||
| + | |||
| + | [[File:Adding an Item service Types.png]] | ||
| + | |||
| + | To Change any of the Descriptions of these Use the Edit option in Manage Dropdowns and to add more Filters use the Filters listed on the Danage Dropdowns page | ||
| − | + | [[File:Adding an Item Filter List.png]] | |
| − | + | Once you have populated your filters appropriately you can then apply them to the Line item. | |
| − | |||
| − | |||
| − | |||
| − | |||
| − | |||
| − | |||
| − | |||
| − | |||
| − | |||
| − | + | === Allowances and Flags === | |
| − | + | ||
| − | + | This can be Overwhelming for some and cause frustration if you don't know what certain settings mean. Which is why we have provided a Simple solution under Allowances and Flags. To expand explanations of the Allowances and Flags area Simply click on the "Question Mark" Icon. | |
| − | + | ||
| − | + | [[File:Adding an Item 3.png]] | |
| − | |||
| − | |||
| − | |||
| − | |||
| − | |||
| − | |||
| − | |||
| − | |||
| − | |||
| − | |||
| − | |||
| − | |||
| − | |||
| − | |||
| − | |||
| − | |||
| − | |||
| − | |||
| − | |||
| − | |||
| − | |||
| − | |||
| − | |||
| − | |||
| − | |||
| − | |||
| − | |||
| − | |||
| − | |||
| − | |||
| | ||
| | ||
| − | <div | + | </div> |
| + | |||
| + | == '''Tags''' == | ||
| + | |||
| + | In ThermoGrid it is possible to create "Packages" or have Automatic Items added to an Item when choosing it in the Service Catalog. This gives us the ability to Quickly create Invoices or Quotes for clients with out the need to search through a price book for the specific Items we need. | ||
| + | |||
| + | Here is an Example Below of the Results of Tagging the necessary items to a piece of equipment. The Item highlighted in <span style="color:#2980b9;">Blue is the Main/Parent </span>Item and the others highlighted in <span style="color:#16a085;">Green are the Tagged Items</span> | ||
| + | |||
| + | [[File:Tagging Example 1.png|RTENOTITLE]] | ||
| + | |||
| + | '''''***Note*** you will see multiple of certain items because multiple options may be necessary such as a 30 foot or a 50 ft line set in this case, the item that is not needed can easily be deleted off of the order''''' | ||
| + | |||
| + | == Main Component Tags == | ||
| + | |||
| + | The "Main Component Tags" are the Items that you are looking to automatically populate below the "Parent/Main" Item that you have chosen. These Need to be created as "Accessory Tags" First, but that will be covered below. | ||
| + | |||
| + | When in ThermoGrid the Tagged Option above will look like ''this'' on the "Parent/Main" Item the Service Catalog. In this case that Item is the "Trane AC 4TTR3018H1000N 13 Seer 1.5 Tons" | ||
| + | |||
| + | [[File:Tagging Example 2.png|RTENOTITLE]] | ||
| + | |||
| + | <div class="mw-parser-output"> | ||
<div class="mw-parser-output"> | <div class="mw-parser-output"> | ||
| − | == ''' | + | == Accessory Component Tags == |
| + | |||
| + | This is the name of the Item that you are tagging to the "Main/Parent" Item in ThermoGrid. Typically this should be something very clear and obvious so that when selecting the Main Components you know exactly what Items will be added. | ||
| + | |||
| + | These Examples below show how each Accessory Item has an '''Accessory Component Tag''' that allows it to be added to other Items. | ||
| + | |||
| + | In This Example we can see the the Description of the Item has been Directly Chosen as the label of the '''Accessory Component Tag '''this allows us to easily pick the same name when selecting it on our '''Main''''''/''''''Parent '''Item. <span style="font-size:smaller;">''Above''</span> | ||
| + | |||
| + | [[File:TAgging connection.png|RTENOTITLE]] | ||
| + | |||
| + | To add a Tag to an Item that is in your Service Catalog Simply Click on the Blue/Teal "+" Button on the right hand side of the Accessory Component Tag Section | ||
| + | |||
| + | [[File:Tagging Instructions.png|RTENOTITLE]] | ||
| + | |||
| + | Chose a Current Tag that is being Used or Add a New Tag | ||
| − | + | Current Tags are Listed in the Dropdown | |
| − | + | [[File:Tagging Instructions 2.png|RTENOTITLE]] | |
| − | + | OR | |
| − | + | Create a New Tag by Clicking "Add New" and Typing in what ever you would like to label this Tag as, after Inputing the Name Click "Save" on the bottom Right of the Page. | |
| − | |||
| − | |||
| − | |||
| − | |||
| − | |||
| − | |||
| − | |||
| − | |||
| − | |||
| − | + | [[File:Tagging Instructions 3.png|RTENOTITLE]] | |
| | ||
| − | + | Once you have Created the Accessory Component Tags you then can go to the Main/Parent Item and select all of the Main Component Tags from the Dropdown so that they are automatically added when that Item is selected from the Service Catalog, | |
| | ||
| − | + | | |
| − | + | | |
| − | + | ||
| − | + | | |
| − | + | <div class="mw-parser-output"> </div> </div> </div> </div> </div> </div> </div> </div> </div> </div></div></div> | |
| − | |||
| − | |||
| − | |||
| − | |||
| − | |||
| − | |||
| − | |||
| − | |||
| − | |||
| − | |||
| − | |||
| − | |||
| − | |||
| − | |||
| − | |||
| − | |||
| − | |||
| − | |||
| − | |||
| − | |||
| − | |||
| − | |||
| − | |||
| − | |||
| − | |||
| − | |||
| − | |||
= '''Manage Suppliers''' = | = '''Manage Suppliers''' = | ||
| Line 1,159: | Line 1,218: | ||
= '''Manage Communications''' = | = '''Manage Communications''' = | ||
| + | <div class="mw-parser-output"> | ||
<div class="mw-parser-output"> | <div class="mw-parser-output"> | ||
== Manage Email Templates == | == Manage Email Templates == | ||
| + | |||
| + | The [[Marketing]] Page has more detailed instructions with Visuals on this process. | ||
| + | |||
| + | | ||
[[Media:ThermoGrid_Administration_Set-Up_Manage_Communications.pdf|'''Media:ThermoGrid Administration Set-Up Manage Communications.pdf''']] | [[Media:ThermoGrid_Administration_Set-Up_Manage_Communications.pdf|'''Media:ThermoGrid Administration Set-Up Manage Communications.pdf''']] | ||
| Line 1,196: | Line 1,260: | ||
---- | ---- | ||
| + | |||
</div> | </div> | ||
| + | <div class="mw-parser-output"> </div> </div> | ||
| − | |||
== Manage Text Templates == | == Manage Text Templates == | ||
| Line 1,211: | Line 1,276: | ||
<div class="mw-parser-output"><div class="mw-parser-output"> </div> </div> </div> </div> </div> | <div class="mw-parser-output"><div class="mw-parser-output"> </div> </div> </div> </div> </div> | ||
| + | <div class="mw-parser-output"> | ||
<div class="mw-parser-output"> | <div class="mw-parser-output"> | ||
= '''Inventory Management''' = | = '''Inventory Management''' = | ||
Latest revision as of 10:49, 16 December 2021
Contents
- 1 Company Settings
- 2 Dispatch Settings
- 3 Club Memberships - Maintenance Agreements
- 4 Financial Settings
- 5 Manage Service Catalog
- 6 Manage Suppliers
- 7 Manage Drop Downs
- 7.1 Standard Operating Procedure
- 7.2 Service Types
- 7.3 Service Categories
- 7.4 Service Filters
- 7.5 Home Types
- 7.6 Job Status
- 7.7 Job Tech Status
- 7.8 Primary Job Types
- 7.9 Job Lead Sources
- 7.10 Job Reasons
- 7.11 Job Priorities
- 7.12 Call Status
- 7.13 Call Resolutions
- 7.14 Tech Skills
- 7.15 Unit Types
- 7.16 Unit Extras
- 7.17 Unit Warranty Types
- 7.18 Compensation Types
- 7.19 Order Presentation Labels
- 8 Manage Job Documents
- 9 Manage Communications
- 10 Inventory Management
- 11 Manage Users
Company Settings
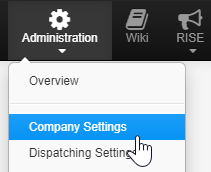
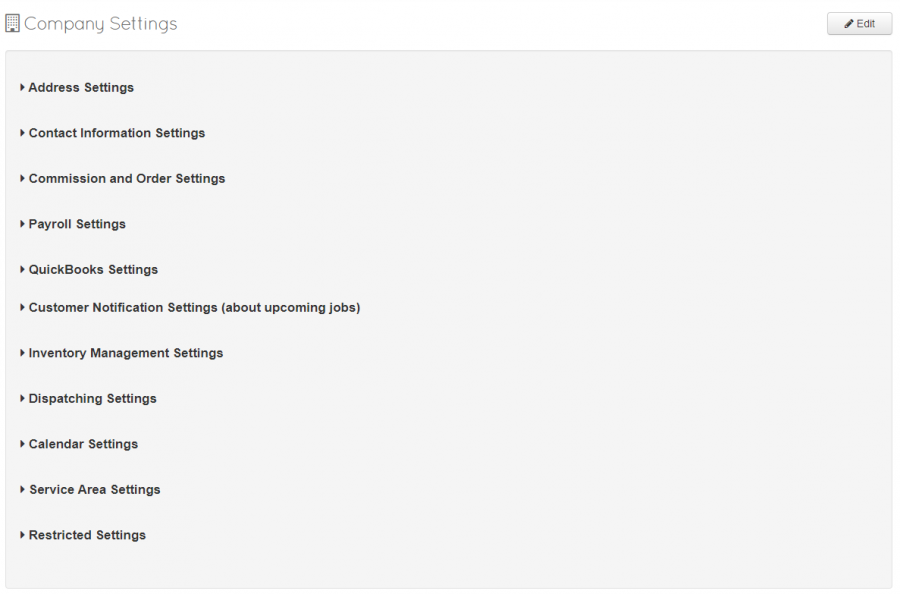
- From the home page select “Administration”
- Select “Company Settings” (top row, left)
- Select the Edit icon on the top right of the screen
- You can edit/adjust any of the information you have entered
- Save the information
Contact Information Settings
This information will be displayed on the company invoice.
The email listed here will be CC'd on invoice sent to clients and will also show up on the message to clients to respond to this email.
Commissions and Order Settings
Order Options - Here you can rename, add, remove options that pre populate on the Order Estimate page where you price out the client. Just follow the format defaulted in your account to edit these options.
Profit Margin - Here you can change your gross profit or profit margin. This must be put in as a decimal (.55). This will change everything in your service catalog ( price book ) that does not have a retail override or a custom gross margin on the item itself.
Max Commission - This is the percentage that will be used to calculate a true gross margin on items in the service catalog that are commissioned and are using gross margins to calculate the price. (Meaning items that you did not make a retail override price for)
Typical Hot Day - Whatever temperature you select here will change the formulas used to calculate the cooling size of system needed on the Engineering Analysis page of an order. (HVAC)
Typical Cold Day - Whatever temperature you select here will change the formulas used to calculate the heating size of system needed on the Engineering Analysis page of an order. (HVAC)
Payroll Settings
Overtime paid after - You can choose if you need to pay overtime after 8 hours in a day or 40 hours in a week here. this will be different state to state, please ask your accountant.
Work week begins on - You will also be able to pick the day your payroll begins for a pay period.
Minimum wage - Put in your local minimum wage here, this will make sure that if you pay task pay or piece rate to any employees you remain legal. This will be calculated based on clocked in hours and show you the difference between their task pay and minimum wage, then it will bonus them so you remain legal.
Time Off Event Color - When an employee requests time off on the calendar, PTO or not it will use this color so you can quickly identify those that are off.
QuickBooks Settings
Here you will be able to connect to QuickBooks, see a log of all syncs done or find errors, see all documentation, and change country. To see full instructions for setup go to QuickBooks page.
QuickBooks Desktop
ThermoGRID_-_Administration_-_Set-Up_10_-_Import_Client_Data.docx
ThermoGRID_-_Administration_-_Set-Up_6_-_QuickBooks_Desktop_Intergration.docx
This is the version that has an app on your computer that you click to login. This you can usually purchase and not have to pay again until you update.
To see full instructions for setup go to QuickBooks page.
QuickBooks Online
ThermoGRID_-_Administration_-_QuickBook_Errors.docx
ThermoGRID_-_Administration_-_Set-Up_6_-_QuickBooks_Online_Intergration.docx
This is the version that you open a browser and search for QuickBooks to login. QuickBooks Online has more integration features but has a monthly fee.
To see full instructions for setup go to QuickBooks page.
Customer Notification Settings (about upcoming jobs)
Here you can change the settings of your text messages and emails for upcoming jobs and appointments for clients. Choose to send E-mail, Text, or Both and add the times in which you wish the messages to be sent.
For more information on how to setup your text messages and emails go to the Message Center.
Inventory Management Settings
Inventory Tracking - *Please Contact ThermoGrid Support to Enable Inventory Management*
Acceptable Quantity Variance - This will display on the inventory variance page how far off each tech is based on the quantity they should have on their truck.
Acceptable Value Variance - This will display on the inventory variance page how far off each tech is based on the cost of each part and total value of wha they should have on their truck.
To learn more go to the Inventory Page.
Dispatch Settings
CC Dispatch Notifications = Anytime a job is dispatched it will CC any email listed here.
Notify Before Unassigned Job Ends = Put in minutes you would want to be notified before a job ends. If a job is set for 2 hours and you put 120 min in there it will notify you when job should begin that you didn't assign it yet.
CC Unassigned Job Notifications = if a job has not been assigned you can CC other emails that it still needs to be dispatched.
Calendar Settings
Default Job Duration = 120 min = a job showing up on the calendar for 2 hours long.
Means any primary job type you create or any that are in there using the default can be changed here to any timeframe. Manage Drop Downs Here you can edit each job type times.- Timezone
- Business Hours
- Business Days
Service Area Settings
Here you can put all the zip codes that you service. If an address it put in that does not match any of these it will inform call center that the job is outside yor service area.
Manage Affiliates
Lets you put other businesses in with the zip codes they service and it will recommend to the call center another company to service the client. If they recommended the client to another company they can click a button that will pass the client info automatically to the affiliate and send the client the affiliates information. This can be used for other industry referrals as well.
Dispatch Settings
ThermoGRID_-_Administration_-_Set-Up_13_-_Dispatching_Settings.docx
These items must be setup prior in the Daily Management Report:
- Category
- Department
- Job Type
Once the DMR is setup you can setup dispatching settings that will dispatch by a few areas.
- Role
- Skill
- Distance
- Performance or KPIs
Example:
Lets say you want to dispatch:
- A service job for HVAC
- Do not want them to drive over 60 miles
- Want to make sure the tech has the skills
- And will make you the most revenue
- And it is a 12+ opp (old system)
- Description "12+ opp Service"
- Distance "60"
- Restrict Skills "Yes"
- Add Condition: "Category" and "HVAC" (third box over) Click +Add
- Add Condition: "Department" and "Service" (third box over) Click +Add
- Add Condition: "Job Type" and "12+opp (third box over) Click +Add
- KPI Measurements: Edit -Indicator = "12+ closing rate" Weight = "Very High" (or low if you are lining up other types of jobs more important) Time period: this month or this and last (time period it is pulling numbers for)
Example:
Lets say you want to dispatch:
- Any HVAC Service job to anyone
Add Condition: "Category" and "Service" (third box over) Click +Add
Club Memberships - Maintenance Agreements
Simply Click to Download the SOP on setting up your memberships
Deferred_Revenue_for_Memberships.docx (This is for QuickBooks Online Only)
ThermoGRID_-_Administration_-_Set-Up_12_-_Club_Memberships.docx
Financial Settings
Standard Operating Procedure
ThermoGRID_-_Administration_-_Set-Up_5_-_Financial_Settings.docx
Commission Scale / bonus scale
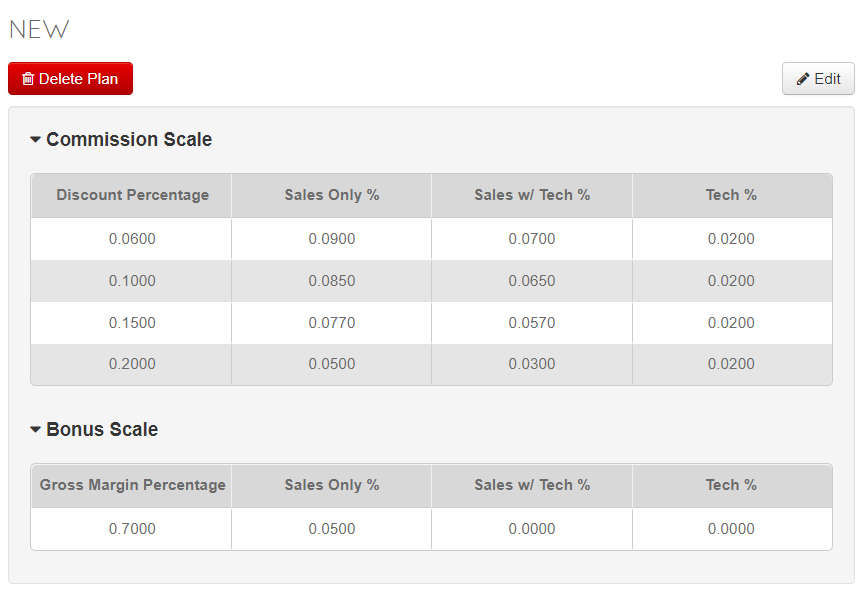
Break down the different types of commission scales you would like to use for your staff, ThermoGrids Commission and Bonus scale is based of the Salesperson/Person who created the order and has an option to split commission nad Bonus if the Sale was generated by a service tech.
Each Item in your catalog Can be edited to include commission or not and your company settings will have a maximum commission amount. Click Here to Learn how to Edit Maximum Commission That amount should match the largest amount on your commission scale, this will ensure that your items are being calculated to maintain a GPM even with paying commission.
EXAMPLES:
If you want to give 10% commission on everything sold no matter what.
Discount Percentage = 1
Sales Only % = .1
If you want to give 10% if the sales rep discounts less than 10% and 5% if they discount 20% and nothing above that.
Discount Percentage = .1
Sales Only % = .1
Discount Percentage = .2
Sales Only % = .05
If you want to give 10% if the sales rep discounts less than 10% and 5% if they discount 20% and nothing above that and if it's a tech lead the tech gets 2% and it goes against the sales rep.
Discount Percentage = .1
Sales Only % = .1
Sales w/ Tech % = .08
Tech % = .02
Discount Percentage = .2
Sales Only % = .05
Sales w/ Tech % = .03
Tech % = .02
If you want to pay on Gross Margin you can Create a Scale under Bonus.
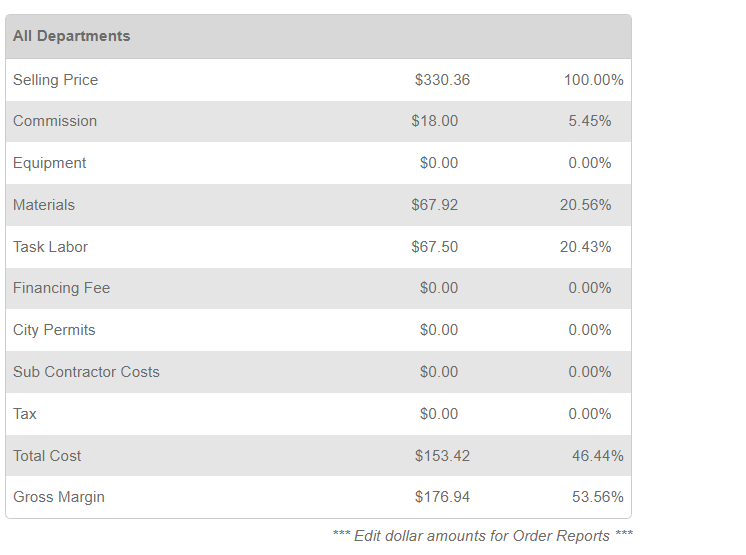
When does Bonus Get Applied?
Your Bonus Scale will be based off of the GPM % from the Job Costing, If the GPM meets a high enough percentage then
If you want to pay sales rep 2% if GM is over 55%
Gross Margin Percentage = 0.57
Sales Only % = 0.00
Sales w/ Tech % = 0.00
Tech % = 0.00
Gross Margin Percentage = 1.00
Sales Only % = 0.02
Sales w/ Tech % = 0.00
Tech % = 0.00
Example
If you want to pay sales rep 2% if GM is over 55% only if it is a tech lead.
Gross Margin Percentage = 0.57
Sales Only % = 0.00
Sales w/ Tech % = 0.00
Tech % = 0.00
Gross Margin Percentage = 1.00
Sales Only % = 0.00
Sales w/ Tech % = 0.02
Tech % = 0.00
Payment Methods
How to Add or Modify Payment - Financing Options
- From the home screen select “Administration”
- Select “Financial Settings” (top row, right)
- Then select “Financing plans” (middle)
- Select the edit icon (top, right of the screen)
- You can edit any of the terms that you have entered
- To add a new plan select “+Add Row” (top, left)
- Type in the company name
- Type a description of the finance plan
- Enter the deal fee (the cost to you to use this plan)
- Enter the interest rate
- The payment factor calculates what the home owners payments would be
- Save the plan
- You can now select this plan on any purchase order
Discounts & Fees
Edit
+ Add Discount Or Fee
Name = This will be the name sale and field reps see on the Order Estimate page under "Discounts and Fees"
Discount / Fee = Here you choose if this item you are setting up a discount or a fee
Percent / Amount = Percentage if adding a certain percent or discounting a certain percent. Amount would be a dollar amount discount such as $200
Value = Put percents in like 10.00 = 10%, Amount = 200.00 = $200Payment Integrations
Manage Service Catalog
Managing Items in ThermoGrid
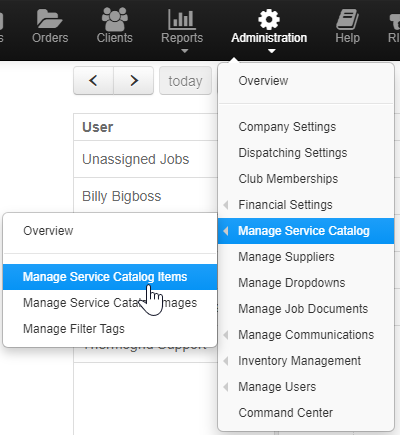
Administration > Manage Service Catalog > Manage Service Catalog Items
Either Add or Edit a Current Item
To Add Click on "+ New Item" or use the Pencil/Edit Icon on the Left of the Item to make changes to it
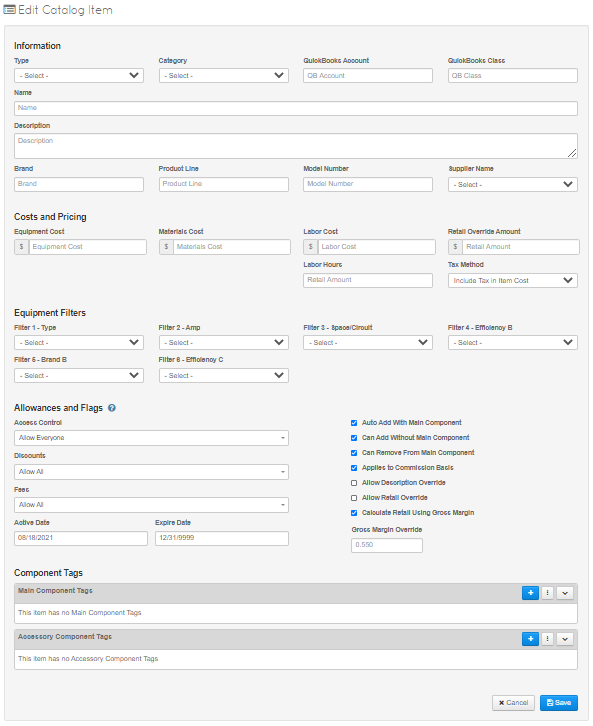
You will be Presented with this Screen:
Information
The information section covers 10 Options about the Item Including:
- Type = The Service Type (Edited in Manage Dropdowns)
- Category = The Category that can be used to either Search for the Item in your Manage Service Catalog or Be used as a Section in your Service Catalog to List your Items. (Edited in Manage Dropdowns)
- QuickBooks Account = What Account do you want this to go to automatically in QuickBooks
- QuickBooks Class = What Class do you want this to go to automatically in QuickBooks
- Name = This is the display name inside of the service catalog when your technicians or field staff are choosing Items for an Order/Invoice/Estimate/Proposal (If no name is chosen the Description will be used)
- Description =Detailed information about the item, this could list of item features, dimensions or information that you would like to relay about the item. (this can be seen with a drop-down in the service catalog)
- Brand =The Items Brand name
- Product Line = The Items Product Line (This will show on the Supplier Order)
- Model Number = The Items Model Number (This will show on the Supplier Order)
- Supplier Name = The Supplier that you typically get this Item from

Cost and Pricing
Here you can edit your Cost of Equipment, Materials and Labor on an Item.
Equipment Cost = What you pay your supplier for this piece of equipment
Material Cost = What you pay your supplier for this material
Labor Cost = Your Labor Burden for this work being completed (If the Job takes 4 hours and your Field staff makes $25 hour, the Labor Cost is $100)
Retail Override Amount = If you do not want ThermoGrid to Calculate your pricing, Enter your desired selling price here.
Labor hours = How long should this Item/Task/Service Take? (.25 = 15 mins)
Tax Method = How will the Item Calculate Tax?
- None = No Sales Tax
- Include = Passes on the sales tax you paid for the item to the client/customer
- Separate = Calculate standard sales tax split from the Item on the Order/Invoice
***Note*** IF you are using Supplier Orders NEVER include Equipment and Material cost Together on one Line Item. This will show your supplier an inaccurate expectation for the price you are going to pay, it will add your material cost on top of your equipment.
Equipment Filters (ADVANCED)
These Filters are used in the Service Catalog to Sort your Items for ease of use and Can be edited in "Manage Dropdowns"
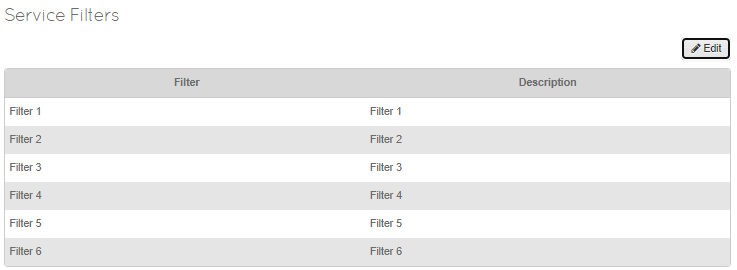
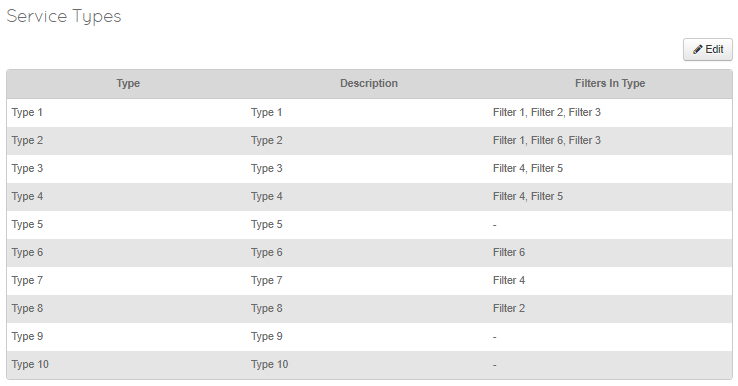
Here are the correlations between Types, Categories and Filters.
To Change any of the Descriptions of these Use the Edit option in Manage Dropdowns and to add more Filters use the Filters listed on the Danage Dropdowns page
Once you have populated your filters appropriately you can then apply them to the Line item.
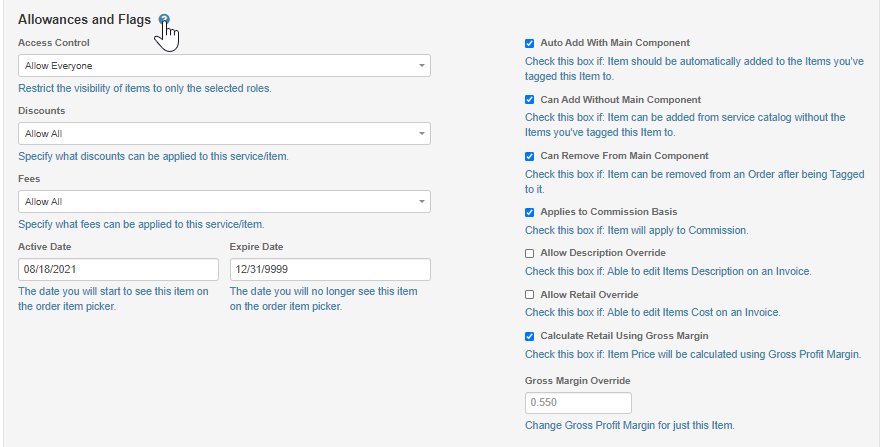
Allowances and Flags
This can be Overwhelming for some and cause frustration if you don't know what certain settings mean. Which is why we have provided a Simple solution under Allowances and Flags. To expand explanations of the Allowances and Flags area Simply click on the "Question Mark" Icon.
Tags
In ThermoGrid it is possible to create "Packages" or have Automatic Items added to an Item when choosing it in the Service Catalog. This gives us the ability to Quickly create Invoices or Quotes for clients with out the need to search through a price book for the specific Items we need.
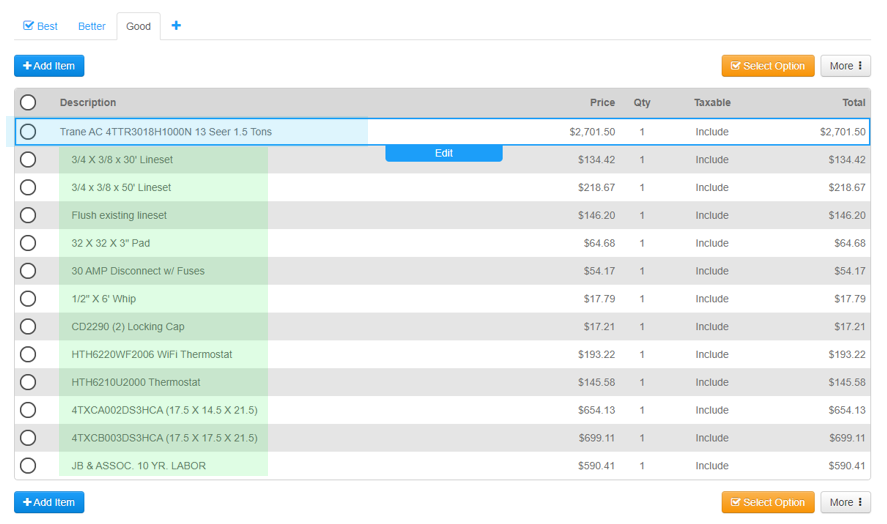
Here is an Example Below of the Results of Tagging the necessary items to a piece of equipment. The Item highlighted in Blue is the Main/Parent Item and the others highlighted in Green are the Tagged Items
***Note*** you will see multiple of certain items because multiple options may be necessary such as a 30 foot or a 50 ft line set in this case, the item that is not needed can easily be deleted off of the order
Main Component Tags
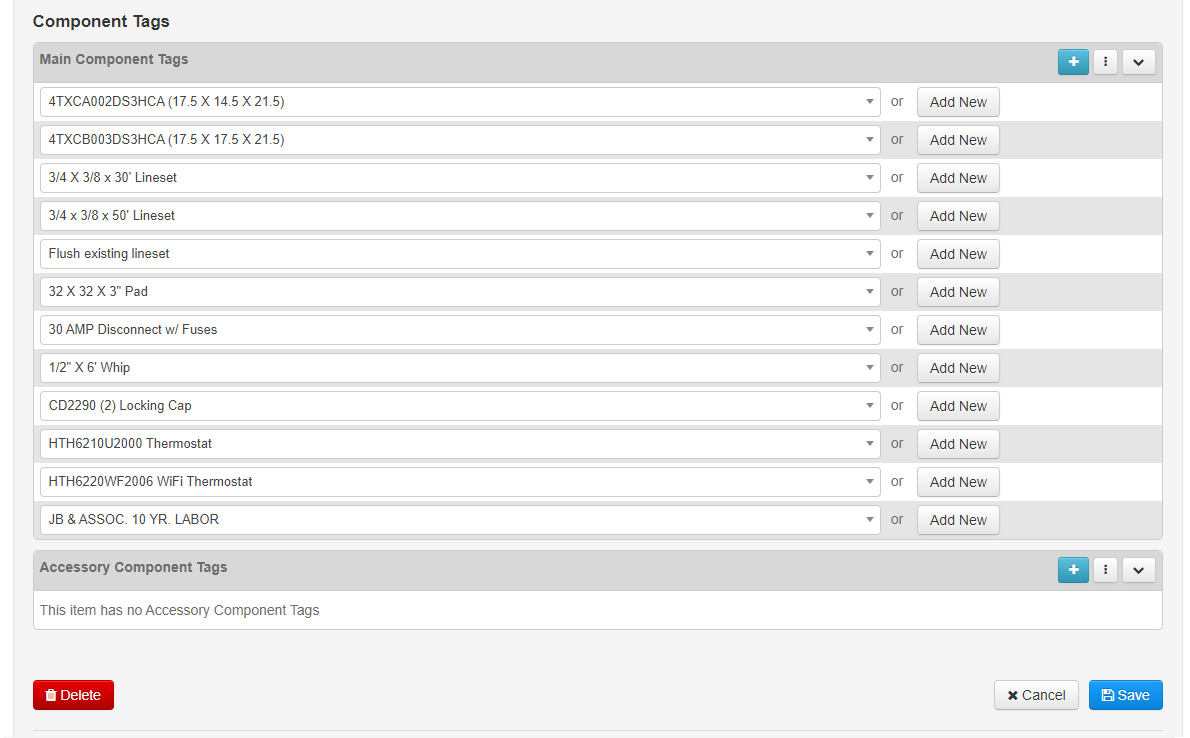
The "Main Component Tags" are the Items that you are looking to automatically populate below the "Parent/Main" Item that you have chosen. These Need to be created as "Accessory Tags" First, but that will be covered below.
When in ThermoGrid the Tagged Option above will look like this on the "Parent/Main" Item the Service Catalog. In this case that Item is the "Trane AC 4TTR3018H1000N 13 Seer 1.5 Tons"
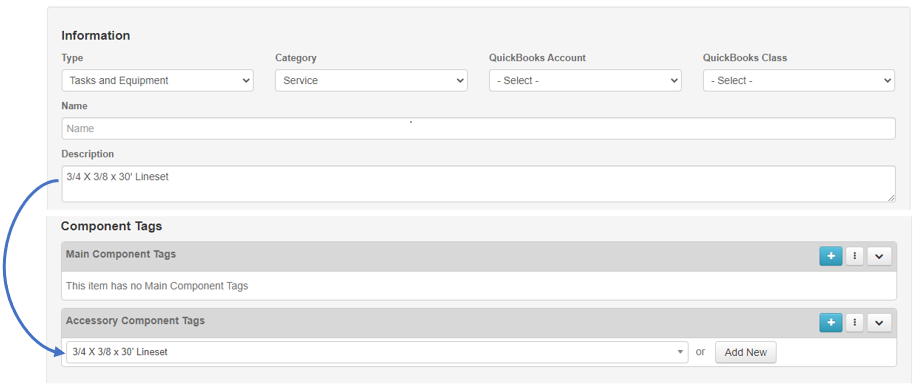
Accessory Component Tags
This is the name of the Item that you are tagging to the "Main/Parent" Item in ThermoGrid. Typically this should be something very clear and obvious so that when selecting the Main Components you know exactly what Items will be added.
These Examples below show how each Accessory Item has an Accessory Component Tag that allows it to be added to other Items.
In This Example we can see the the Description of the Item has been Directly Chosen as the label of the Accessory Component Tag this allows us to easily pick the same name when selecting it on our Main'/'Parent Item. Above
To add a Tag to an Item that is in your Service Catalog Simply Click on the Blue/Teal "+" Button on the right hand side of the Accessory Component Tag Section
Chose a Current Tag that is being Used or Add a New Tag
Current Tags are Listed in the Dropdown
OR
Create a New Tag by Clicking "Add New" and Typing in what ever you would like to label this Tag as, after Inputing the Name Click "Save" on the bottom Right of the Page.
Once you have Created the Accessory Component Tags you then can go to the Main/Parent Item and select all of the Main Component Tags from the Dropdown so that they are automatically added when that Item is selected from the Service Catalog,
Manage Suppliers
Enter all Supplier information for your standard supply houses. By adding this information if will populate the location of the supplier on your Maps as well as create automatic supplier orders as long as your catalog items have an assigned supplier.(Note: If you create a supplier with no address the map will give you an error saying "Unable to locate the following addresses because address is empty:")
How to Add a Supplier
- From the home screen select “Administration”
- Select “Manage Supplier” (bottom row, middle)
- Select “+ Add Supplier” at the top right of the page
- Enter all the necessary information that appears
- You will enter the supplier name and address information and the suppliers contact information
- The e-mail is important for when you create the purchase order
- Save all information
</div> </div> </div>
Manage Drop Downs
Standard Operating Procedure
This will provide a more in depth look at editing and changing your dropdown menu options. Choose the Video or the File Below
Service Types
These are the filters use when selecting items from the Order Estimate page. Some items have additional filters the allow Techs or sales reps to narrow down their searches.
Below we can see some Defaults for HVAC
These are the defaults in the price book that have filters. These are the main pages when the service catalog is exported to excel. You can edit these names in ThermoGrid but not on the export.
- Furnace (HVAC)
- Air Handler (HVAC)
- Air Conditioner (HVAC)
- Tasks and Equipment (ANY)
- Heat Pump (HVAC)
- Mobile Home Furnace (HVAC)
- Geo Thermal (HVAC)
- Boiler (HVAC)
This will show you which filter goes with each area, make sure you look this over and think it through if you want to edit these. Service Filters
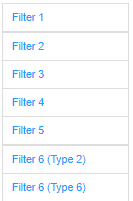
The filters that default are:
| Filter 1 | Brand A |
| Filter 2 | Efficiency A |
| Filter 3 | Size |
| Filter 4 | Efficiency B |
| Filter 5 | Brand B |
| Filter 6 | Efficiency C |
Before adjusting these make sure you understand what you are looking for. We recommend adding items from the price book to see how it all flows and even ask for help if you need it.
When these are change it will change it on the export to excel from the service catalog but it must be changed in ThermoGRID not on the excel file.
Service Categories
These are the Default Categories for an HVAC Account and can be edited or changed.
In addition to the default Service Types you can create other categories that have no filters. this means when you click the category you will see a list of all items within it right away.
- Furnace (HVAC)
- Air Handler (HVAC)
- Air Conditioner (HVAC)
- Heat Pump (HVAC)
- Tasks and Equipment
- Mobile Home Furnace (HVAC)
- Geo Thermal (HVAC)
- Boiler (HVAC, Plumbing)
Examples
- Ductwork (HVAC)
- IAQ (HVAC, Electrical)
- Water Heaters (HVAC, Plumbing)
- Electrical (HVAC, Electrical)
- Fixtures (HVAC, Electrical, Plumbing,etc.)
- Service
- Etc.
Or you can go even further and put:
- Capacitors (HVAC, Electrical)
- Contractors
- Blower Motors (HVAC)
- Etc.
When you export the service catalog it will be column B. You can create new Categories on the fly while the catalog is in excel and import back in.
</div> </div> </div>
Service Filters
- Furnace
- Air Handler
- Air Conditioner
- Heat Pump
- Mobile Home Furnace
- Geo Thermal
- Boiler
The filters that default are:
| Filter 1 | Brand A |
| Filter 2 | Efficiency A |
| Filter 3 | Size |
| Filter 4 | Efficiency B |
| Filter 5 | Brand B |
| Filter 6 | Efficiency C |
Before adjusting these make sure you understand what you are looking for. We recommend adding items from the price book to see how it all flows and even ask for help if you need it.
When these are change it will change it on the export to excel from the service catalog but it must be changed in ThermoGRID not on the excel file.
Home Types
By editing this you will be able to add different types home types in your market. This allows a tech to know what they are getting into before arriving on the job.
You can add in Business or Slab. You can customize any way you wish.
It will default with:
| Apartment | |
| 2 Story | |
| Ranch | |
| Duplex | |
| Town House |
Just click edit and + Add to add new ones.
Click the trash can to delete
Job Status
By editing this you will be able to add different types status for jobs.
This can allow you to sort daily on people the waiting for parts, No Sales, Missed opportunities, etc. Just make sure any type of call needing to be closed needs to have the word closed in it. "Close Client Canceled"
You can customize any way you wish.
It will default with:
| Open | |
| Holding for parts | |
| Go Back | |
| Closed |
Click the trash can to delete
Just click edit and + Add to add new ones.
Job Tech Status
By editing this you will be able to add different types statuses for jobs.
This can allow you to see where each tech is at with a job and have it color coded.
You can customize any way you wish.
It will default with:
| Dispatched | ||
| In-Route | ||
| Onsite | ||
| Running Late | ||
| Complete |
Just click edit and + Add to add new ones.
Click the trash can to delete</div>Primary Job Types
By editing this you will be able to add different types of Primary Job Types.
Primary Job Types we can:
- Assign different color to them.
- Different Roles
- Default expected duration of the job.
- Number of expected jobs.
- Assign different client notifications templates.
Also you can go to Customer Notification Settings (about upcoming jobs) to set when and how many reminders are sent.
You can customize any way you wish.
Just click edit and + Add to add new ones.
Click the trash can to delete
Job Lead Sources
By editing this you will be able to add different types of Lead Source you wish to track. The VoIP system can automate this for you but you can still edit it.
You are able to add this to a job that is created and you can run reports based on lead source on the "Orders Report".
You can customize any way you wish.
It will default with:
| Internet | |
| Phone Book | |
| Radio | |
| TV | |
| Referral | |
| Networking | |
| Home Show | |
| Existing Client |
Click the trash can to delete
Just click edit and + Add to add new ones.
Job Reasons
By editing this you will be able to add different types of Job Reasons.
This can allow you to look at the dispatch board at a glance and see what types of jobs are coming in but narrow it down a little more that just "Service" or "Repair" Maybe like "No Heat" or "Water Leak"
You can customize any way you wish.
It will default with:
| Install | |
| No Heat | |
| No Cool | |
| Noise Issue | |
| Comfort Issue | |
| Maintenance | |
| Needs Estimate |
Click the trash can to delete
Just click edit and + Add to add new ones. </div>
Job Priorities
By editing this you will be able to add different types Priorities for jobs. This way call center can look at the dispatch board and quickly see which job is a higher priority than another if ones need to be rescheduled.
This can allow you to sort daily on people the need to be called back, etc. Just make sure any type of call needing to be closed needs to have the word closed in it. "Close Client Canceled"
You can customize any way you wish.
It will default with:
| 1 | Flexible Call Back / Club Member No Heat No Cool | |
| 2 | Call Back / Club Member No Heat No Cool | |
| 3 | Flexible No Heat, No Cool 12+ Years Old | |
| 4 | No Heat, No Cool 12+ Years Old | |
| 5 | Flexible No Heat, No Cool Less than 12 Years Old | |
| 6 | No Heat, No Cool Less than 12 Years Old | |
| 7 | Club Member Maintenance 12+ Years Old | |
| 8 | Club Member Maintenance Less Than 12 Years Old | |
| 9 | Tune-Up 12+ Years Old | |
| 10 | Tune-Up less than 12 Years Old | |
| -1 | Tech Lead No Heat / No Cool (Sales) | |
| -2 | Marketed Lead No Heat / No Cool (Sales) | |
| -3 | Tech Lead Operational (Sales) | |
| -4 | Marketed Lead Operational (Sales) | |
| -5 | One Legger / Tight Time Schedule (Sales) |
Just click edit and + Add to add new ones.
Click the trash can to delete
Call Status
By editing this you will be able to add different types status for calls.
This can allow you to sort daily on people the need to be called back, etc. Just make sure any type of call needing to be closed needs to have the word closed in it. "Close Client Canceled"
You can customize any way you wish.
It will default with:
| Open | |
| Holding for parts | |
| Go Back | |
| Closed |
Click the trash can to delete
Just click edit and + Add to add new ones.
Call Resolutions
By editing this you will be able to add different types of resolutions for calls.
This can allow you to track Reason for no book. Just Put "No Book - Price" and "No Book - Full Schedule"
You can customize any way you wish.
It will default with:
| Booked | |
| No book | |
| Vendor | |
| Telemarketing | |
| Wrong Number | |
| Existing Client Info |
Just click edit and + Add to add new ones.
Click the trash can to delete
Tech Skills
By editing this you will be able to add different types of skills required to perform certain jobs.
It will default with:
| Call Back | |
| Repair Mini-split | |
| Install Furnace | |
| Install AC | |
| Install HP | |
| Install Boiler | |
| Install Geo | |
| Install IAQ | |
| Sales IAQ | |
| Repair Geo | |
| Repair Boiler | |
| Tune Up AC | |
| Tune Up HP | |
| Tune Up Furnace | |
| Tune Up Boiler | |
| Tune Up Geo | |
| Repair AC | |
| Repair HP | |
| Repair Furnace | |
| Sales Replacement |
Just click edit and + Add to add new ones.
Click the trash can to delete
These can be added to each user under Manage User Accounts.
These can be added to a job.
Unit Types
By editing this you will be able to add different types of units your company provides service for or sells.
It will default with:
| Air Conditioner | |
| Water Heater | |
| EAC | |
| Package Unit | |
| Filter | |
| Humidifier | |
| Furnace | |
| Heat Pump | |
| Mini Split | |
| HRV | |
| Water Heater | |
| Boiler | |
| Geothermal |
Just click edit and + Add to add new ones.
Click the trash can to delete.
Unit Extras
By editing this you will be able to add different types of items your company provides as part of maintenance. (UV Lights, Filters, Belts Etc.)
Just click edit and + Add to add new ones.
Click the trash can to delete.
Once a "Unit" (Furnace, AC, Heat Pump, Water Heater, Ect.) is added in on the Call, Order, or Client section then you can add the extras. **Must save the unit first.
This allows you to add the extras to the units and see what the client needs before going out or even report on all of them from the Membership Report.
Unit Warranty Types
By editing this you will be able to add different types of warranties your company provides.
It will default with:
- Manufacturer
- In House
- 3rd Party
Just click edit and + Add to add new ones.
Click the trash can to delete
Compensation Types
Compensation types are consistent spiffs or bonuses that your employees would receive after completing a Task, Job or Activity.
Example: a Service Tech receives $10 for adding or replacing the Sticker with your company sticker on the equipment worked on.
These Will be able to be selected when then Tech or Admin/Office is looking at the Calendar under Add
Order Presentation Labels
ThermoGrid uses certain terminology for our pages when quoting or selling to a client. These Terms are "Order Estimate" and "Client Agreement" if you would like to have multiple options to use when creating a Proposal/Invoice/Estiamte ect. You are able to add and Edit those here
Manage Job Documents
- Safety Inspection Checklist
- Preventative Maintenance Agreement
- Service Maintenance Agreement Application
- Final Inspection Check List
- Inspection Report
- Installation Checklist
It is always good practice to put a little data in when creating the document then going the order to see what it looks like when printing as it will look a little different.
***NOTE*** Do not set a height perimeter for the document or it will not be able to load when printing.
Manage Communications
Manage Email Templates
The Marketing Page has more detailed instructions with Visuals on this process.
Media:ThermoGrid Administration Set-Up Manage Communications.pdf
1. To create as many email/text templates you want follow these steps.
- Administration
- Manage communications
- Manage email templates
- Either click pencil to edit or add new
- Choose a Category:
- Customer Email Notification (About Upcoming Jobs)
- Client Job Communications
- Membership Communications
- Equipment Communications
For Example: If we were setting up a "Customer Email Notification (About Upcoming Jobs)"
2. Set your reminder notification time frames
- Administration
- Company Settings
- Edit
- Customer Notifications of upcoming calls
- Here you can choose time frame and type.
3. To choose different notifications for different job types follow these steps.
- Administration
- Manage drop downs
- Primary job types
- Edit
- Here you can choose message by job type
Manage Text Templates
See Manage Email Templates Link above
Communication Integration
Inventory Management
Inventory Management PageManage Users
This allows you to edit team members information or time off requests.
Standard Operating Procedure
ThermoGRID_-_Administration_-_Set-Up_3_-_Manage_Users.docx
Manage User Accounts
How to Add a New User to ThermoGrid
- From the home screen select “Administration”
- Select “Manage Users” (top row, center)
- Select the “+Add User” icon that appears at the top right of the page
- Type in all the necessary information that appears
- The authorization level gives them different rights, so select accordingly - Roles
- Create a username/password
- Select “Add User” at the bottom of the page
- If you want to remove a person select their name and click the remove ____(their name) button on the screen that appears and then select remove on the pop-up
Manage Time Off Requests
Hours of PTO must be given to an employee in Manage User Accounts
Then you can See how much PTO each person has remaining, what they used when they used it.
You can approve or decline time from here or on the calendar by clicking on the request.
Manage Compensation Requests
Compensation requests are Direct Spiffs or bonuses of an exact dollar amount. A technician can request compensation for a task completed and the request can be managed from here and will show up on payroll.
You are able to search and sort through Requests with the following options:
- Date Earned Start
- Date Earned End
- Users
- Type
- Status
- Paid
Bulk actions, such as Delete or Update are also available.
Here is an example of how a compensation request will look and you will have the ability to edit this with a Settings menu on the right hand side of the request.
| User | Date Earned | Amount | Type | Paid | Status | ||
|---|---|---|---|---|---|---|---|
| Johnny Serviceman | 09/02/2020 | $5.00 | Sticker Replacement | No | Pending |
Manage User Groups
If you have a large number of users or just wish not to see certain users on the calendar. User groups can be utilized to filter the visible users on the calendar.
- First Choose "+ New User Group"
- Input a Name and a Description (Optional)
- Select "+ Add Users"
- Select the User you would like to be applied to this Group
When you are completed
Go to the Calendar and on the Top Middle of the Page under the Date will be an option that says "User Group(s): (None Selected)" . By clicking on "User Group(s)" you will be able to select which group is visible on the calendar.
Manage API Keys
API Keys are used Specifically to access the ThermoGrid Beta App, if you are interested in this, please reach out to support for more information.
Full Beta release is expected for August and more information will be available at that time.
